Printing from USB Memory Media
You can print data directly from a USB memory media device by inserting it into the machine and selecting the desired images on the touch panel display. You do not need to connect the machine to your computer to print images.
This function is available only when the Use Media Print setting in the Memory Media Settings is set to ‘On’. For more information, see Other System Settings.
|
IMPORTANT
|
|
The supported file systems of a USB memory media device are FAT16 and FAT32.
The supported maximum sizes of a USB memory media device are as follows:
FAT32: 8GB
FAT16: 2GB
USB memory media devices with security function or card readers are not supported.
USB memory media devices used with an extension cable are not supported.
Use of USB memory media devices through a USB hub (except for the optional USB Application 3-Port Interface Kit-A1) is not supported.
USB memory media devices that do not comply with USB specifications are not supported.
|
|
NOTE
|
|
You can only print data from one folder at a time.
You cannot select data in a lower level folder.
The following file formats are supported:
JPEG
TIFF
JPEG files that conform to the following are supported:
DCF/Exif2.21 or earlier/JFIF
Number of pixels: 160 × 120 to 7,040 × 10,200 pixels (approximately equivalent to A3 or 11" × 17" size in 600 dpi)
Number of components: 3
Sampling ratios: 4:1:1 (16 × 16), 4:1:1 (32 × 8), 4:2:2 (16 × 8), or 4:4:4 (8 × 8)
Progressive JPEG files are not supported.
Supported TIFF file format is TIFF Profile F, which is a black and white TIFF file format used for I-faxes.
The images to be printed are automatically rotated to fit on the selected paper size when necessary. However, the TIFF image with the length of 8,192 pixels or more cannot be rotated.
Printing may not be performed properly depending on the data.
|
1
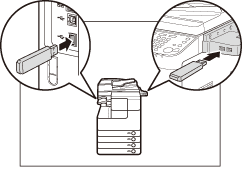
Insert the USB memory media device containing the data file you want to print into the USB port on the left or right side of the machine.
IMPORTANT:
The USB ports on the right side of the machine are optional (USB Application 3-Port Interface Kit-A1).
The left side USB port is not available when the above option is attached.
NOTE:
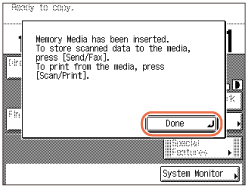
If the screen above appears, press [Done].
The displayed message may vary depending on the settings in Memory Media Settings. (Other System Settings)
If any of the messages below appear, follow the instructions in Basic Operations to take the required steps:
<Enter the Department ID and Password using the numeric keys.>
<You must insert a control card.>
<Enter the User ID and Password.>
2
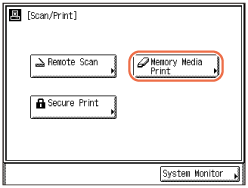
Press  (SCAN/PRINT) → [Memory Media Print].
 (SCAN/PRINT) → [Memory Media Print].
3
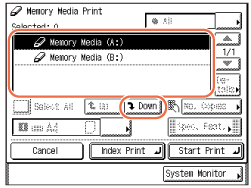
Select the USB memory media device that stores the data that you want to print → [Down].
NOTE:
You can print an index of all the files in the selected USB memory media device. For instructions on how to print an index, see Index Printing.
4
Select the folder that contains the data that you want to print → [Down].
If you select data which is saved outside the folder, proceed to step 5.
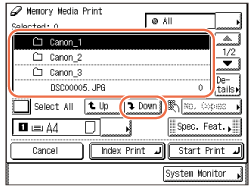
NOTE:
You can select the desired data by sorting all data according to date or extension. For instructions on how to sort data by date, see Selecting Files by Date. For instructions on how to sort data by extension, see Selecting Files by Extension.
5
Select the data that you want to print.
You can simultaneously select multiple files in the same folder.
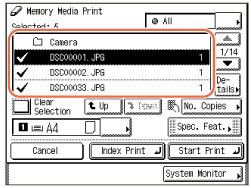
NOTE:
You can select data from only one folder at a time.
If you want to check the details of the data, press [Details].
6
Specify the desired paper source and the number of prints.
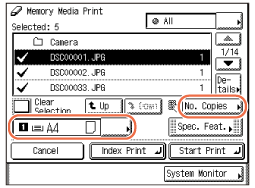
 : Press
  and select the desired paper source.
NOTE:
The image size is automatically adjusted to fit on the selected paper size. If the image size exceeds the size of the selected paper, only the part that fits on the paper is printed.
|
|
[No. Copies]:
|
Specify the number of prints by pressing [-] or [+] or using
 - -  (numeric keys). The number can be specified individually. (numeric keys). The number can be specified individually. |
7
If you want to make the additional settings, press [Spec. Feat.].
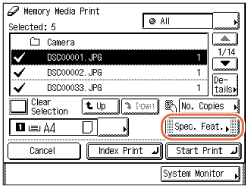
Otherwise, proceed to step 9.
NOTE:
The settings below are only for JPEG files. If the selected data includes TIFF files, the settings are not applied to the TIFF files.
8
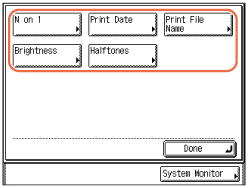
Select the desired settings for the prints.
|
|
[N on 1]:
|
Select [2 On 1] or [4 On 1] to reduce two or four images onto one sheet.
|
NOTE:
The number of prints is limited to one.
Only JPEG data can be printed. If the selected files include TIFF files, only the JPEG files are printed.
The print size is adjusted automatically to fit on one sheet of paper.
The layout order cannot be specified.
A blank space for printing the date and file name is left below the printed image even if [Print Date] or [Print File Name] is set to [Off].
|
|
[Print Date]:
|
Select whether or not to print the creation date on the printed image.
|
|
[Print File Name]:
|
Select whether or not to print the file name on the printed image.
|
NOTE:
Only the dates and file names for JPEG files can be printed.
The printable file name can consist of up to 20 characters.
When you print an index, the date and file names are printed automatically. For instructions on how to print an index, see Index Printing.
|
|
[Brightness]:
|
Adjust brightness to suit your needs.
|
|
[Halftones]:
|
Select [Error Diffusion] or [Gradation] to optimize the image for printing.
|
NOTE:
The [Brightness] and [Halftones] settings are applied only to the JPEG files.
The default setting for the [Halftones] setting is [Error Diffusion].
9
Press [Start Print].
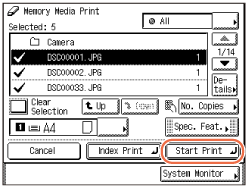
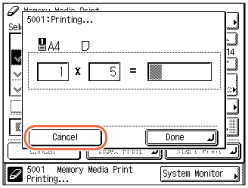
If you want to cancel the job, press [Cancel] or  (Stop) while the pop up screen is displayed.
 (Stop) while the pop up screen is displayed.
NOTE:
For instructions on how to check the record of media print jobs, see Checking the Print Log.
10
When printing is complete, remove the USB memory media device from the USB port.
IMPORTANT:
Do not remove the USB memory media device when the Processing/Data indicator is blinking. The blinking indicator indicates that the machine is accessing the memory data. The data may be damaged if you remove the USB memory media device at this point.
Index Printing
You can print an index of the data saved on a USB memory media device.
|
NOTE
|
|
This function is available only for JPEG files. If the selected folder contains TIFF files, they are not printed.
The print date and file names are printed under the images automatically.
|
1
Display the media print screen to specify the files for printing.
For help, see Printing from USB Memory Media.
2
Select the folder that contains the files for which you want to print an index.
If you want to select a folder, press the folder → [Down].
3
Press [Index Print] → [Yes].
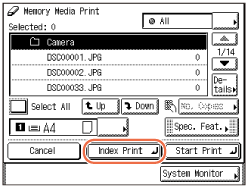
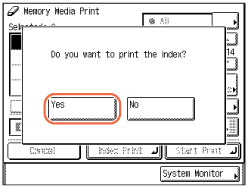
When printing is complete, remove the USB memory media device from the USB port.
IMPORTANT:
Do not remove the USB memory media device when the Processing/Data indicator is blinking. The blinking indicator indicates that the machine is accessing the memory data. The data may be damaged if you remove the USB memory media device at this point.
Selecting All Files in Folder
You can print all files saved on the selected folder at a single time. The number of prints can be specified for each individual file.
1
Display the media print screen to specify the files for printing.
For help, see Printing from USB Memory Media.
2
Select the folder that contains the files that you want to print.
If you want to select a folder, press the folder → [Down].
3
Press [Select All].
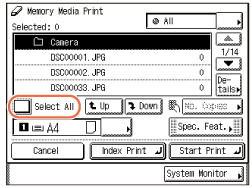
To specify the number of prints for individual files, see Printing from USB Memory Media.
4
Press [Start Print].
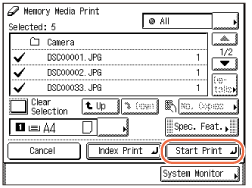
When printing is complete, remove the USB memory media device from the USB port.
IMPORTANT:
Do not remove the USB memory media device when the Processing/Data indicator is blinking. The blinking indicator indicates that the machine is accessing the memory data. The data may be damaged if you remove the USB memory media device at this point.
Selecting Files by Date
You can search files by date to select and print only the desired files. This function is useful especially when there are a number of files in the folder or when the file names make it difficult to identify the desired file(s).
1
Display the media print screen to specify the files for printing.
For help, see Printing from USB Memory Media.
2
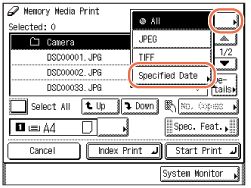
Press  → [Specified Date].
 → [Specified Date].
3
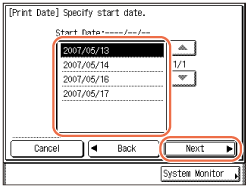
Select the start date → [Next].
4
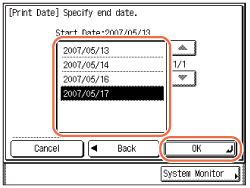
Select the end date → [OK].
5
Select the data that you want to print.
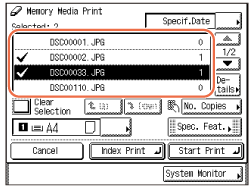
To specify the number of prints for individual files, see Printing from USB Memory Media.
6
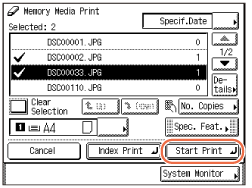
Press [Start Print].
When printing is complete, remove the USB memory media device from the USB port.
IMPORTANT:
Do not remove the USB memory media device when the Processing/Data indicator is blinking. The blinking indicator indicates that the machine is accessing the memory data. The data may be damaged if you remove the USB memory media device at this point.
Selecting Files by Extension
You can search files by format to select and print only the desired files.
1
Display the media print screen to specify the files for printing.
For help, see step 1 to 3 in Printing from USB Memory Media.
2
Select a folder that contains the files that you want to print.
If you want to select a folder, press the folder → [Down].
3
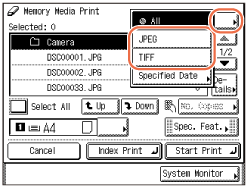
Press  → [JPEG] or [TIFF].
 → [JPEG] or [TIFF].
4
Select the data that you want to print.
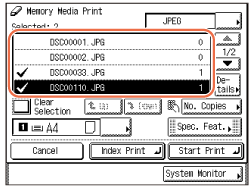
To specify the number of prints for individual files, see step 6 in Printing from USB Memory Media.
5
Press [Start Print].
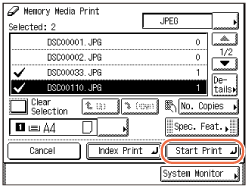
When printing is complete, remove the USB memory media device from the USB port.
IMPORTANT:
Do not remove the USB memory media device when the Processing/Data indicator is blinking. The blinking indicator indicates that the machine is accessing the data in the USB memory media device. The data may be damaged if you remove the USB memory media device at this point.