Setting File Server (File Sharing)
To send data from the machine to a computer on your network, you need to specify the settings of the computer that receives the data.
This section describes how to configure a shared folder.
This section describes how to configure a shared folder.
|
IMPORTANT
|
|
It is recommended that the network administrator configure the file server.
To send data from the machine to a server on the network, you must enter an address setting from the control panel. For instructions on how to specify recipient address settings, see Sending Documents.
To send scanned documents to a Windows shared folder, you need to set up the send files function of the machine. For more information, see Setting up the Send Files Function of the Machine (SMB Settings).
The procedure in this section describes how to configure a sample shared folder. Depending on your environment, the actual configuration procedure may differ.
To send data to a shared folder with the imageRUNNER 2525/2520, the Send function must be activated with the optional Color Send Kit-Y1.
IPv6 is not supported.
|
|
NOTE
|
|
You can also send data to an FTP server over a TCP/IP network. For more information, see Setting File Server (FTP).
If the [User Account Control] dialog box appears during the procedure in Windows Vista/Server 2008, click [Continue].
If the [User Account Control] dialog box appears during the procedure in Windows 7/Server 2008 R2, click [Yes].
|
Confirming Computer Name and Necessary Components for File Sharing (Windows 2000/XP/Vista/7/Server 2003/Server 2008)
|
NOTE
|
|
The number of users or clients that can access a server running Windows 2000/XP/Vista/7/Server 2003/Server 2008 is limited. After this number of users or clients is reached, it is not possible to send to a server running Windows 2000/XP/Vista/7/Server 2003/Server 2008.
|
1
Log on to Windows with administrator privileges.
2
Confirm the computer name.
If you are using Windows 2000:
|
1
|
Right-click the [My Computer] icon on the desktop → click [Manage] to open the [Computer Management] dialog box.
|
|
2
|
Right-click the [Computer Management (Local)] icon → click [Properties].
|
|
3
|
Click the [Network Identification] tab to display the [Network Identification] sheet → confirm the [Computer name] setting.
|
|
4
|
Click [Cancel] repeatedly to close all the dialog boxes.
|
If you are using Windows XP/Server 2003:
|
1
|
Click [Start] on the Windows taskbar, right-click [My Computer] → click [Properties].
|
|
2
|
Click the [Computer Name] tab to display the [Computer Name] sheet.
|
|
3
|
Click [Change] → [More] in the [Computer Name Changes] dialog box.
|
|
4
|
In the [Computer Name Changes] dialog box, confirm the computer name in the [Computer name] box.
|
|
5
|
Click [Cancel] repeatedly to close all the dialog boxes.
|
If you are using Windows Vista/7/Server 2008:
|
1
|
Click [Start] on the Windows taskbar, right-click [Computer] → select [Properties].
|
|
2
|
In the [System] window, confirm the computer name.
|
|
3
|
Close the [System] window.
|
3
Confirm the necessary components for file sharing.
If you are using Windows 2000:
|
1
|
Right-click the [My Network Places] icon on the desktop → select [Properties] to open the [Network and Dialup Connections] dialog box.
|
|
2
|
Right-click the [Local Area Connection] icon → select [Properties].
|
|
3
|
Make sure that all the check boxes below are selected. If any of the boxes are not selected, select them.
[Client for Microsoft Networks]
[File and Printer Sharing for Microsoft Networks]
[Internet Protocol (TCP/IP)]
|
|
4
|
Close all the dialog boxes.
|
If you are using Windows XP:
|
1
|
Click [Start] on the Windows taskbar, right-click [My Network Places] → select [Properties].
|
|
2
|
Right-click [Local Area Connection] → select [Properties].
|
|
3
|
Make sure that all the check boxes below are selected. If any of the boxes are not selected, select them.
[Client for Microsoft Networks]
[File and Printer Sharing for Microsoft Networks]
[Internet Protocol (TCP/IP)]
|
|
4
|
Close all the dialog boxes.
|
If you are using Windows Vista/Server 2008:
|
1
|
Click [Start] on the Windows taskbar, right-click [Network] → select [Properties].
|
|
2
|
Click [Manage network connections].
|
|
3
|
Right-click [Local Area Connection] → select [Properties].
|
|
4
|
Make sure that all the check boxes below are selected. If any of the boxes is not selected, select it.
[Client for Microsoft Networks]
[File and Printer Sharing for Microsoft Networks]
[Internet Protocol Version 4 (TCP/IPv4)]
|
|
5
|
Close all the dialog boxes.
|
If you are using Windows 7:
|
1
|
Click [Start] on the Windows taskbar, click [Control Panel].
|
|
2
|
Click [Network and Internet].
|
|
3
|
Click [Network and Sharing Center].
|
|
4
|
Click [Local Area Connection].
|
|
5
|
Click [Properties].
|
|
6
|
Make sure that all the check boxes below are selected. If any of the boxes is not selected, select it.
[Client for Microsoft Networks]
[File and Printer Sharing for Microsoft Networks]
[Internet Protocol Version 4 (TCP/IPv4)]
|
|
7
|
Close all the dialog boxes.
|
If you are using Windows Server 2003:
|
1
|
Click [Start] on the Windows taskbar → select [Control Panel].
|
|
2
|
Select [Network Connections].
|
|
3
|
Right-click [Local Area Connection] → select [Properties].
|
|
4
|
Make sure that all the check boxes below are selected. If any of the boxes are not selected, select them.
[Client for Microsoft Networks]
[File and Printer Sharing for Microsoft Networks]
[Internet Protocol (TCP/IP)]
|
|
5
|
Close all the dialog boxes.
|
If you are using Windows Server 2008 R2:
|
1
|
Click [Start] on the Windows taskbar, right-click [Network] → select [Properties].
|
|
2
|
Click [Local Area Connection].
|
|
3
|
Click [Properties].
Make sure that all the check boxes below are selected. If any of the boxes is not selected, select it.
[Client for Microsoft Networks]
[File and Printer Sharing for Microsoft Networks]
[Internet Protocol Version 4 (TCP/IPv4)]
|
|
4
|
Close all the dialog boxes.
|
|
NOTE
|
|
If any components are not installed, follow the procedures below to install them.
Click [Install...] to open the [Select Network Component Type] dialog box.
If [Client for Microsoft Networks] is not installed, select [Client], and then click [Add...].
If [File and Printer Sharing for Microsoft Networks] is not installed, select [Service], and then click [Add...].
If [Internet Protocol (TCP/IP)] ([Internet Protocol Version 4 (TCP/IPv4)] for Windows Vista/7/Server 2008) is not installed, select [Protocol], and then click [Add...].
Select the component you want to install, and then click [OK].
If [Internet Protocol (TCP/IP)] ([Internet Protocol Version 4 (TCP/IPv4)] for Windows Vista/7/Server 2008) is not installed, you need to set an IP address for your computer. For details, ask your network administrator.
|
4
If required, restart your computer.
Setting Shared Folder
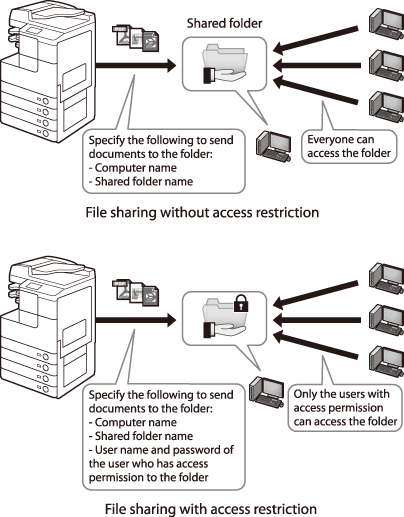
You can set up a shared folder with or without access restriction. If “Access permissions” are granted to users who are registered for computers, they are authorized to operate folders and files.
There are two types of access permissions:
There are two types of access permissions:
Network-level access permission
This is to control users who access to the shared folder over the network.
Local-level access permission
This is to control users who access folders by logging on to their computers. The local-level access permission can be set only for the folders located in the NTFS formatted drives.
Setting Shared Folder without Access Restriction (Windows 2000/XP/Server 2003)
This section describes the procedure for granting FULL Control permission to the “Everyone” account so that any user can access the shared folder.
1
Create a new shared folder in any drive.
It is recommended to create the folder in a place where users can find it easily, such as the first level in C drive.
Ex.: C:\share
Ex.: C:\share
2
Right-click the created folder.
3
Select [Sharing] ([Sharing and Security...] for Windows Server 2003 and Windows XP) to open the [<Folder name> Properties] dialog box.
4
Enable file sharing.
If you are using Windows 2000/Server 2003:
|
1
|
Select [Share this folder].
|
If you are using Windows XP:
|
1
|
Click [If you understand the security risks but want to share files without running the wizard, click here.].
|
|
2
|
In the [Enable File Sharing] dialog box, select the [Just enable file sharing] check box, and then click [OK].
NOTE:
The procedure above is necessary only when you open the dialog box for the first time. If you are opening the dialog box for the second or subsequent time, proceed to the next step.
|
5
Set access permission.
If you are using Windows 2000/Server 2003:
|
1
|
Click the [Permissions] button to open the [Permissions for <Folder Name>].
|
|
2
|
Under [Group or user names], select [Everyone] to grant → select the [Full Control] box under [Allow] if not selected.
NOTE:
Select the [Full Control] box so that you can store data scanned with this machine on a computer (the file server).
|
|
3
|
Click [OK] to close the [Permissions for <Folder Name>] dialog box.
|
|
4
|
If the [Security] tab is displayed in the [<Folder name> Properties], click the [Security] tab to set the local-level access permission. If not, proceed to step 7.
NOTE:
The [Security] tab is not displayed when:
The drive to which the shared folder is set is formatted in FAT16 or FAT32.
Simple file sharing is enabled.
|
|
5
|
Click [Add...] to open the [Select Users or Groups] dialog box.
|
|
6
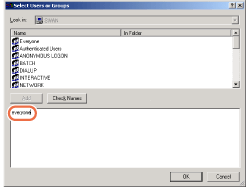
|
Type “Everyone”.
|
|
For Windows 2000
|
For Windows Server 2003
|
 |
 |
|
7
|
[Check Names] → make sure that the correct object name is typed.
NOTE:
If the object name is entered incorrectly, the [Name Not Found] dialog box is displayed. If this happens, click [Cancel] to check whether or not the computer name and user name are incorrect.
|
|
8
|
Click [OK] to close the [Select Users or Groups] dialog box.
|
|
9
|
In the [Security] sheet, under [Name], select [Everyone]. Select the [Full Control] box under [Allow].
NOTE:
Select the [Full Control] box so that you can store data scanned with this machine on a computer (the file server).
|
If you are using Windows XP:
|
1
|
Select the [Share this folder on the network] and [Allow network users to change my files] check boxes under [Network sharing and security].
|
6
Click [OK] to close the [<Folder name> Properties] dialog box.
7
Activate the Guest user account.
|
1
|
Right-click the [My Computer] icon on the desktop → click [Manage] to open the [Computer Management] window.
|
|
2
|
Under [System Tools], click [Local Users and Groups].
|
|
3
|
Double-click the [Guest] user.
|
|
4
|
Deselect [Account is Disabled] to activate the Guest user account.
|
|
5
|
Click [OK] to close the [Guest Properties] dialog box.
NOTE:
This step is not necessary for Windows XP.
|
Setting Shared Folder without Access Restriction (Public Folder) (Windows Vista/7/Server 2008)
In Windows Vista/7/Server 2008, you can use the special folder named “Public folder,” which allows files to be shared with other users on the same network. Using Public folder, you can set up a shared folder without access control. You can store files in the first level of the Public folder.
For Windows Vista/Server 2008
1
Click [Start] on the Windows taskbar, select [Control Panel].
2
Click [Set up file sharing] under [Network and Internet].
3
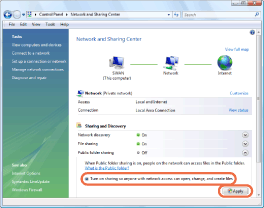
In the [Network and Sharing Center] window, click the down arrow next to [Public folder sharing] under [Sharing and Discovery].
4
Select [Turn on sharing so anyone with network access can open, change, and create files], and then click [Apply].
For Windows Vista
NOTE:
Do not select [Turn on sharing so anyone with network access can open files]. Otherwise, you will not be able to store a document scanned with this machine in a shared folder.
5
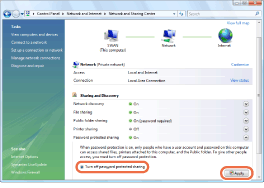
Click the down arrow next to [Password protected sharing] under [Sharing and Discovery].
6
Click [Turn off password protected sharing], and then click [Apply].
For Windows Vista
7
Display the Public folder in Windows Explorer, etc.
8
Create a new folder in the Public folder.
For Windows 7/Server 2008 R2
1
Click [Start] on the Windows taskbar, select [Control Panel].
2
Click [Choose homegroup and sharing options] under [Network and Internet], then click [Change advanced sharing settings].
3
Click to select [Turn on sharing so anyone with network access can read and write files in the Public folders] under [Public folder sharing].
4
Click to select [Turn off password protected sharing] under [Password protected sharing].
5
Click [Save Changes].
6
Display the Public folder in Windows Explorer, etc.
7
Create a new folder in the Public folder.
Setting Shared Folder with Access Restriction (Windows 2000/XP/Server 2003)
Follow the procedure below to set up file sharing with access restriction.
|
NOTE
|
|
Windows XP Home Edition does not support file sharing with access restriction.
|
1
Create a user account for accessing a shared folder.
NOTE:
Even if you do not create a new account by following the procedures below, you can add a pre-registered account for users who are permitted to access the shared folder. In such case, you need to create a password if one has not been set for the pre-registered account. Once the password is created, the user is prompted to type it when he/she logs on to a computer.
If you are using Windows 2000/Server 2003:
|
1
|
Right-click the [My Computer] icon on the desktop → click [Manage] to open the [Computer Management] dialog box.
|
|
2
|
Under [System Tools], double-click [Local Users and Groups].
|
|
3
|
Right-click the [Users] folder → click [New User].
|
|
4
|
Set up the user accessing the shared folder.
|
|
For Windows Server 2003
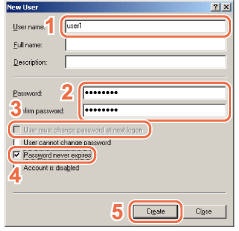 1. In the [New User] dialog box, enter the user name in [User name].
2. Enter the password in [Password] → re-enter the password in [Confirm password] → enter a user name not longer than 20 alphanumeric characters, and a password not longer than 14 alphanumeric characters.
3. Deselect [User must change password at next logon].
4. Select [Password never expires]. Confirm the settings.
5. Click [Create].
|
|
|
5
|
Close the [Computer Management] dialog box.
|
If you are using Windows XP:
|
1
|
Click [start] on the Windows taskbar → select [Control Panel].
|
|
2
|
Click [User Accounts].
|
|
3
|
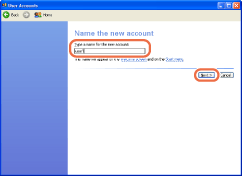
Click [Create a new account] → type a user name in [Type a name for the new account], and then click [Next].
 NOTE:
The user name can be up to 20 alphanumeric characters long.
|
|
4
|
Select [Limited] → [Create Account].
|
|
5
|
Click the created user → click [Create a password].
|
|
6
|
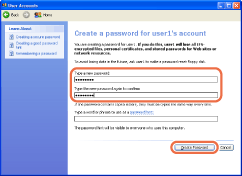
Type a password in [Type a new password] and [Type the new password again to confirm], and then click [Create Password].
 NOTE:
The password can be up to 14 alphanumeric characters long.
|
|
7
|
Close the [User Accounts] dialog box.
|
2
Create a new shared folder in any drive.
It is recommended to create the folder in a place where users can find it easily, such as the first level in C drive.
Ex.: C:\share
Ex.: C:\share
3
Right-click the created folder.
4
Select [Sharing and Security...] to open the [<Folder name> Properties] dialog box.
5
Select [Share this folder].
6
Set the network-level access permission.
|
1
|
Click the [Permissions] button to open the [Permissions for <Folder Name>].
|
|
2
|
Click [Add...] to open the [Select Users or Groups] dialog box.
|
|
3
|
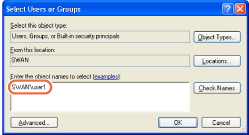
Type [Computer Name]\[User Name] in [Enter the object names to select].
For Windows XP
 |
|
4
|
[Check Names]. Make sure that the correct object name is typed.
NOTE:
If the object name is entered incorrectly, the [Name Not Found] dialog box appears. If this happens, click [Cancel] to check whether or not the computer name and user name are incorrect.
|
|
5
|
Click [OK] to close the [Select Users or Groups] dialog box.
|
|
6
|
In the [Permissions for <Folder name>], under [Group or user names], select the user to whom you want to grant permission. Select the [Full Control] box under [Allow].
NOTE:
Select the [Full Control] box so that you can store data scanned with this machine to a computer (the file server).
|
|
7
|
Click [OK] to close the [Permissions for <Folder Name>] dialog box.
|
|
8
|
If the [Security] tab is displayed in the [<Folder name> Properties], click the [Security] tab to set the local-level access permission. If not, proceed to step 8.
NOTE:
The [Security] tab is not displayed when:
The drive to which the shared folder is set is formatted in FAT16 or FAT32.
Simple file sharing is enabled.
|
7
Set the local-level access permission.
If the drive to which the shared folder is set is formatted in NTFS, you need to set the local-level as well as the network-level access permissions.
|
1
|
Click [Add...] to open the [Select Users or Groups] dialog box.
|
|
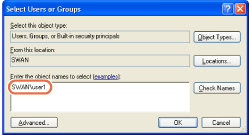
2
|
Type [Computer Name]\[User Name] in [Enter the object names to select].
For Windows XP
 |
|
3
|
Click [Check Names]. Make sure that the correct object name is typed.
NOTE:
If the object name is entered incorrectly, you see the [Name Not Found] dialog box. If this happens, click [Cancel] to check whether or not the computer name and user name are incorrect.
|
|
4
|
Click [OK] to close the [Select Users or Groups] dialog box.
|
|
5
|
In the [Security] sheet, under [Name], select the user whom you want to grant permission. Select the [Full Control] box under [Allow].
NOTE:
Select the [Full Control] box so that you can store data scanned with this machine on a computer (the file server).
|
8
Click [OK] to close the [<Folder name> Properties] dialog box.
Setting Shared Folder with Access Restriction (Windows Vista/7/Server 2008)
Follow the procedures below to set up file sharing with access restriction.
1
Create a user account for accessing a shared folder.
|
NOTE
|
|
Even if you do not create a new account by following the procedures below, you can add a pre-registered account for users who are permitted to access the shared folder. In such case, you need to create a password if one has not been set for the pre-registered account. Once the password is created, the user is prompted to type it when he/she logs on to a computer.
|
|
1
|
Click [Start] on the Windows taskbar, select [Control Panel].
|
|
2
|
Click [Add or remove user accounts] under [User Accounts and Family Safety] ([User Accounts] for Windows Vista/Server 2008).
|
|
3
|
In the [Manage Accounts] dialog box, click [Create a new account].
|
|
4
|
In the [Create New Account] dialog box, type the desired user name → select [Standard user], and then click [Create Account].
NOTE:
The user name can be up to 20 alphanumeric characters long.
|
|
5
|
Click the user name created above → click [Create a password].
|
|
6
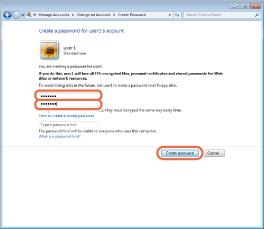
|
In the [Create Password] dialog box, type the password in two boxes circled in red, and then click [Create password].
For Windows 7
 NOTE:
The password can be up to 14 alphanumeric characters long.
|
|
7
|
Close the [Change an Account] dialog box.
|
2
Create a new shared folder in any drive.
It is recommended to create the folder in a place where users can find it easily, such as the first level in C drive.
Ex.: C:\share
Ex.: C:\share
3
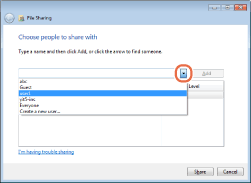
Right-click the created folder → select [Share with] → [Specific people] ([Share...] for Windows Vista/Server 2008) to open the [File Sharing] dialog box.
4
Click on the down arrow on the left side of [Add...] → select the user → click [Add...].
For Windows 7
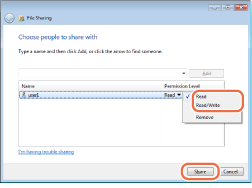
5
Select the added user → select [Read] or [Read/Write] ([Contributor] or [Co-owner] for Windows Vista/Server 2008) → click [Share].
For Windows 7
NOTE:
Access permissions in Windows Vista/Server 2008 are as follows:
Reader: A reader can only view shared files.
Contributor: A contributor can create, alter and delete shared files, but not alter access permissions.
Co-owner: A co-owner can perform all file operations including creating, altering and deleting shared files and altering access permissions.
Access permissions in Windows 7/Server 2008 R2 are as follows:
Read: Users can view the contents of the folders and open files and folders.
Read/Write: Users can create new files and folders and make changes to shared files are allowed.
6
Click [Done] to close the [File Sharing] dialog box.
Setting Shared Folder (Mac OS X)
|
NOTE
|
|
Samba 2.2.8a or later is supported.
The procedures described in this section is are based on Mac OS X version 10.5. The procedures may differ depending on the version of Mac OS X you are using.
In some environments, detailed settings may be required in order to use Samba. For details, consult your network administrator.
|
1
Log in to Mac OS X as Administrator.
2
Start the File Sharing services under Mac OS X.
|
1
|
Click the Apple icon in the top left of the screen → [System Preferences].
|
|
2
|
Click the [Sharing] icon in the [System Preferences] window.
|
|
3
|
Select [File Sharing] → click [Options].
|
|
4
|
Select [Share files and folders using SMB] → click [Done].
|
|
5
|
Click [Show All] on the toolbar.
|
3
Specify the account for access to the shared folder.
|
1
|
Click the [Accounts] icon in the [System Preferences] window.
|
|
2
|
Click [+] to create a new account.
|
|
3
|
Select [Sharing Only] in [New Account].
|
|
4
|
Enter the account information such as [Name] and [Password] → click [Create Account].
|
|
5
|
Close the [Accounts] window.
|
4
Create a shared folder to which files are to be sent.
5
Grant access to the shared folder.
|
1
|
Click to select the shared folder created in step 4 → select [Show Info] from the [File] menu.
|
|
2
|
In the [<folder name> Info] window, select [Shared Folder] under [General].
|
|
3
|
Click the lock icon at the bottom of the window to make changes in [Sharing & Permissions].
|
|
4
|
Enter your system password in the password prompt dialog box → click [OK].
|
|
5
|
Click [+] → select the account created in step 3 from the list displayed in [Select New User or Group] → click [Select].
|
|
6
|
Set the permissions for the user.
NOTE:
To send files to the shared folder, it is necessary to enable write access for the user.
|
|
7
|
Close the [<folder name> Info] window.
|
Setting Shared Folder (Samba (UNIX/Linux))
|
NOTE
|
|
Samba 2.2.8a or later is supported.
In some environments, detailed settings may be required in order to use Samba. For details, consult your network administrator.
|
1
Log in to a workstation as a superuser.
2
Set up the users who access Samba shared folder, and their passwords.
Set a user name not longer than 24 alphanumeric characters, and a password not longer than 14 alphanumeric characters.
Specifying Destinations
Once the shared folder is ready, you can scan and store documents in it. To specify the shared folder as the destination, use the machine’s control panel. Each table in this section shows the items you should specify according to the shared folder type you created.
|
IMPORTANT
|
|
If you use <Windows (SMB): Browse> to specify each item, use it after the startup time has elapsed. For details about the Startup Time Settings, see Setting Startup Time.
Up to 47 alphanumeric characters can be entered for [Host Name] and 120 characters for [File Path] on the touch panel display.
If you change the language of the touch panel display, [Host Name] and [File Path] may not be displayed correctly, or you may not be able to browse the directories.
If the language of the touch panel display differs from the computer on your network, [Host Name] and [File Path] may not be displayed correctly, or you may not be able to browse the directories.
If you are using Window XP Home Edition, you do not need to specify the [User Name] and [Password].
|
|
NOTE
|
|
For instructions on how to specify destination address settings, see Sending Documents.
|
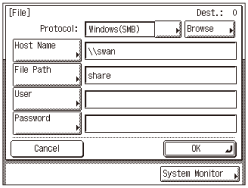
File Sharing without Access Restriction (Windows 2000/XP/Vista/7/Server 2003/Server 2008)
If you want to specify a shared folder without access restriction as the destination, specify the items listed in the table below.
Setting example
|
Setting Item
|
Description
|
Example
|
|
The Protocol drop-down list
|
Windows (SMB)
|
|
|
Host Name
|
Computer name confirmed in step 2 in Confirming Computer Name and Necessary Components for File Sharing (Windows 2000/XP/Vista/7/Server 2003/Server 2008).
|
Example: \\swan (Double backslash “\\” can be omitted)
|
|
File Path
|
Name of the shared folder created in step 1 in Setting Shared Folder without Access Restriction (Windows 2000/XP/Server 2003) or in step 8 in Setting Shared Folder without Access Restriction (Public Folder) (Windows Vista/7/Server 2008).
|
Example: share
|
|
User
|
Leave this box blank.
|
|
|
Password
|
Leave this box blank.
|
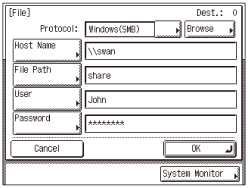
File Sharing with Access Restriction (Windows 2000/XP/Vista/7/Server 2003/Server 2008)
If you want to specify a shared folder with access restriction as the destination, specify the items listed in the table below.
Setting example
|
Setting Item
|
Description
|
Example
|
|
The Protocol drop-down list
|
Windows (SMB)
|
|
|
Host Name
|
Computer name confirmed in step 2 in Confirming Computer Name and Necessary Components for File Sharing (Windows 2000/XP/Vista/7/Server 2003/Server 2008).
|
Example: \\swan (Double backslash “\\” can be omitted)
|
|
File Path
|
Name of the shared folder created in step 2 in Setting Shared Folder without Access Restriction (Windows 2000/XP/Server 2003) or Setting Shared Folder without Access Restriction (Public Folder) (Windows Vista/7/Server 2008).
|
Example: share
|
|
User
|
||
|
Password
|
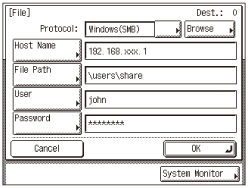
File Sharing (Mac OS X)
If you want to specify a folder in a computer running Mac OS X, specify the items listed in the table below.
Setting example
|
Setting Item
|
Description
|
Example
|
|
The Protocol drop-down list
|
Windows (SMB)
|
|
|
Host Name
|
IP address of Macintosh
|
|
|
File Path
|
Name of the folder created in step 4 in Setting Shared Folder (Mac OS X).
|
Example: \Users\share (If a folder named “share” has been created in the “Home” folder in “Users”)
|
|
User
|
“Name” of the account created in step 3 in Setting Shared Folder (Mac OS X).
|
|
|
Password
|
“Password” of the account created in step 3 in Setting Shared Folder (Mac OS X).
|
|
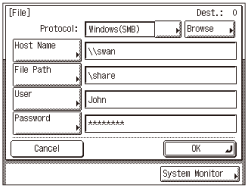
File Sharing (UNIX/Linux)
If you want to specify a folder in a UNIX machine, specify the items listed in the table below.
Setting example
|
Setting Item
|
Description
|
Example
|
|
The Protocol drop-down list
|
Windows (SMB)
|
|
|
Host Name
|
Computer name of the UNIX machine
|
Example: \\swan (Double backslash “\\” can be omitted)
|
|
File Path
|
Name of the shared folder
|
Example: \share
|
|
User
|
User name entered in step 2 in Setting Shared Folder (Samba (UNIX/Linux)).
|
|
|
Password
|
Password entered in step 2 in Setting Shared Folder (Samba (UNIX/Linux)).
|
|