Erasing Shadows / Frame Lines (Frame Erase)
The Frame Erase modes erase shadows and lines that appear when copying various types of originals. This section describes the three Frame Erase modes available.
|
IMPORTANT
|
|
Only one of the three Frame Erase modes can be set at a time. If you select one of these modes, the previously set mode is canceled.
You can set the Frame Erase modes only for the original sizes shown on the touch panel display.
|
|
NOTE
|
|
You can select the following original sizes: A4, A4R, A3, A5, A5R, B4, B5, or B5R.
|
Original Frame Erase
The Original Frame Erase mode erases the dark borders and frame lines that appear around the copy if the original is smaller than the selected paper size. You can also use this mode to create a blank border around the edge of the copy.
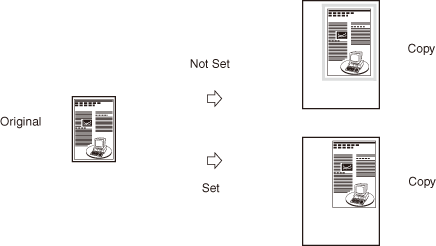
|
IMPORTANT
|
|
The Original Frame Erase mode cannot be used with the Image Combination, ID Card Copy, or Different Size Originals modes.
|
Book Frame Erase
The Book Frame Erase mode erases the dark borders such as center and contour lines that appear when you copy facing pages in a bound original onto a single sheet of paper.
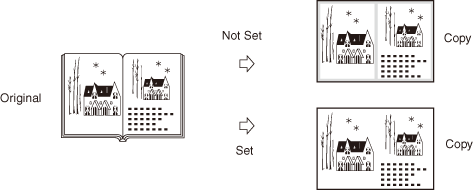
|
IMPORTANT
|
|
Place the bound original to be copied on the platen glass.
The Book Frame Erase mode cannot be used with the Image Combination, ID Card Copy, or Different Size Originals modes.
|
Binding Erase
The Binding Erase mode erases shadows from binding holes on originals.
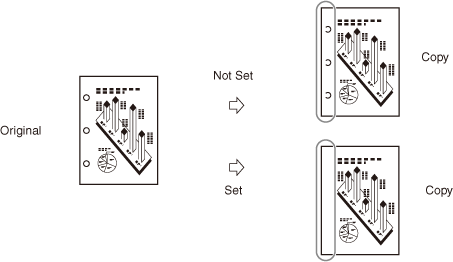
|
IMPORTANT
|
|
Do not place originals with binding holes into the feeder. Dosing so may damage the originals.
The Binding Erase mode cannot be used with the Book to 2-Sided, 2-Page Separation, ID Card Copy, Different Size Originals or Booklet modes.
|
Original Frame Erase
1
Place your originals → press [Special Features] → [Frame Erase].
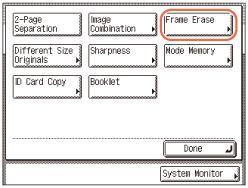
2
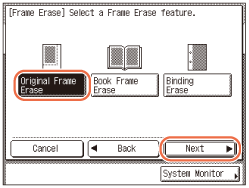
Press [Original Frame Erase] → [Next].
3
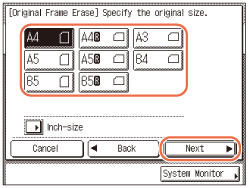
Select the original size → press [Next].
IMPORTANT:
You can set the Original Frame Erase mode only for the original paper sizes shown on the touch panel display.
NOTE:
To select the paper size in inches, press [Inch-size].
4
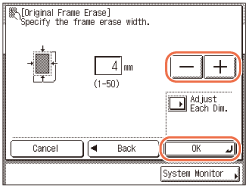
Press [-] or [+] to set the frame erase width.
NOTE:
The default setting is ‘4 mm’. You can adjust the frame erase width to between 1 mm and 50 mm.
When entering values in millimeters, you can also use  -
-  (numeric keys) and
  (Clear) on the control panel.
 -
-  (numeric keys) and
  (Clear) on the control panel.
To enter values in inches, see Configuring the Machine's Basic Settings.
If you want to set the same width for all four borders:
|
1
|
Press [-] or [+] to set the frame erase width → press [OK].
 |
If you want to set the top, left, right, and bottom widths independently:
|
1
|
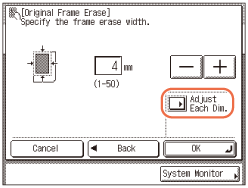
Press [Adjust Each Dim.].
 |
|
2
|
Select the side to set the erase width → press [-] or [+] to set their respective frame erase widths → press [OK].
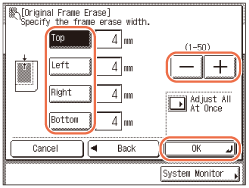 [Top], [Left], [Right], and [Bottom] on the display refer to the positions of your originals when you place them on the platen glass or in the feeder.
NOTE:
To return to the screen for setting the same width for all four borders, press [Adjust All At Once].
|
5
Press [Done].
The display returns to the top screen.
6
Enter the desired copy quantity (from 1 to 999) using  -
-  (numeric keys).
 -
-  (numeric keys).
7
Press  (Start).
 (Start).
Copying starts.
|
NOTE
|
|
To cancel this setting, press [Special Features] → [Frame Erase] → [Cancel].
To cancel all settings and return the machine to the Standard Settings, press
 (Reset). (Reset). |
Book Frame Erase
1
Place your original on the platen glass → press [Special Features] → [Frame Erase].
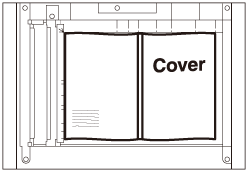
For help, see Original Frame Erase.
2
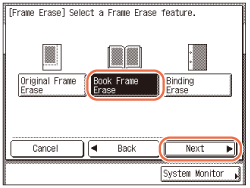
Press [Book Frame Erase] → [Next].
3
Select the size of the bound original when it is open → press [Next].
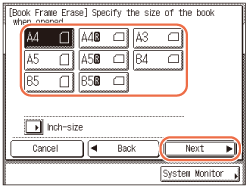
IMPORTANT:
You can set the Book Frame Erase mode only for the original paper sizes shown on the touch panel display.
NOTE:
To select the paper size in inches, press [Inch-size].
4
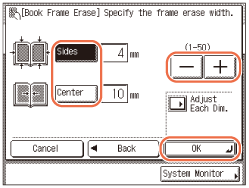
Press [-] or [+] to set the frame erase widths.
NOTE:
The default settings are ‘4 mm’ for each side and ‘10 mm’ for the center. You can adjust the frame erase width to between 1 mm and 50 mm.
When entering values in millimeters, you can also use  -
-  (numeric keys) and
  (Clear) on the control panel.
 -
-  (numeric keys) and
  (Clear) on the control panel.
To enter values in inches, see Configuring the Machine's Basic Settings.
If you want to set the same width for all four borders:
|
1
|
Press [Center] and/or [Sides] → press [-] or [+] to set their respective frame erase widths → press [OK].
 |
If you want to set the top, left, center, right, and bottom widths independently:
|
1
|
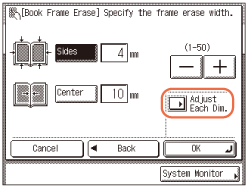
Press [Adjust Each Dim.].
 |
|
2
|
Select the side to set the erase width → press [-] or [+] to set their respective frame erase widths → press [OK].
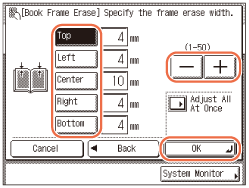 To erase dark borders on the left side, select [Right].
To erase dark borders on the right side, select [Left].
NOTE:
To return to the screen for setting the same width for all four borders, press [Adjust All At Once].
|
5
Press [Done].
The display returns to the top screen.
6
Enter the desired copy quantity (from 1 to 999) using  -
-  (numeric keys).
 -
-  (numeric keys).
7
Press  (Start).
 (Start).
Copying starts.
NOTE:
To cancel this setting, press [Special Features] → [Frame Erase] → [Cancel].
To cancel all settings and return the machine to the Standard Settings, press  (Reset).
 (Reset).
Binding Erase
This mode erases shadows from binding holes on originals.
1
Place your original on the platen glass → press [Special Features] → [Frame Erase].
For help, see step 1 in Original Frame Erase.
2
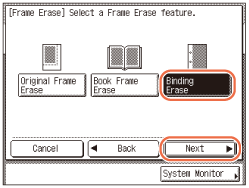
Press [Binding Erase] → [Next].
3
Select the side where the binding holes are located → press [Next].
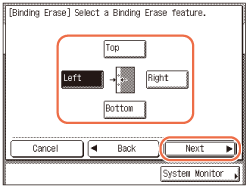
[Top], [Left], [Right], and [Bottom] on the display refer to the positions of your originals when you place them on the platen glass.
4
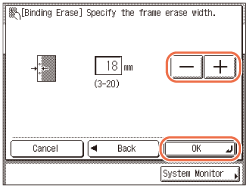
Press [-] or [+] to set the frame erase width → press [OK] → [Done].
The display returns to the top screen.
NOTE:
The default setting is ‘18 mm’. You can adjust the frame erase width to between 3 mm and 20 mm.
When entering values in millimeters, you can also use  -
-  (numeric keys) and
  (Clear) on the control panel.
 -
-  (numeric keys) and
  (Clear) on the control panel.
To enter values in inches, see Configuring the Machine's Basic Settings.
5
Enter the desired copy quantity (from 1 to 999) using  -
-  (numeric keys).
 -
-  (numeric keys).
6
Press  (Start).
 (Start).
Copying starts.
NOTE:
To cancel this setting, press [Special Features] → [Frame Erase] → [Cancel].
To cancel all settings and return the machine to the Standard Settings, press  (Reset).
 (Reset).