Timer Settings
To make effective use of the machine in a digitized office, set the current date and time for the machine. The machine is also equipped with two types of automatic functions that are controlled by the internal timer system: Auto Sleep Time and Auto Clear Time.
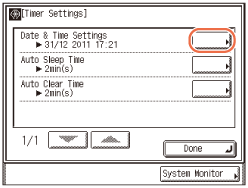
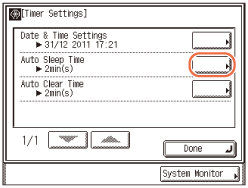
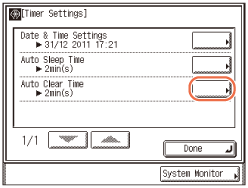
Date & Time Settings
The date and time settings are used as the machine’s standard clock by various functions that require them. You can also set the time zone and daylight saving time as well.
1
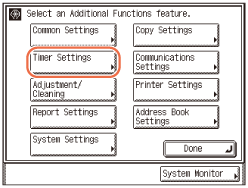
Press  (Additional Functions).
(Additional Functions).The Additional Functions menu appears.
2
Press [Timer Settings].
3
Press [Date & Time Settings].
4
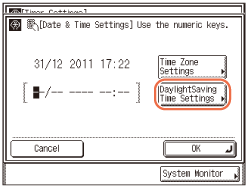
Specify the Date & Time Settings:
To set the current date and time:
|
1
|
Enter the current date and time using
 - -  (numeric keys). (numeric keys).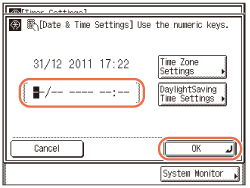 Enter the day, month, and year, and then the time in 24-hour notation:
DD/MM YYYY hh:mm
Example) 10:05 p.m. on May 6, 2011 → 06/05 2011 22:05
|
|
2
|
Press [OK].
NOTE:
If you make a mistake when entering numbers, press
|
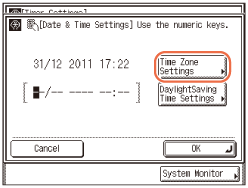
To set the time zone:
|
1
|
Press [Time Zone Settings].
 |
|
2
|
Press [
 ] or [ ] or [ ] until the desired time zone appears in the list. ] until the desired time zone appears in the list.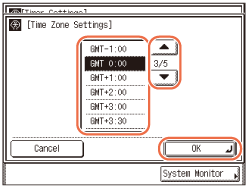 GMT (Greenwich Mean Time):
The time at the Greenwich Observatory in England. The standard time zones of the world are expressed globally in terms of the difference in hours (up to ±12 hours) from GMT (±0 hours). |
|
3
|
Select the time zone in which the machine is located.
|
|
4
|
Press [OK].
|
To set the daylight saving time:
|
1
|
Press [Daylight Saving Time Settings].
 |
|
2
|
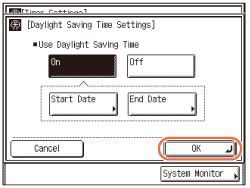
Press [On] → [Start Date].
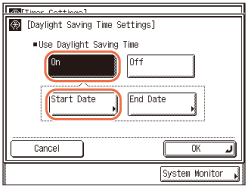 |
|
3
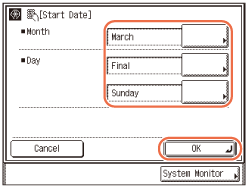
|
Specify the start date (month, week, and day) of the daylight saving time using the drop-down list boxes → press [OK].
 |
|
4
|
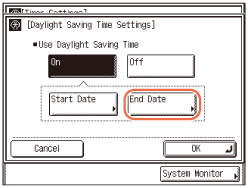
Press [End Date].
 |
|
5
|
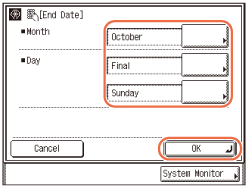
Specify the end date (month, week, and day) of the daylight saving time using the drop-down list boxes → press [OK].
 NOTE:
If the daylight saving time is set, the machine automatically shifts the standard clock forward by one hour.
|
|
6
|
Press [OK].
 |
5
Press  (Reset) to return to the top screen.
(Reset) to return to the top screen.Auto Sleep Time
If the machine remains idle for a certain period of time, the control panel power switch automatically switches OFF to save power. The machine enters the Sleep mode when this occurs. You can specify the time it takes for the machine to enter the Sleep mode (from one to 30 minutes)*. You can also disable the Auto Sleep Time setting.
* It is recommended to use the factory-installed settings for this item.
|
NOTE
|
|
To set the machine to manually enter the Sleep mode, or to wake the machine from the Sleep mode, press the control panel power switch.
The machine will not enter the Sleep mode in the following cases:
The machine is in operation.
Paper is jammed in the machine.
All the paper drawers are empty for which APS/ADS are enabled for copying.
The toner cartridge is empty.
A service call message is displayed on the screen.
The machine will automatically wake from the Sleep mode when the machine receives jobs to print.
The default settings are ‘On’ and ‘2 min’.
|
1
Press (Additional Functions) → [Timer Settings].
(Additional Functions) → [Timer Settings].For help, see steps 1 and 2 in Date & Time Settings.
2
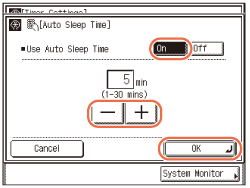
Press [Auto Sleep Time].
3
Press [On] for <Use Auto Sleep Time> → press [-] or [+] to enter the desired time period → press [OK].
You can also enter values using - (numeric keys).
- (numeric keys).The Auto Sleep Time can be set from one to 30 minutes in one minute increments.
The selected mode is set.
NOTE:
To disable the Auto Sleep Time setting, press [Off] for <Use Auto Sleep Time> → press [OK].
4
Press (Reset) to return to the top screen.
(Reset) to return to the top screen.Auto Clear Time
If the machine remains idle for a certain period of time, the display returns to the default top screen or the top screen of the selected function. This period of time is called the “Auto Clear Time.”
|
NOTE
|
|
The default setting is ‘2 min’.
|
1
Press (Additional Functions) → [Timer Settings].
(Additional Functions) → [Timer Settings].For help, see steps 1 and 2 in Date & Time Settings.
2
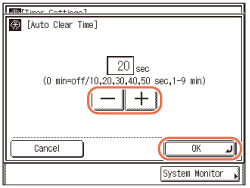
Press [Auto Clear Time].
3
Press [-] or [+] to enter the desired time period → press [OK].
The Auto Clear Time can be set to zero (Off), from 10 to 50 seconds (in ten second increments), and from one to nine minutes (in one minute increments).
The selected mode is set.
NOTE:
To disable the Auto Clear Time setting, select <0> → press [OK].
4
Press (Reset) to return to the top screen.
(Reset) to return to the top screen.