Specifying the Color Mode and Resolution
You can specify the color mode and resolution of scanned originals for sending. The color mode setting enables you to select whether to scan originals in black-and-white or color. The resolution setting enables you to send documents with fine text and images clearly by changing resolution from low to high. The higher the resolution, the higher the output quality, but the longer the sending time.
|
NOTE
|
|
The default settings are:
Color Mode: ‘B&W’
Resolution: ‘200 × 200 dpi’
|
1
Press  (SEND) → place your originals → specify the destination.
(SEND) → place your originals → specify the destination.NOTE:
For instructions on how to place your originals, see Basic Operations.
For instructions on how to specify the destination, see Basic Sending Methods or Specifying Destinations Easily and Quickly.
2
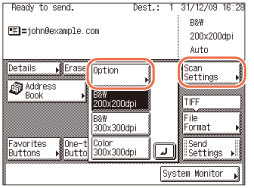
Press [Scan Settings] → select the desired mode from the three preset scan modes.

Preset scan modes consist of color mode and resolution settings.
IMPORTANT:
The following combinations of file format and preset scan modes are not available:
- [JPEG], [PDF (Compact)], or [PDF (Compact+OCR)] as the file format and [B&W 200 × 200 dpi] or [B&W 300 × 300 dpi] as the scan mode
- [TIFF] as the file format and [Color 300 × 300 dpi] as the scan mode
[Color 300 × 300 dpi] is not available when sending I-faxes or faxes.
If the Send function (optional for the imageRUNNER 2545/2535/2530/2525/2520) is not activated and the optional Super G3 Fax Board-AG1 is attached to the machine, [200 × 200 dpi (Fine)], [200 × 400 dpi (SuperFine)], and [400 × 400 dpi (UltraFine)] appear as preset scan modes.
If you want to specify the color mode and resolution separately:
|
1
|
Press [Scan Settings] → select [Option].
 |
|
2
|
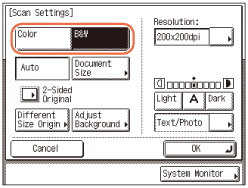
Select the desired color mode.
 |
|
|
[Color]:
|
Always scans in color regardless of whether the original is in color or black-and-white.
|
|
[B&W]:
|
Always scans in black-and-white regardless of whether the original is in color or black-and-white.
|
IMPORTANT:
If you are sending documents via I-fax or fax, be sure to select [B&W]. You cannot send color documents via I-fax or fax.
The following combinations of file format and color mode are not available:
- [JPEG], [PDF (Compact)], or [PDF (Compact+OCR)] as the file format and [B&W] as the color mode
- [TIFF] as the file format and [Color] as the color mode
NOTE:
If a black-and-white original is scanned in [Color], it is counted as a color scan.
|
3
|
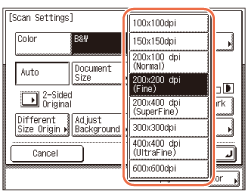
Press the Resolution drop-down list → select the desired resolution.
 If you want to use less memory and make the sending time shorter, select a low resolution.
|
IMPORTANT:
If you select [Color] as the color mode, you can select [100 × 100 dpi], [150 × 150 dpi], [200 × 200 dpi], or [300 × 300 dpi] as the available resolution.
If you select [PDF (Compact)] or [PDF (Compact+OCR)] as the file format, the resolution is set to [300 × 300 dpi] automatically. You cannot select the resolution other than [300 × 300 dpi] for [PDF (Compact)] or [PDF (Compact+OCR)].
If you are sending documents via I-fax, you can select [200 × 100 dpi], [200 × 200 dpi], [200 × 400 dpi], [300 × 300 dpi], [400 × 400 dpi], or [600 × 600 dpi] as the available resolution.
If you are sending documents via fax, you can select [200 × 100 dpi], [200 × 200 dpi], [200 × 400 dpi], or [400 × 400 dpi] as the available resolution.
The maximum size of an image that you can send at a resolution of 600 × 600 dpi is A3. If the image exceeds this size, it may be cut off.
If you send a long original at a resolution of 600 × 600 dpi, the periphery of the original image may cut off slightly.
If you are sending documents via fax, the maximum size of an image that you can send at a resolution of 400 × 400 dpi is A3.
|
4
|
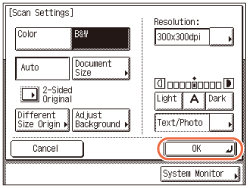
Press [OK].
 NOTE:
To cancel the specified settings, press [Cancel] on the Scan Settings screen or press  (Reset). (Reset). |
3
Press  (Start) to start scanning your originals.
(Start) to start scanning your originals.To cancel scanning, press [Cancel] or  (Stop).
(Stop).If the original is placed on the platen glass, follow the instructions that appear on the touch panel display → press  (Start) once for each original. When scanning is complete, press [Done].
(Start) once for each original. When scanning is complete, press [Done].The scanned data is sent to the specified destination when scanning is complete.
NOTE:
The specified settings return to their defaults after documents are sent. If you want to keep the settings as the default, see Registering Frequently Used Scan Settings as Default (Standard Send Settings).