Transmission Related Items
This section describes the transmission features that can be customized to your preferences.
Specifying the Data Compression Ratio for Sending Color Documents
You can set the compression ratio for color scanned data. A high compression ratio reduces the amount of memory used for the document, but results in low quality images. Conversely, a low compression ratio increases the amount of memory used for the document, but results in high quality images.
|
NOTE
|
|
This setting is effective when [JPEG], [PDF], or [PDF (OCR)] is selected as the file format.
If you are sending documents via I-fax and fax or to a USB memory media device, this setting is disabled.
The default setting is ‘Normal’.
|
1
Press  (Additional Functions).
 (Additional Functions).
The Additional Functions menu appears.
2
Press [Communications Settings].
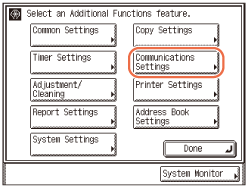
3
Press [TX Settings] under <Common Settings>.
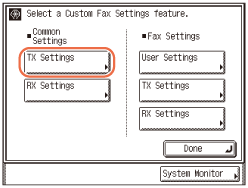
4
Press [Data Compression Ratio].
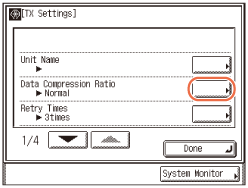
5
Select [High Ratio], [Normal], or [Low Ratio] → press [OK].
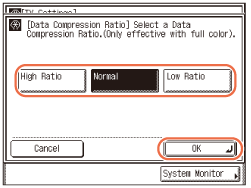
|
|
[High Ratio]:
|
A small amount of memory is used for the document, but the images are of a low quality.
|
|
[Normal]:
|
The amount of memory used for the document and the quality of the images are moderate, between the High and Low Ratio settings.
|
|
|
[Low Ratio]:
|
A large amount of memory is used for the document, but the images are of a high quality.
|
NOTE:
If [PDF (Compact)], [PDF (Compact+OCR)], or [JPEG] is selected as the file format, set Data Compression Ratio to 'Normal' or 'Low Ratio'. If Data Compression Ratio is set to 'High Ratio', the images that are output may be of a low quality even if 'Image Priority' is selected in step 3 of Color TX Scan Settings.
6
Press  (Reset) to return to the top screen.
 (Reset) to return to the top screen.
Resending Data Automatically When an Error Occurs (Retry Times)
Retry Times is the mode which automatically resends data when the data cannot be sent. This occurs because the receiver is busy sending or receiving, or when an error occurs. This setting determines the number of retry attempts. You can set from one to five retry attempts, or select '0' to turn the Retry Times mode 'Off'.
|
NOTE
|
|
If you are sending documents via fax or to a USB memory media device, this setting is disabled.
The default setting is '3times'.
|
1
Press  (Additional Functions) → [Communications Settings] → [TX Settings] under <Common Settings>.
 (Additional Functions) → [Communications Settings] → [TX Settings] under <Common Settings>.
For help, see steps 1 to 3 in Specifying the Data Compression Ratio for Sending Color Documents.
2
Press [Retry Times].
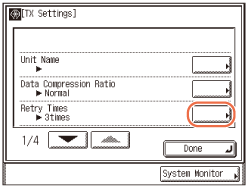
3
Press [-] or [+] to set the number of Retry Times → press [OK].
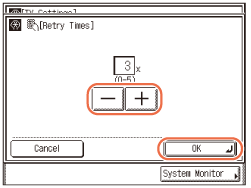
If the number of retry times is set to '0', the machine will not resend the data.
You can also use  -
-  (numeric keys) to enter the value.
 -
-  (numeric keys) to enter the value.
4
Press  (Reset) to return to the top screen.
 (Reset) to return to the top screen.
Registering Frequently Used Scan Settings as Default (Standard Send Settings)
This mode enables you to register frequently used scan settings for future use. The registered settings are always used when sending documents, unless you do not change the settings on the Scan Settings or Send Settings screen.
|
NOTE
|
|
The default settings are:
Color Mode: 'B&W'
Document Size: 'Auto'
File Format: 'TIFF'
Adjust Background: 'Off'
Resolution: '200 × 200 dpi'
Finished Stamp: 'Off'
Density: '5'
Original Type: 'Text/Photo'
If you are sending documents via I-fax and fax, the color mode and file format set here are disabled.
|
Registering the Standard Send Settings
Follow this procedure to change and register the standard send settings.
1
Press  (Additional Functions) → [Communications Settings] → [TX Settings] under <Common Settings>.
 (Additional Functions) → [Communications Settings] → [TX Settings] under <Common Settings>.
For help, see steps 1 to 3 in Specifying the Data Compression Ratio for Sending Color Documents.
2
Press [ ] or [
 ] until [Edit Standard Send Settings] appears → press [Edit Standard Send Settings].
 ] or [
 ] until [Edit Standard Send Settings] appears → press [Edit Standard Send Settings].
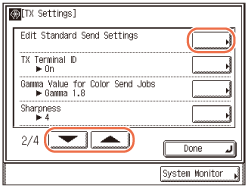
3
Press [Store].
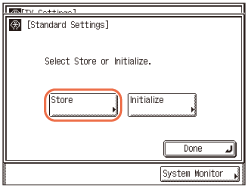
4
Specify the desired settings → press [OK].
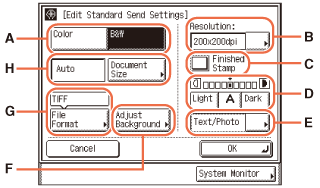
You can specify the following settings:
|
|
A
(Color Mode) |
Specifies the color mode of scanned originals. (Specifying the Color Mode and Resolution)
|
|
B
(Resolution) |
Specifies the resolution of scanned originals. (Specifying the Color Mode and Resolution)
|
|
|
C
(Finished Stamp) |
Stamps the front side of scanned originals. (Stamping Originals Which Have Already Been Scanned)
|
|
|
D
(Density) |
Adjusts the density of scanned originals. (Adjusting the Density and Image Quality)
|
|
|
E
(Original Type) |
Adjusts the image quality of scanned originals. (Adjusting the Density and Image Quality)
|
|
|
F
(Adjust Background) |
Adjusts the density of the background color when scanning color originals. (Adjusting the Density of Background Color)
|
|
|
G
(File Format) |
Specifies the file format of scanned originals. (Specifying the File Format)
|
|
|
H
(Document Size) |
Specifies the document size. (Specifying the Document Size)
|
IMPORTANT:
[Finished Stamp] is available only when the following options are attached to the machine:
Stamp Unit-B1
Feeder* (DADF-AA1 for the imageRUNNER 2545/2535 or DADF-AB1 for the imageRUNNER 2530/2525/2520)
* Standard-equipped for the imageRUNNER 2545i/2535i/2525i/2520i.
The setting for [Adjust Background] is invalid when all of the conditions below are met.
[100 × 100 dpi], [150 × 150 dpi], or [200 × 100 dpi] is selected as the resolution. (Specifying the Color Mode and Resolution)
[B&W] is selected as the color mode. (Specifying the Color Mode and Resolution)
[Text] is selected as the image quality. (Adjusting the Density and Image Quality)
To activate [Adjust Background], change the settings.
NOTE:
If you set Document Size to anything but ‘Auto,’ [Finished Stamp] is grayed out.
5
Press  (Reset) to return to the top screen.
 (Reset) to return to the top screen.
Restoring the Standard Send Settings to Their Default
Follow this procedure to restore the standard send settings to their default settings.
1
Press  (Additional Functions) → [Communications Settings] → [TX Settings] under <Common Settings>.
 (Additional Functions) → [Communications Settings] → [TX Settings] under <Common Settings>.
For help, see steps 1 to 3 in Specifying the Data Compression Ratio for Sending Color Documents.
2
Press [ ] or [
 ] until [Edit Standard Send Settings] appears → press [Edit Standard Send Settings].
 ] or [
 ] until [Edit Standard Send Settings] appears → press [Edit Standard Send Settings].
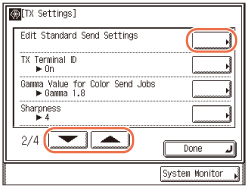
3
Press [Initialize].
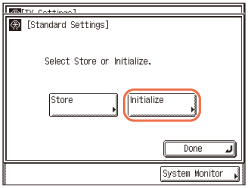
4
Press [Yes].
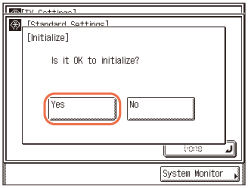
The message <Initialized.> appears for approximately two seconds on the touch panel display.
The Standard settings are initialized.
5
Press  (Reset) to return to the top screen.
 (Reset) to return to the top screen.
Printing Sender Information on a Sent Document (TX Terminal ID)
The TX Terminal ID setting enables you to specify whether the Terminal ID information is printed at the top of documents that you send via I-fax/fax. Information such as your I-fax address, name, and fax number is printed, enabling the recipient to know who sent the document.
|
NOTE
|
|
The default settings are:
TX Terminal ID: 'On'
Printing Position: 'Outside'
Telephone # Mark: 'FAX' (Telephone # Mark appears only when the optional Super G3 Fax Board-AG1 is attached to the machine.)
|
1
Press  (Additional Functions) → [Communications Settings] → [TX Settings] under <Common Settings>.
 (Additional Functions) → [Communications Settings] → [TX Settings] under <Common Settings>.
For help, see steps 1 to 3 in Specifying the Data Compression Ratio for Sending Color Documents.
2
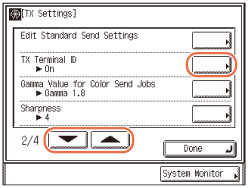
Press [ ] or [
 ] until [TX Terminal ID] appears → press [TX Terminal ID].
 ] or [
 ] until [TX Terminal ID] appears → press [TX Terminal ID].
3
Select [On] or [Off].
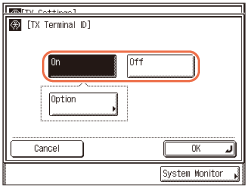
If you select [On] with the optional Super G3 Fax Board-AG1 not attached to the machine:
|
1
|
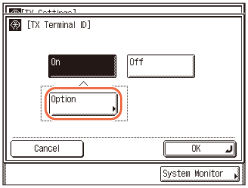
Press [Option].
 |
|
2
|
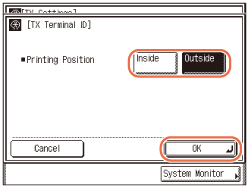
Select [Inside] or [Outside] → press [OK].
 |
|
|
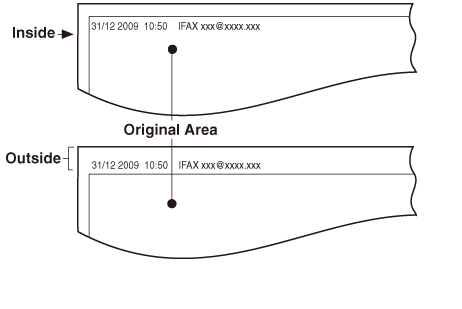
[Inside]:
|
The Terminal ID information is printed inside the image area on the recipient’s paper.
|
|
[Outside]:
|
The Terminal ID information is printed outside the image area on the recipient’s paper.
|
|
|
Example:
|
If you set the TX Terminal ID to 'On', the Terminal ID information is printed on the recipient’s paper as follows:
|
If you select [On] with the optional Super G3 Fax Board-AG1 attached to the machine:
|
1
|
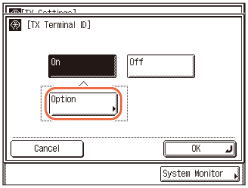
Press [Option].
 |
|
2
|
Specify each setting → press [OK].
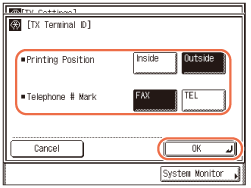 |
<Printing Position>
|
|
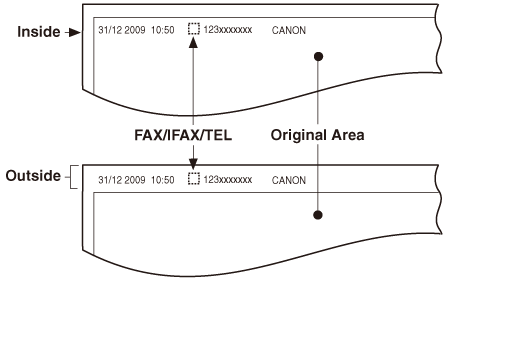
[Inside]:
|
The Terminal ID information is printed inside the image area on the recipient’s paper.
|
|
[Outside]:
|
The Terminal ID information is printed outside the image area on the recipient’s paper.
|
<Telephone # Mark>
|
|
[FAX]:
|
"IFAX" or "FAX" is printed before the I-fax address or fax number.
|
|
[TEL]:
|
"TEL" is printed before the telephone number.
|
|
|
Example:
|
If you set the TX Terminal ID to 'On', the Terminal ID information is printed on the recipient’s paper as follows:
|
If you select [Off]:
|
1
|
Press [OK].
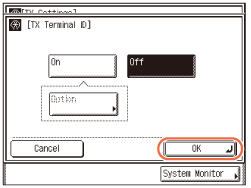 |
4
Press  (Reset) to return to the top screen.
 (Reset) to return to the top screen.
Specifying the Gamma Value for Sending Color Documents
You can set the gamma value for color scanned data. If the set value corresponds to the gamma value on the recipient’s machine, the scan exposure of the output data at the recipient’s machine is automatically adjusted to the level best suited to the quality of the original. Gamma values are expressed as input-output characteristics. Output is darkened when the gamma value is increased, and it is lightened when the gamma value is decreased. If the density of images received at the destination is excessively light or dark, the gamma value can be changed before resending the images.
|
NOTE
|
|
If you are sending documents via I-fax and fax, this setting is disabled.
If [PDF (Compact)] or [PDF (Compact+OCR)] is selected as the file format, this setting is disabled.
The default setting is 'Gamma 1.8'.
|
1
Press  (Additional Functions) → [Communications Settings] → [TX Settings] under <Common Settings>.
 (Additional Functions) → [Communications Settings] → [TX Settings] under <Common Settings>.
For help, see steps 1 to 3 in Specifying the Data Compression Ratio for Sending Color Documents.
2
Press [ ] or [
 ] until [Gamma Value for Color Send Jobs] appears → press [Gamma Value for Color Send Jobs].
 ] or [
 ] until [Gamma Value for Color Send Jobs] appears → press [Gamma Value for Color Send Jobs].
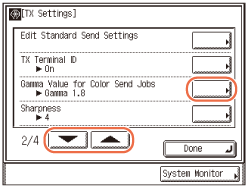
3
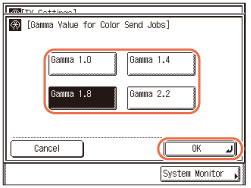
Select [Gamma 1.0], [Gamma 1.4], [Gamma 1.8], or [Gamma 2.2] → press [OK].
|
|
[Gamma 1.0]:
|
Although light output results can be obtained, the overall color impression is pale.
|
|
[Gamma 1.4]:
|
Output results that are slightly lighter than the default gamma value can be obtained.
|
|
|
[Gamma 1.8]:
|
The default setting. Dark output results can be obtained, while the detail of the darkest portion is not solid.
|
|
|
[Gamma 2.2]:
|
Dark output results can be obtained overall, although the detail of the darkest portion may be solid.*
|
|
|
* The word "solid" indicates that if you adjust the exposure to a darker setting when making copies of an image, the fine details of the image may appear as blended in with the background. As a result, the fine details may not show in a distinct fashion.
|
||
4
Press  (Reset) to return to the top screen.
 (Reset) to return to the top screen.
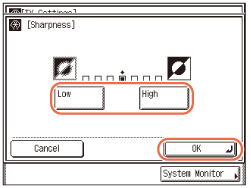
Adjusting the Contrast (Sharpness)
This mode enables you to scan original images with a sharper or softer contrast.
|
IMPORTANT
|
|
The setting for [Sharpness] is invalid when all of the conditions below are met.
[100 × 100 dpi], [150 × 150 dpi], or [200 × 100 dpi] is selected as the resolution. (Specifying the Color Mode and Resolution)
[B&W] is selected as the color mode. (Specifying the Color Mode and Resolution)
[Text] is selected as the image quality. (Adjusting the Density and Image Quality)
To activate [Sharpness], change the settings.
|
|
NOTE
|
|
The default setting is '4'.
|
1
Press  (Additional Functions) → [Communications Settings] → [TX Settings] under <Common Settings>.
 (Additional Functions) → [Communications Settings] → [TX Settings] under <Common Settings>.
For help, see steps 1 to 3 in Specifying the Data Compression Ratio for Sending Color Documents.
2
Press [ ] or [
 ] until [Sharpness] appears → press [Sharpness].
 ] or [
 ] until [Sharpness] appears → press [Sharpness].
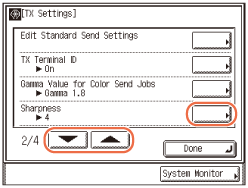
3
Press [Low] or [High] to adjust the sharpness → press [OK].
|
|
[Low]:
|
To scan originals containing printed images or other halftones, the setting should be towards [Low]. This setting lessens the moiré effect (a shimmering, wavy pattern).
|
|
[High]:
|
To scan text or lines clearly, the setting should be towards [High]. This setting is particularly suited for scanning blueprints and faint pencil drawn images.
|
4
Press  (Reset) to return to the top screen.
 (Reset) to return to the top screen.
Adjusting the Image Quality of PDF (Compact)
If [PDF (Compact)] or [PDF (Compact+OCR)] is selected as the file format, you can set the image quality level of the document.
|
NOTE
|
|
The default setting is 'Normal'.
If you are sending documents via I-fax and fax, this setting is disabled.
|
1
Press  (Additional Functions) → [Communications Settings] → [TX Settings] under <Common Settings>.
 (Additional Functions) → [Communications Settings] → [TX Settings] under <Common Settings>.
For help, see steps 1 to 3 in Specifying the Data Compression Ratio for Sending Color Documents.
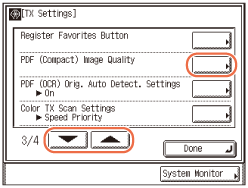
2
Press [ ] or [
 ] until [PDF (Compact) Image Quality] appears → press [PDF (Compact) Image Quality].
 ] or [
 ] until [PDF (Compact) Image Quality] appears → press [PDF (Compact) Image Quality].
3
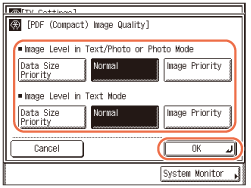
Specify each setting → press [OK].
|
|
[Data Size Priority]:
|
The data size is small, but the image quality is low.
|
|
[Normal]:
|
The data size and image quality are in between those of [Data Size Priority] and [Image Priority].
|
|
|
[Image Priority]:
|
The data size is large, but the image quality is high.
|
NOTE:
The setting made for <Image Level in Text/Photo or Photo Mode> or <Image Level in Text Mode> is enabled only if [Text/Photo], [Photo], or [Text] is selected as the image quality setting. (Adjusting the Density and Image Quality)
If an original with many colors is scanned, the compression level is determined by the data size and the number of colors, according to the selected image level. However, if the original is in monochrome or has few colors, it does not matter which image level you select.
4
Press  (Reset) to return to the top screen.
 (Reset) to return to the top screen.
Specifying the Settings for Sending PDF (OCR)
This mode enables you to perform OCR (optical character recognition) on a scanned original to create a PDF with searchable text.
This mode automatically detects the orientation of the characters on the original when sending it.
|
NOTE
|
|
This mode is available only when the optional OCR function is activated.
The default setting is 'On'.
If you are sending documents via I-fax and fax, this setting is disabled.
|
1
Press  (Additional Functions) → [Communications Settings] → [TX Settings] under <Common Settings>.
 (Additional Functions) → [Communications Settings] → [TX Settings] under <Common Settings>.
For help, see steps 1 to 3 in Specifying the Data Compression Ratio for Sending Color Documents.
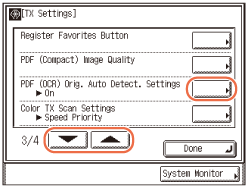
2
Press [ ] or [
 ] until [PDF (OCR) Orig. Auto Detect. Settings] appears → press [PDF (OCR) Orig. Auto Detect. Settings].
 ] or [
 ] until [PDF (OCR) Orig. Auto Detect. Settings] appears → press [PDF (OCR) Orig. Auto Detect. Settings].
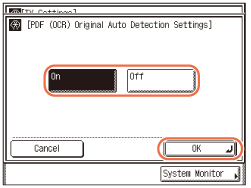
3
Select [On] or [Off] → press [OK].
|
|
[On]:
|
The orientation of the original is detected, and the document is automatically rotated before sending.
|
|
[Off]:
|
The orientation of the original is not detected, and the document is sent as is.
|
4
Press  (Reset) to return to the top screen.
 (Reset) to return to the top screen.
Color TX Scan Settings
You can set the priority for color scanned data. Selecting Speed Priority reduces the time spent on sending the document, but results in low quality images. Conversely, selecting Image Priority increases the time spent on sending the document, but results in high quality images.
|
NOTE
|
|
This feature is available for imageRUNNER 2530/2525i/2525/2520i/2520.
The default setting is 'Speed Priority'.
This setting is disabled when:
Sending documents via I-fax and fax or to a USB memory media device
Placing your originals on the platen glass for scanning
|
1
Press  (Additional Functions) → [Communications Settings] → [TX Settings] under <Common Settings>.
 (Additional Functions) → [Communications Settings] → [TX Settings] under <Common Settings>.
For help, see steps 1 to 3 in Specifying the Data Compression Ratio for Sending Color Documents.
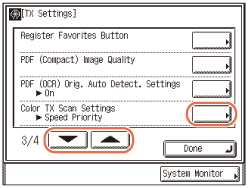
2
Press [ ] or [
 ] until [Color TX Scan Settings] appears → press [Color TX Scan Settings].
 ] or [
 ] until [Color TX Scan Settings] appears → press [Color TX Scan Settings].
3
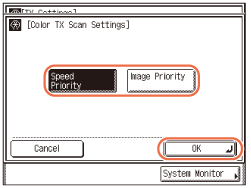
Select [Speed Priority] or [Image Priority] → [OK].
|
|
[Speed Priority]:
|
Less time is spent in sending the document, but the images are of a low quality.
|
|
[Image Priority]:
|
More time is spent in sending the document, but the images are of a high quality.
|
4
Press  (Reset) to return to the top screen.
 (Reset) to return to the top screen.
Specifying What to Display on the Screen for a Send Operation
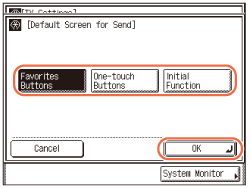
This mode enables you to specify what screen is displayed first for a send operation. You can select the desired screen from the One-touch screen, Favorites Buttons screen, or top screen (Send). The specified screen is displayed when:
 (SEND) or
  (Reset) is pressed
The power is turned ON
The Auto Clear mode is activated
|
NOTE
|
|
The default setting is 'Initial Function'.
|
1
Press  (Additional Functions) → [Communications Settings] → [TX Settings] under <Common Settings>.
 (Additional Functions) → [Communications Settings] → [TX Settings] under <Common Settings>.
For help, see steps 1 to 3 in Specifying the Data Compression Ratio for Sending Color Documents.
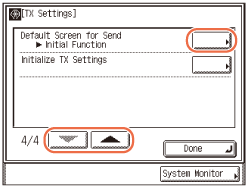
2
Press [ ] or [
 ] until [Default Screen for Send] appears → press [Default Screen for Send].
 ] or [
 ] until [Default Screen for Send] appears → press [Default Screen for Send].
3
Select [Favorites Buttons], [One-touch Buttons], or [Initial Function] → press [OK].
|
|
[Favorites Buttons]:
|
The Favorite Buttons screen is displayed first for a send operation.
|
|
[One-touch Buttons]:
|
The One-touch screen is displayed first for a send operation.
|
|
|
[Initial Function]:
|
The top screen (Send) is displayed first for a send operation.
|
4
Press  (Reset) to return to the top screen.
 (Reset) to return to the top screen.
Restoring the TX Settings to Their Default
You can restore almost all of the TX Settings to their default settings.
|
IMPORTANT
|
|
The following setting items are not initialized even if you initialize the TX Settings:
Unit Name
Retry Times
Edit Standard Send Settings
TX Terminal ID
|
|
NOTE
|
|
If you initialize the TX Settings, the settings stored in the favorites buttons are also initialized.
|
1
Press  (Additional Functions) → [Communications Settings] → [TX Settings] under <Common Settings>.
 (Additional Functions) → [Communications Settings] → [TX Settings] under <Common Settings>.
For help, see steps 1 to 3 in Specifying the Data Compression Ratio for Sending Color Documents.
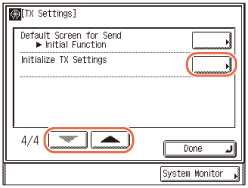
2
Press [ ] or [
 ] until [Initialize TX Settings] appears → press [Initialize TX Settings].
 ] or [
 ] until [Initialize TX Settings] appears → press [Initialize TX Settings].
3
Press [Yes].
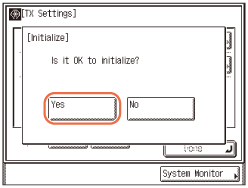
The message <Initialized.> appears for approximately two seconds on the touch panel display.
The TX settings are initialized.
4
Press  (Reset) to return to the top screen.
 (Reset) to return to the top screen.
Sending with Error Correction Mode (ECM Transmission)
ECM (Error Correction Mode) reduces the effect of system and line errors on documents that may occur when sending or receiving with another fax machine that supports ECM. If the other machine does not support ECM, this setting is ignored.
If transmission speed appears to be extremely slow, you may be able to speed up the transmission time by turning ECM 'Off'.
|
IMPORTANT
|
|
If you want to transmit using ECM, ECM reception should be set on the recipient’s machine. This setting is ignored unless ECM is set in both machines.
Even when ECM is set, errors can sometimes occur due to a poor telephone line connection.
If there is trouble with the line, it will take more time to send the documents.
|
|
NOTE
|
|
The default setting is 'On'.
|
1
Press  (Additional Functions).
 (Additional Functions).
The Additional Functions menu appears.
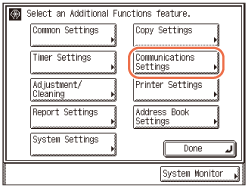
2
Press [Communications Settings].
3
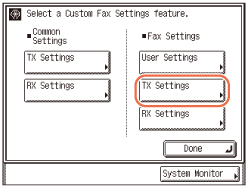
Press [TX Settings] under <Fax Settings>.
4
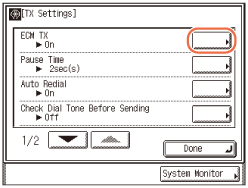
Press [ECM TX].
5
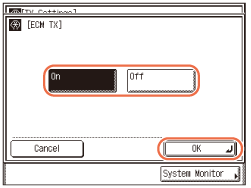
Select [On] or [Off] → press [OK].
|
|
[On]:
|
Uses ECM.
|
|
[Off]:
|
Does not use ECM.
|
6
Press  (Reset) to return to the top screen.
 (Reset) to return to the top screen.
Adjusting the Pause Time
Some overseas dialing may be affected by the distance or complex routing of connections when dialing the international access code, country code, and the destination’s telephone number all at once. In such cases, insert a pause after the international access code. This helps to improve the connection.
|
NOTE
|
|
You can insert a pause when you dial the fax number using
 - -  (numeric keys). (Sending a Fax, Calling from an Extension) (numeric keys). (Sending a Fax, Calling from an Extension)Pauses entered at the end of dialed fax numbers are always 10 seconds long.
The default setting is '2sec(s)'.
|
1
Press  (Additional Functions) → [Communications Settings] → [TX Settings] under <Fax Settings>.
 (Additional Functions) → [Communications Settings] → [TX Settings] under <Fax Settings>.
For help, see steps 1 to 3 in Sending with Error Correction Mode (ECM Transmission).
2
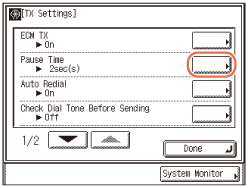
Press [Pause Time].
3
Press [-] or [+] to set the pause time → press [OK].
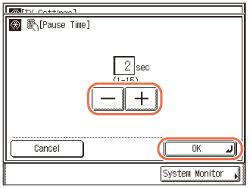
You can also use  -
-  (numeric keys) to enter the value.
 -
-  (numeric keys) to enter the value.
4
Press  (Reset) to return to the top screen.
 (Reset) to return to the top screen.
Redialing Automatically When the Line Is Busy (Auto Redial)
Auto Redial enables the machine to automatically redial the recipient’s fax number if the recipient cannot be reached due to a busy line or sending error.
Auto Redial can be turned 'On' or 'Off'. If you set Auto Redial to 'On', you can set how many times the machine redials, the redial interval, and whether the document should be resent in the event of an error.
|
NOTE
|
|
The default settings are:
Auto Redial: 'On'
Redial Times: '2times'
Redial Interval: '2min(s)'
TX Error Redial: 'All Pages'
|
1
Press  (Additional Functions) → [Communications Settings] → [TX Settings] under <Fax Settings>.
 (Additional Functions) → [Communications Settings] → [TX Settings] under <Fax Settings>.
For help, see steps 1 to 3 in Sending with Error Correction Mode (ECM Transmission).
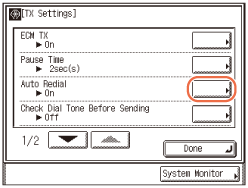
2
Press [Auto Redial].
3
Select [On] or [Off].
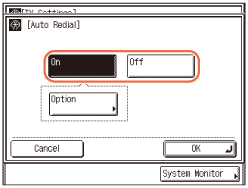
If you select [On]:
|
1
|
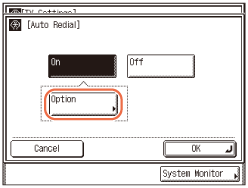
Press [Option].
 |
|
2
|
Press [Redial Times].
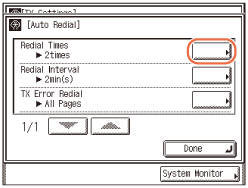 |
|
3
|
Press [-] or [+] to set the number of redial times → press [OK].
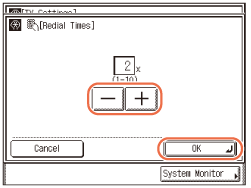 You can also use
 - -  (numeric keys) to enter the value. (numeric keys) to enter the value. |
|
4
|
Press [Redial Interval].
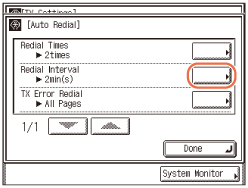 |
|
5
|
Press [-] or [+] to set the redial interval → press [OK].
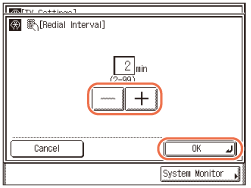 You can also use
 - -  (numeric keys) to enter the value. (numeric keys) to enter the value. |
|
6
|
Press [TX Error Redial].
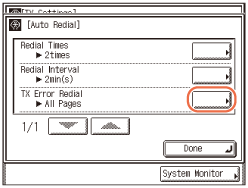 |
|
7
|
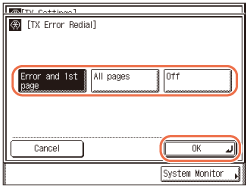
Select [Error and 1st page], [All pages], or [Off] → press [OK].
 |
|
|
[Error and 1st page]:
|
Auto Redial takes place if a sending error occurs. The first page of the document, the error page, and all subsequent pages are resent.
|
|
[All pages]:
|
Auto Redial takes place if a sending error occurs. All pages of the document are resent.
|
|
|
[Off]:
|
Redialing does not take place if a sending error occurs.
|
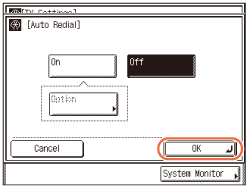
If you select [Off]:
|
1
|
Press [OK].
 |
4
Press  (Reset) to return to the top screen.
 (Reset) to return to the top screen.
Checking the Dial Tone Before Sending
You can set whether to check for the dial tone before dialing when sending a fax.
|
NOTE
|
|
The default setting is 'Off'.
This feature is not available in Singapore.
|
1
Press  (Additional Functions) → [Communications Settings] → [TX Settings] under <Fax Settings>.
 (Additional Functions) → [Communications Settings] → [TX Settings] under <Fax Settings>.
For help, see steps 1 to 3 in Sending with Error Correction Mode (ECM Transmission).
2
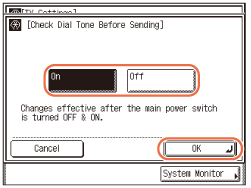
Press [Check Dial Tone Before Sending].
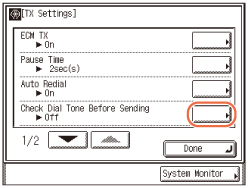
3
Select [On] or [Off] → press [OK].
4
Press  (Reset) to return to the top screen.
 (Reset) to return to the top screen.
NOTE:
The Check Dial Tone Before Sending mode is enabled only after you restart the machine (the main power switch is turned OFF, then back ON again).
TX Rotation
The TX Rotation function automatically corrects the orientation of the document by rotating the image when sending a fax. For example, if a document with a horizontal orientation is placed vertically, the machine rotates the image and sends it horizontally.
|
NOTE
|
|
You can use the TX Rotation mode for A4 documents only.
The TX Rotation mode is not available if you are using the Direct Sending or Manual Sending.
The default setting is 'On'.
|
1
Press  (Additional Functions) → [Communications Settings] → [TX Settings] under <Fax Settings>.
 (Additional Functions) → [Communications Settings] → [TX Settings] under <Fax Settings>.
For help, see steps 1 to 3 in Sending with Error Correction Mode (ECM Transmission).
2
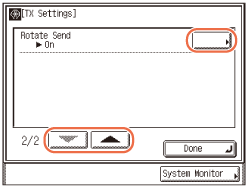
Press [ ] or [
 ] until [Rotate Send] appears → press [Rotate Send].
 ] or [
 ] until [Rotate Send] appears → press [Rotate Send].
3
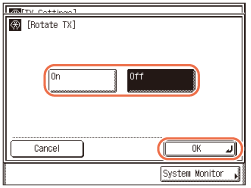
Select [On] or [Off] → press [OK].
4
Press  (Reset) to return to the top screen.
 (Reset) to return to the top screen.