Scanning Different Size Originals Together (Different Size Originals)
The Different Size Originals mode enables you to place different size originals into the feeder and scan them at the same time.
The combinations of the paper sizes available for the Different Size Originals mode are as follows:
The combinations of the paper sizes available for the Different Size Originals mode are as follows:
Combinations with the same width*: A4 and A3, A4R and A5, B4 and B5
Combinations with different widths*: A4 and B5, A4R and B4, A3 and B4, A5 and B5
* “Width” refers to the vertical measurement of the paper from the front of the machine to the back of the machine when the paper is placed in the feeder.
|
IMPORTANT
|
|
The combinations other than described above may wrinkle originals.
The Different Size Originals mode is available only when the machine is equipped with the feeder (optional for the imageRUNNER 2545/2535/2530/2525/2520).
If you place originals with different widths, the originals may move slightly when fed to the scanning area. As a result, the scanned images may appear slanted.
Make sure that the different sized originals are of the same weight (paper type).
If the Different Size Originals mode is set, the scanning speed may be slower than normal.
The Different Size Originals mode cannot be used with the following modes:
Document Size (except for [Auto]) (Specifying the Document Size)
|
1
Press  (SEND) → place your originals into the feeder → specify the destination.
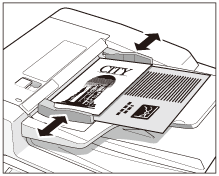
(SEND) → place your originals into the feeder → specify the destination.To place the originals with the same width:
|
1
|
Align the top and bottom edges of the originals with the edges of the feeder by adjusting the slide guides.
 |
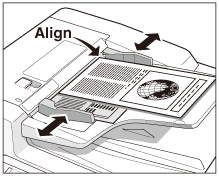
To place the originals with different widths:
|
1
|
Adjust the slide guides of the feeder to fit the width of the originals.
|
|
2
|
Align the top edges of all of the originals with the back edge of the feeder.
 |
NOTE:
For instructions on how to place your originals, see Basic Operations.
For instructions on how to specify the destination, see Basic Sending Methods or Specifying Destinations Easily and Quickly.
2
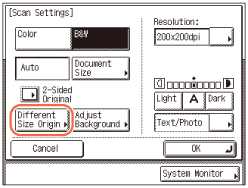
Press [Scan Settings] → select [Option].
For help, see step 2 in Specifying the Document Size.
3
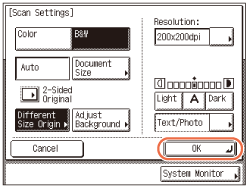
Press [Different Size Origin].
4
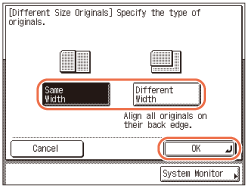
Select the type of originals → press [OK].
If you are placing originals with the same width, press [Same Width].
If you are placing originals with different widths, press [Different Width].
If you are placing originals with different widths, press [Different Width].
5
Press [OK].
NOTE:
To cancel the specified settings, press [Cancel] on the Scan Settings screen or press  (Reset).
(Reset).6
Press  (Start) to start scanning your originals.
(Start) to start scanning your originals.To cancel scanning, press [Cancel] or  (Stop).
(Stop).The scanned data is sent to the specified destination when scanning is complete.