Favorites Buttons
You can register the frequently used scan settings, send settings, and destinations in a favorites button for future use. This feature is useful if you frequently send documents with the same document settings to the same destination.
The following settings can be registered in a favorites button:
Destinations
Settings from the Scan Settings or the Send Settings screen (Specifying the Scan Settings, Basic Sending Methods)
Sender’s name (Registering the Unit Name)
Once you register a favorites button, you can send documents simply by selecting the favorites button containing the desired document settings and destinations, and pressing  (Start).
(Start).|
IMPORTANT
|
|
If the Language Switch setting is set to ‘On’, some characters are restricted and cannot be entered. To enter all characters, set the Language Switch setting to ‘Off’. (Configuring the Machine's Basic Settings)
|
|
NOTE
|
|
The document settings and destinations registered in a favorites button are not deleted when the power is turned OFF.
If a destination included in a favorites button is deleted from the Address Book, it is also deleted from the settings registered in the favorites button.
If a destination is not registered in a favorites button, you need to specify destinations when you send documents.
|
Registering the Favorites Buttons
Follow this procedure to register scan settings, send settings, and destinations in a favorites button.
1
Press  (SEND) → specify scan settings, send settings, and destinations that you want to register in a favorite button.
(SEND) → specify scan settings, send settings, and destinations that you want to register in a favorite button.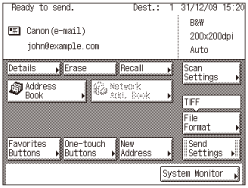
2
Display the Register Favorites Button screen.
You can access this screen from the Additional Functions screen or by using the Register key (shortcut key to the Register Favorites Button screen) on the Favorites Buttons screen.
If you want to access from the Additional Functions screen:
|
1
|
Press
 (Additional Functions) → [Communications Settings]. (Additional Functions) → [Communications Settings].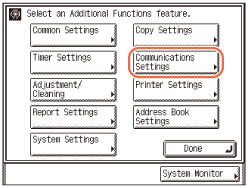 |
|
2
|
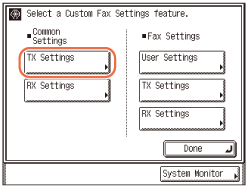
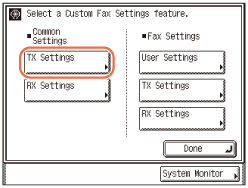
Press [TX Settings] under <Common Settings>.
 |
|
3
|
Press [
 ] or [ ] or [ ] until [Register Favorites Button] appears → press [Register Favorites Button]. ] until [Register Favorites Button] appears → press [Register Favorites Button]. |
If you want to access using the Register key on the Favorites Buttons screen:
|
1
|
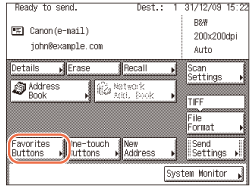
Press [Favorites Buttons].
 |
|
2
|
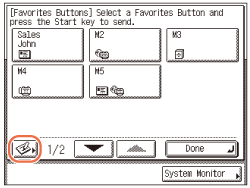
Press
 . . |
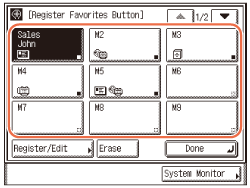
3
Select a favorites button to register → press [Register/Edit].
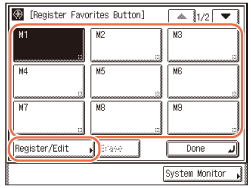
Press [] or [] to scroll to the desired favorites button if it is not displayed.
] or [] to scroll to the desired favorites button if it is not displayed.NOTE:
Favorites buttons that already have settings stored in them are displayed with a black square ( ) in the lower right corner of the button.
) in the lower right corner of the button.If you select a favorites button that already has settings stored in it, the settings are displayed.
4
Press [Register].
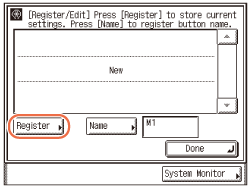
A screen appears, asking for your confirmation to store the settings.
5
Confirm the settings.
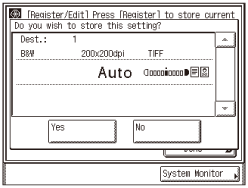
If there are more settings than are currently displayed, you can scroll through the screen by pressing [] or [].
] or [].6
Press [Yes].
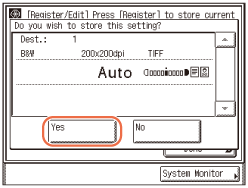
The message <Stored in memory.> appears for approximately two seconds on the touch panel display.
The stored settings are displayed.
7
Press [Name] to assign a name to the selected favorite button.
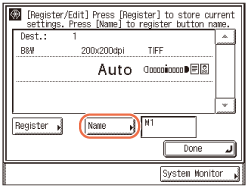
Two lines can be used for the favorite button name.
NOTE:
If you do not specify a favorite button name, the default name (M1 to M18) is used.
8
Enter the favorite button name (up to 10 characters) for line 1 → press [Next].
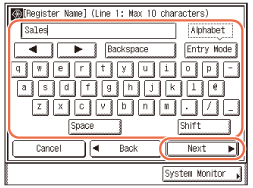
NOTE:
For instructions on how to enter characters, see Basic Operations.
9
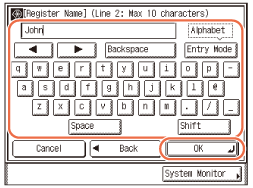
If necessary, enter the favorite button name (up to 10 characters) for line 2 → press [OK].
10
Press [Done].
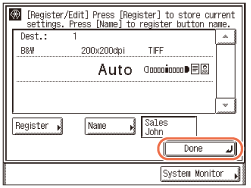
The assigned name appears on the favorite button.
11
Press  (Reset) to return to the top screen.
(Reset) to return to the top screen.Using the Favorites Buttons
Follow this procedure to specify destinations using the favorites buttons.
1
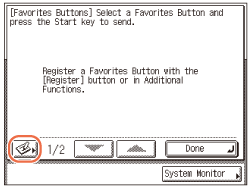
Press (SEND) → [Favorites Buttons].
(SEND) → [Favorites Buttons].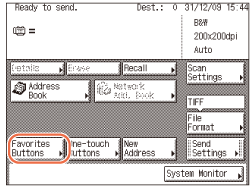
2
Select the favorites button containing the desired destination → press [Done].
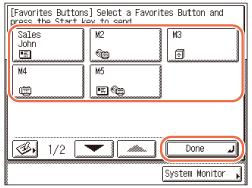
Press [] or [] to scroll to the desired favorites button if it is not displayed.
] or [] to scroll to the desired favorites button if it is not displayed.The registered document settings and destinations are recalled.
NOTE:
You can manually change the recalled settings and destinations before you send your documents.
If you press another favorites button, the settings and destinations stored in that button are recalled.
To cancel the recalled settings and destinations, press  (Reset).
(Reset).If multiple destinations are stored in the selected favorites button, the destinations may not be listed in the order in which they were set.
The destinations you can specify may vary depending on the settings under <Send Restriction Settings>. (Customizing Settings) For example, if E-mail Send is set to ‘Do not allow’ or ‘Only allow sending to own address’, the favorites buttons containing e-mail addresses or I-fax addresses are not displayed.
3
Press  (Start) to send documents.
(Start) to send documents.NOTE:
If the settings under <Authentication Method> in <SMTP Authentication Settings> are configured to display an authentication screen, the Enter Network Password screen appears when you press (Start) to send e-mails or I-faxes. (Customizing Settings) Specify the user name and password → press [OK].
(Start) to send e-mails or I-faxes. (Customizing Settings) Specify the user name and password → press [OK].If the settings under <When Sending File to Address Registered in Address Book> are configured to display an authentication screen, the Enter Network Password screen appears when you press (Start) to send documents to a file server. (Customizing Settings) Specify the user name and password → press [OK].
(Start) to send documents to a file server. (Customizing Settings) Specify the user name and password → press [OK].Editing/Deleting the Registered Information in the Favorites Buttons
Follow this procedure to edit or delete the registered information in the favorites buttons.
1
Display the Register Favorites Button screen.
You can access this screen from the Additional Functions screen or by using the Register key (shortcut key to the Register Favorites Button screen) on the Favorites Buttons screen.
If you want to access from the Additional Functions screen:
|
1
|
Press
(Additional Functions) → [Communications Settings].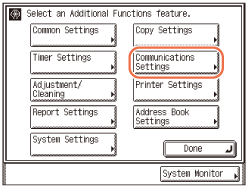 |
|
2
|
Press [TX Settings] under <Common Settings>.
 |
|
3
|
Press [
] or [] until [Register Favorites Button] appears → press [Register Favorites Button]. |
If you want to access using the Register key on the Favorites Buttons screen:
|
1
|
Press
 (SEND) → [Favorites Buttons]. (SEND) → [Favorites Buttons].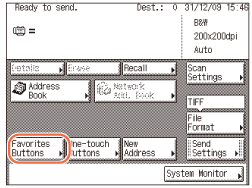 |
|
2
|
Press
. |
2
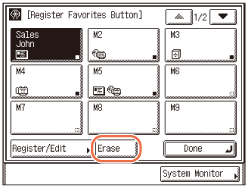
Select the favorites button to be changed or deleted.
Press [] or [] to scroll to the desired favorites button if it is not displayed.
] or [] to scroll to the desired favorites button if it is not displayed.3
Change or delete the registered information of the selected favorites button.
If you want to change the registered information:
|
1
|
Press [Register/Edit].
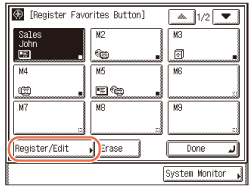 The current settings for the selected favorites button appear.
|
|
2
|
Change the registered information → press [Done].
The display returns to the Register Favorites Button screen.
NOTE:
For instructions on how to register the favorites buttons, see Registering the Favorites Buttons.
|
If you want to delete the registered information:
|
1
|
Press [Erase].
 |
|
2
|
Confirm the settings.
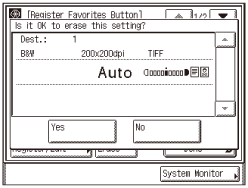 If there are more settings than are currently displayed, you can scroll through the screen by pressing [
] or []. |
|
3
|
Press [Yes].
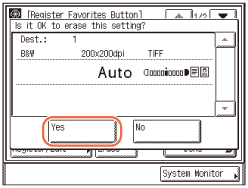 The message <Erased.> appears for approximately two seconds on the touch panel display.
The registered information is deleted.
NOTE:
Favorites button names are not deleted.
|
4
Press (Reset) to return to the top screen.
(Reset) to return to the top screen.