Managing Key Pairs and Digital Certificates from a Web Browser
Key pairs and digital certificates can be used for security purposes, such as IEEE802.1X port-based authentication and TLS communication.
You can manage key pairs and digital certificates from the Remote UI by dividing them into the following types:
Key and Certificate
In IEEE802.1X port-based authentication, a key pair (or a private key and certificate) in PKCS#12 format is required for enabling the EAP-TLS method on the client device. If you want to access the machine securely from a web browser (Remote UI), generate a key pair and set it for TLS communications. Up to three key pairs can be registered.
CA Certificate
CA certificates are used for verifying the digital certificates sent from other devices, such as servers, client computers, etc. Up to 10 CA certificates (including the pre-installed CA certificates) can be registered.
This section focuses on how to install and register key pairs and digital certificates from a computer on the network. For instructions on how to generate a key pair for TLS communications, see Setting up the Machine for Your Network Environment.
|
IMPORTANT
|
|
Certificates must meet the following requirements:
Format: X.509 version 1 or version 3 (DER encoded binary)
Signature algorithm: SHA1-RSA, SHA256-RSA, SHA384-RSA*, SHA512-RSA*, MD5-RSA, or MD2-RSA (For CA certificates, SHA1-DSA is also allowed.)
Key length: 512, 1024, 2048, or 4096 bits (RSA)/2048 or 3072 bits (DSA)
File extension: ‘.p12’ or ‘.pfx’ (for key pair files)/‘.cer’ or ‘.der’ (for CA certificate files)
* SHA384-RSA and SHA512-RSA are supported only when the key length is 1024 bits or more.
The machine does not use certificate revocation list (CRL) for verifying digital certificates.
The Certificate Settings are available only when the Remote UI is in the System Manager Mode.
|
Installing and Registering a Key and Certificate
Install a key pair (or a private key and certificate) in the machine as described below. You can also register the key pair or delete unnecessary key pair files.
1
Click [Add.Func.] → [Settings] in the [Add.Func.] menu.
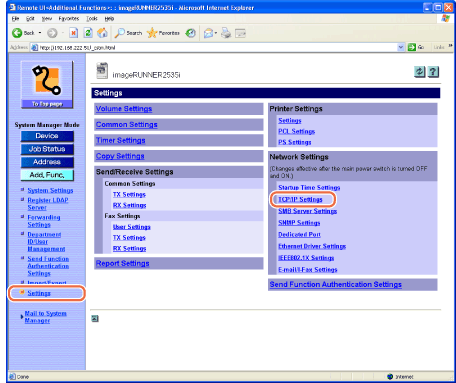
The Settings page is displayed.
2
Click [TCP/IP Settings] on the page shown in step 1.
The TCP/IP Settings page is displayed.
3
Scroll the page until [Certificate Settings] appears → click [Key and Certificate Settings].
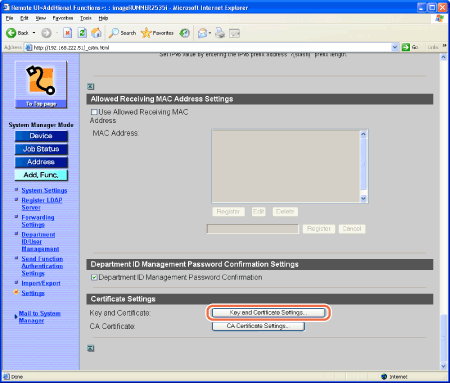
The Key and Certificate Settings page is displayed.
4
Click [Register Key and Certificate].
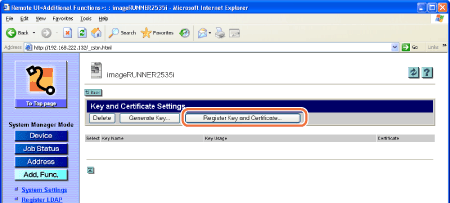
The Register Key and Certificate page is displayed.
NOTE:
If you want to generate an TLS key pair with the machine, click [Generate Key] → enter the required information on the page that appears → click [OK]. For more information, see Setting up the Machine for Your Network Environment.
5
Select the function.
To install a new key and certificate:
|
1
|
Click [Install].
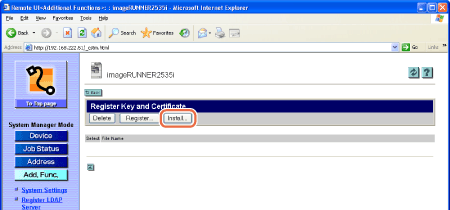 The Install Key and Certificate page is displayed.
|
|
2
|
Click [Browse] → select the key pair file to install → click [Start Installation].
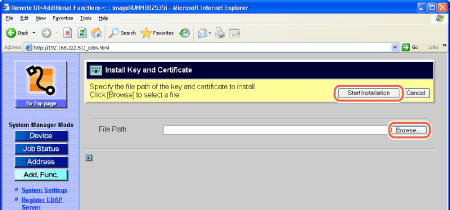 The Remote UI starts installing the key and certificate and when it is complete, the page returns to the Register Key and Certificate page.
IMPORTANT:
The maximum number of characters that you can enter for the file name is 24 (including the file extension ‘.p12’ or ‘.pfx’).
|
To register the key and certificate:
|
1
|
Click [
 |
|
2
|
Enter the key name and password (up to 24 characters respectively) → click [OK].
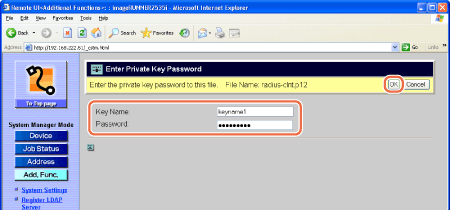 The Remote UI starts registering the key and certificate and when it is complete, the page returns to the Register Key and Certificate page.
|
To delete the installed (but not registered) key and certificate:
|
1
|
Click [
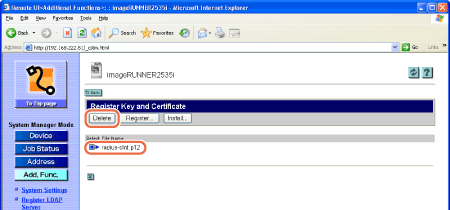 The selected file is deleted.
|
6
Restart the machine.
Turn OFF the machine, wait at least 10 seconds, and then turn it ON.
Deleting a Key and Certificate
Key pairs become invalid when the certificate expires or when the file becomes corrupted. If this happens, delete unnecessary key pair files as described below.
1
Click [Add.Func.] → [Settings] in the [Add.Func.] menu.
For help, see the screen shot in step 1 in Installing and Registering a Key and Certificate.
The Settings page is displayed.
2
Click [TCP/IP Settings] on the page shown in step 1.
For help, see the screen shot in step 1 in Installing and Registering a Key and Certificate.
The TCP/IP Settings page is displayed.
3
Scroll the page until [Certificate Settings] appears → click [Key and Certificate Settings].
For help, see the screen shot in step 3 in Installing and Registering a Key and Certificate.
The Key and Certificate Settings page is displayed.
4
Click [ ] (Select) next to the key pair you want to delete → [Delete].
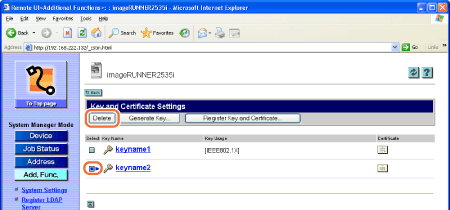
The selected key pair is deleted.
NOTE:
If you want to display the details of a certificate, click [ ] (Certificate).
You may not be able to delete a key pair. In this case, check what the key pair is being used for (indicated under <Key Usage>) and perform the following:
If the key pair is used for TLS, disable the TLS settings for e-mails/I-faxes and the Remote UI. (Setting up the Machine for Your Network Environment, Protecting the Machine from Unauthorized Access)
If the key pair is used for IEEE802.1X authentication, register a new key pair and set it as the default key. (Connecting the Machine to a TCP/IP Network) The key pair reset to ‘Off’ can be deleted.
5
Restart the machine.
Turn OFF the machine, wait at least 10 seconds, and then turn it ON.
Installing and Registering a CA Certificate
Install a CA certificate in the machine as described below. You can also register the CA certificate or delete unnecessary certificate files.
1
Click [Add.Func.] → [Settings] in the [Add.Func.] menu.
For help, see the screen shot in step 1 in Installing and Registering a Key and Certificate.
The Settings page is displayed.
2
Click [TCP/IP Settings] on the page shown in step 1.
For help, see the screen shot in step 1 in Installing and Registering a Key and Certificate.
The TCP/IP Settings page is displayed.
3
Scroll the page until [Certificate Settings] appears → click [CA Certificate Settings].
For help, see the screen shot in step 3 in Installing and Registering a Key and Certificate.
The CA Certificate Settings page is displayed.
4
Click [Register CA Certificate].
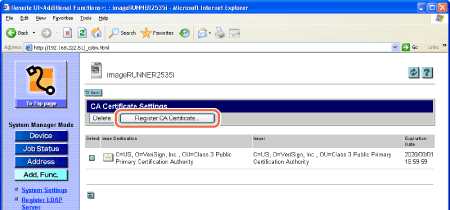
The Register CA Certificate page is displayed.
5
Select the function.
To install a new CA certificate:
|
1
|
Click [Install].
 The Install CA Certificate page is displayed.
|
|
2
|
Click [Browse] → select the CA certificate file to install → click [Start Installation].
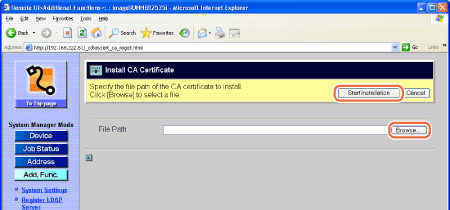 The Remote UI starts installing the CA certificate and when it is complete, the page returns to the Register CA Certificate page.
IMPORTANT:
The maximum number of characters that you can enter for the file name is 24 (including the file extension ‘.cer’ or ‘.der’).
|
To register the CA certificate:
|
1
|
Click [
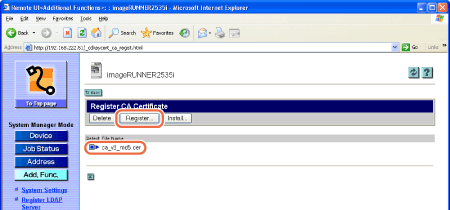 The Remote UI starts registering the CA certificate and when it is complete, the page returns to the CA Certificate Settings page.
|
To delete the installed (but not registered) CA certificate:
|
1
|
Click [
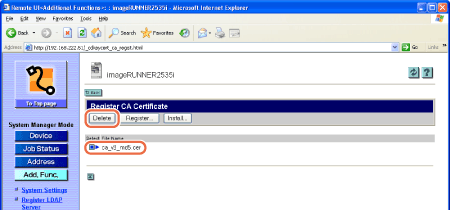 The selected file is deleted.
|
6
Restart the machine.
Turn OFF the machine, wait at least 10 seconds, and then turn it ON.
Deleting a CA Certificate
CA certificates become invalid when the certificate expires or when the file becomes corrupted. If this happens, delete unnecessary files as described below.
1
Click [Add.Func.] → [Settings] in the [Add.Func.] menu.
For help, see the screen shot in step 1 in Installing and Registering a Key and Certificate.
The Settings page is displayed.
2
Click [TCP/IP Settings] on the page shown in step 1.
For help, see the screen shot in step 1 in Installing and Registering a Key and Certificate.
The TCP/IP Settings page is displayed.
3
Scroll the page until [Certificate Settings] appears → click [CA Certificate Settings].
For help, see the screen shot in step 3 in Installing and Registering a Key and Certificate.
The CA Certificate Settings page is displayed.
4
Click [] (Select) next to the CA certificate you want to delete → [Delete].
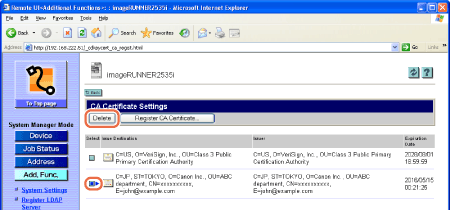
The selected CA certificate is deleted.
NOTE:
If you want to display the details of a certificate, click [] (Certificate).
5
Restart the machine.
Turn OFF the machine, wait at least 10 seconds, and then turn it ON.