Managing Key Pairs and Digital Certificates
The machine can take advantage of key pairs and digital certificates for security purposes, such as IEEE802.1X port-based authentication and TLS communication. After key pairs and digital certificates are installed in the machine, register them for use as described below.
The key pairs and digital certificates registered in the machine are divided into the following types:
Key and Certificate
In IEEE802.1X port-based authentication, a key pair (or a private key and certificate) in PKCS#12 format is required for enabling the EAP-TLS method on the client device. If you want to access the machine securely from a web browser (Remote UI) or send/receive e-mails and I-faxes securely, generate a key pair and set it for TLS communications. Up to three key pairs can be registered.
CA Certificate
CA certificates are used for verifying the digital certificates sent from other devices, such as servers, client computers, etc. Up to 10 CA certificates (including the pre-installed CA certificates) can be registered.
|
IMPORTANT
|
|
Certificates must meet the following requirements:
Format: X.509 version 1 or version 3 (DER encoded binary)
Signature algorithm: SHA1-RSA, SHA256-RSA, SHA384-RSA*, SHA512-RSA*, MD5-RSA, or MD2-RSA (For CA certificates, SHA1-DSA is also allowed.)
Key length: 512, 1024, 2048, or 4096 bits (RSA)/2048 or 3072 bits (DSA)
File extension: ‘.p12’ or ‘.pfx’ (for key pair files)/‘.cer’ or ‘.der’ (for CA certificate files)
* SHA384-RSA and SHA512-RSA are supported only when the key length is 1024 bits or more.
The machine does not use certificate revocation list (CRL) for verifying digital certificates.
|
|
NOTE
|
|
Key pairs and digital certificates can be installed from a web browser (Remote UI). (Managing Jobs and Machine Data)
Key pairs and digital certificates can be registered both with the control panel and from a web browser (Remote UI).
|
Generating a Key Pair for TLS Communications
If you want to use encrypted TLS communication for accessing the machine from a web browser (Remote UI) or sending/receiving e-mails and I-faxes, generate a key pair file as described below.
1
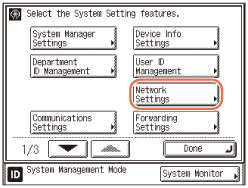
Press  (Additional Functions) → [System Settings] → [Network Settings].
 (Additional Functions) → [System Settings] → [Network Settings].
2
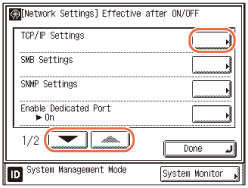
Press [TCP/IP Settings].
3
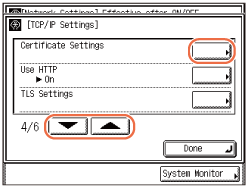
Press [ ] or [
 ] until [Certificate Settings] appears → press [Certificate Settings].
 ] or [
 ] until [Certificate Settings] appears → press [Certificate Settings].
4
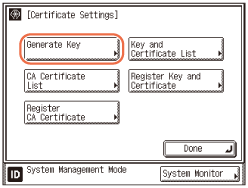
Press [Generate Key].
5
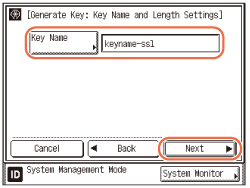
Name the key pair.
|
1
|
Press [Key Name] → enter a name for the key pair (up to 24 characters) using the on-screen keyboard → press [OK].
 |
|
2
|
Press [Next].
|
6
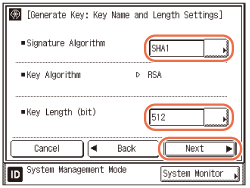
Specify the signature algorithm and the key length.
|
1
|
Press the Signature Algorithm drop-down list → press [SHA1], [SHA256], [SHA384], or [SHA512] to select the desired hash algorithm.
 IMPORTANT:
SHA384 and SHA512 are supported only when the key length is 1024 bits or more.
|
|
2
|
Press the Key Length drop-down list → press [512], [1024], [2048], or [4096] to select the desired key length (expressed in bits).
|
|
3
|
Press [Next].
|
7
Specify the dates from and to which the certificate is valid.
|
1
|
Press [Validity Start Date] → enter the date (day, month, and year) from which the certificate is valid using
 - -  (numeric keys). (numeric keys).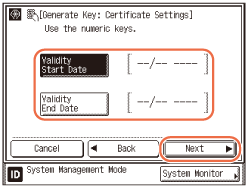 |
|
2
|
Press [Validity End Date] → enter the date (day, month, and year) to which the certificate is valid using
 - -  (numeric keys). (numeric keys).IMPORTANT:
The date set for [Validity End Date] must not be earlier than [Validity Start Date].
|
|
3
|
Press [Next].
|
8
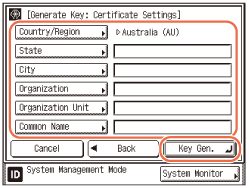
Specify the details for the self-signed server certificate → press [Key Gen.] to generate the key pair.
IMPORTANT:
At least one of the items listed below must be entered.
A DNS server is required in order to use the machine’s FQDN as the common name.
The generated key pair cannot be used for TLS communications until it is set as the default key.
Specify the following items:
|
|
[Country/Region]:
|
Press to select a country/region from the list. If [Other] is selected, you can specify the country/region by entering an Internet country code using the on-screen keyboard. An Internet country code consists of two uppercase letters, such as US, UK, etc.
|
|
[State]:
|
Press to enter the state name (up to 24 characters) using the on-screen keyboard.
|
|
|
[City]:
|
Press to enter the city name (up to 24 characters) using the on-screen keyboard.
|
|
|
[Organization]:
|
Press to enter the organization name (up to 24 characters) using the on-screen keyboard.
|
|
|
[Organization Unit]:
|
Press to enter the name of the organization unit, such as a department, section, etc., (up to 24 characters) using the on-screen keyboard.
|
|
|
[Common Name]:
|
Press to enter the machine’s IP address or FQDN (up to 48 characters) using the on-screen keyboard → press [OK].
|
NOTE:
For instructions on how to manage the key pair files, see Checking/Deleting a Key and Certificate.
9
Proceed to set the default key pair for TLS communications.
For help, see Setting the Default Key for TLS Communications.
Registering a Key and Certificate
If you have installed a key pair (or a private key and certificate) in the machine from a web browser (Remote UI), register the key pair as described below.
1
Press  (Additional Functions) → [System Settings] → [Network Settings].
 (Additional Functions) → [System Settings] → [Network Settings].
For help, see step 1 in Generating a Key Pair for TLS Communications.
2
Press [TCP/IP Settings] → press [ ] or [
 ] until [Certificate Settings] appears → press [Certificate Settings].
 ] or [
 ] until [Certificate Settings] appears → press [Certificate Settings].
For help, see steps 2 and 3 in Generating a Key Pair for TLS Communications.
3
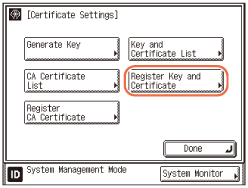
Press [Register Key and Certificate].
4
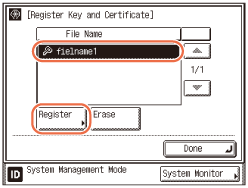
Register the desired key and certificate.
|
1
|
Select the key pair file you want to register → press [Register].
 NOTE:
Up to three key pairs can be registered.
If you want to delete unnecessary files, select the file → press [Erase] → [Yes].
|
|
2
|
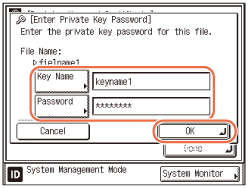
Press [Key Name] → enter the name of the private key (up to 24 characters) using the on-screen keyboard → press [OK].
 |
|
3
|
Press [Password] → enter the password for the private key (up to 24 characters) using the on-screen keyboard → press [OK].
|
|
4
|
Press [OK].
|
5
Restart the machine.
Turn OFF the machine, wait at least 10 seconds, and then turn it ON.
|
NOTE
|
|
For instructions on how to manage the registered key pair and certificate, see Checking/Deleting a Key and Certificate.
|
Checking/Deleting a Key and Certificate
You can display the details of registered key pairs and check how they are currently being used. Delete any unnecessary key pair files including those that are corrupted or marked as invalid.
1
Press  (Additional Functions) → [System Settings] → [Network Settings].
 (Additional Functions) → [System Settings] → [Network Settings].
For help, see step 1 in Generating a Key Pair for TLS Communications.
2
Press [TCP/IP Settings] → press [ ] or [
 ] until [Certificate Settings] appears → press [Certificate Settings].
 ] or [
 ] until [Certificate Settings] appears → press [Certificate Settings].
For help, see steps 2 and 3 in Generating a Key Pair for TLS Communications.
3
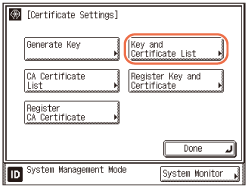
Press [Key and Certificate List].
4
Check or delete the desired keys and certificates.
|
IMPORTANT
|
|
If
|
If you want to display the details of a certificate:
|
1
|
Select the key and certificate you want to check → press [Cert. Details].
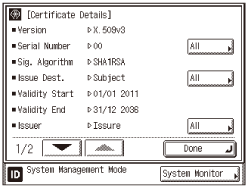
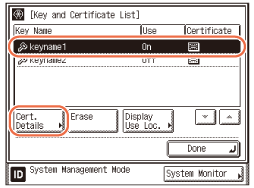 The certificate details are displayed.
 NOTE:
Press [All] to display the complete information of the listing.
If [Cert. Verif.] is pressed, the machine checks for errors in the certificate.
|
If you want to check what a key pair is being used for:
|
1
|
Select the key and certificate with ‘On’ indicated under <Use> → press [Display Use Loc.].
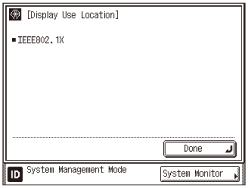
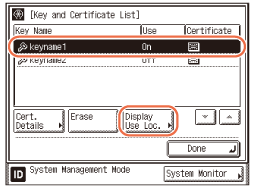 The Display Use Location screen is displayed.
 |
If you want to delete a registered key pair:
|
1
|
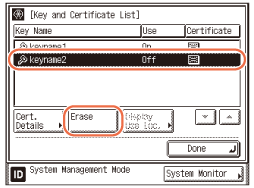
Select the key pair that you want to erase → press [Erase].
 IMPORTANT:
You may not be able to delete a key pair if ‘On’ is indicated under <Use> in the list. In this case, press [Display Use Loc.] to check what the key pair is being used for and perform the following:
If the key pair is used for TLS, disable the TLS settings for e-mails/I-faxes and the Remote UI. (Setting up E-Mail / I-Fax Function, Restricting the Remote UI)
If the key pair is used for IEEE802.1X authentication, register a new key pair and set it as the default key. (Registering a Key and Certificate, Selecting the IEEE802.1X Authentication Method) The key pair reset to ‘Off’ can be deleted.
|
|
2
|
Press [Yes] to erase the selected file.
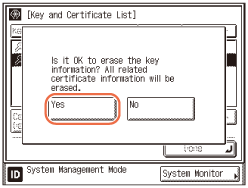 To quit, press [No].
|
|
3
|
Restart the machine.
Turn OFF the machine, wait at least 10 seconds, and then turn it ON.
|
Registering a CA Certificate
Apart from the X.509 CA certificates (DER) pre-installed in the machine, you can install additional CA certificates. If you have installed a CA certificate in the machine from a web browser (Remote UI), register the certificate as described below.
1
Press  (Additional Functions) → [System Settings] → [Network Settings].
 (Additional Functions) → [System Settings] → [Network Settings].
For help, see step 1 in Generating a Key Pair for TLS Communications.
2
Press [TCP/IP Settings] → press [ ] or [
 ] until [Certificate Settings] appears → press [Certificate Settings].
 ] or [
 ] until [Certificate Settings] appears → press [Certificate Settings].
For help, see steps 2 and 3 in Generating a Key Pair for TLS Communications.
3
Press [Register CA Certificate].
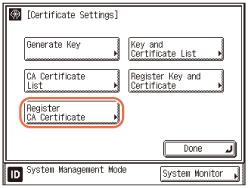
4
Register the CA certificate.
|
1
|
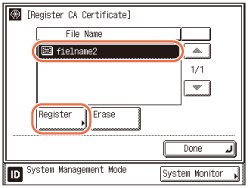
Select the CA certificate file you want to register → press [Register].
 NOTE:
Up to 10 CA certificates can be registered.
If you want to delete unnecessary files, select the file → press [Erase] → [Yes].
|
|
2
|
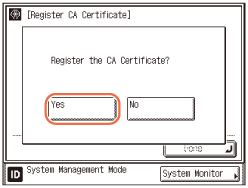
Press [Yes].
 |
5
Restart the machine.
Turn OFF the machine, wait at least 10 seconds, and then turn it ON.
|
NOTE
|
|
For instructions on how to manage the registered CA certificate, see Checking/Deleting a CA Certificate.
|
Checking/Deleting a CA Certificate
You can display the details of registered CA certificates. You can also delete unnecessary CA certificates.
1
Press  (Additional Functions) → [System Settings] → [Network Settings].
 (Additional Functions) → [System Settings] → [Network Settings].
For help, see step 1 in Generating a Key Pair for TLS Communications.
2
Press [TCP/IP Settings] → press [ ] or [
 ] until [Certificate Settings] appears → press [Certificate Settings].
 ] or [
 ] until [Certificate Settings] appears → press [Certificate Settings].
For help, see steps 2 and 3 in Generating a Key Pair for TLS Communications.
3
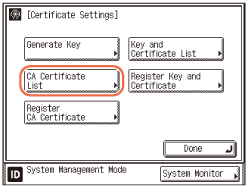
Press [CA Certificate List].
4
Check or delete the desired CA certificates.
If you want to display the details of a CA certificate:
|
1
|
Select the CA certificate you want to check → press [Cert. Details].
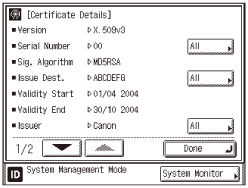
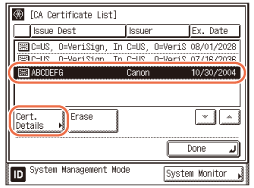 The certificate details are displayed.
 NOTE:
Press [All] to display the complete information of the listing.
If [Cert. Verif.] is pressed, the machine checks for errors in the certificate.
|
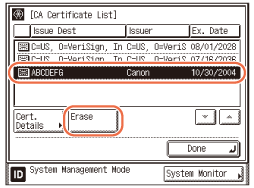
If you want to delete a registered CA certificate:
|
1
|
Select the CA certificate you want to erase → press [Erase].
 |
|
2
|
Press [Yes] to erase the selected file.
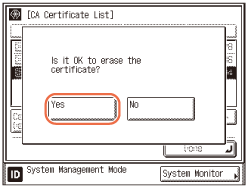 To quit, press [No].
|
|
3
|
Restart the machine.
Turn OFF the machine, wait at least 10 seconds, and then turn it ON.
|