Restricting the Send Function
This section describes the setting items that restrict the Send function.
Setting a Password for the Address Book
You can set a password for the Address Book. If a password is set, restrictions can be placed on registering, editing, and erasing destinations.
|
IMPORTANT
|
|
This setting is available only when the Send function (optional for the imageRUNNER 2545/2535/2530/2525/2520) is activated or the optional Super G3 Fax Board-AG1 is attached to the machine.
|
|
NOTE
|
|
It is not necessary to enter the Address Book password when you have logged in to the machine by entering the System Manager ID and System Password.
You can enter up to seven digits for the password.
|
1
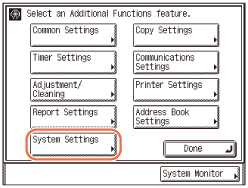
Press  (Additional Functions) → [System Settings].
 (Additional Functions) → [System Settings].
2
Press [ ] or [
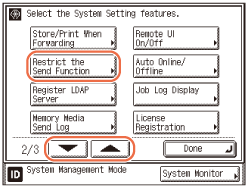
 ] until [Restrict the Send Function] appears → press [Restrict the Send Function].
 ] or [
 ] until [Restrict the Send Function] appears → press [Restrict the Send Function].
3
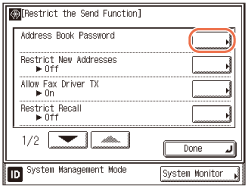
Press [Address Book Password].
4
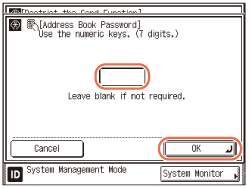
Enter the desired password using  -
-  (numeric keys) → press [OK].
 -
-  (numeric keys) → press [OK].
If you set a password, it is necessary to enter the password whenever you want to change Address Book settings, including the one-touch buttons.
You cannot store a password that only consists of zeros, such as <0000000>.
If you enter fewer than seven digits, the machine stores the password with leading zeros.
Example: If <02> or <002> is entered, <0000002> is stored.
IMPORTANT:
Since there is no way to check the stored password, be sure to write it down, and keep it in a safe place.
NOTE:
If you make a mistake when entering the password, press  (Clear) → enter the correct password.
 (Clear) → enter the correct password.
If you do not want to use the Address Book password, delete the registered password by pressing  (Clear) → [OK].
 (Clear) → [OK].
5
Press  (Reset) to return to the top screen.
 (Reset) to return to the top screen.
Restricting New Addresses
This mode enables you to restrict the entry of new destinations. When you set Restrict New Addresses to ‘On’, the following are restricted:
Specifying a destination using the numeric keys.
Changing registered destinations.
Registering new destinations.
|
IMPORTANT
|
|
This setting is available only when the Send function (optional for the imageRUNNER 2545/2535/2530/2525/2520) is activated or the optional Super G3 Fax Board-AG1 is attached to the machine.
If Restrict New Addresses is set to ‘On’, all stored settings in the Recall mode are erased.
|
|
NOTE
|
|
The default setting is ‘Off’.
|
1
Press  (Additional Functions) → [System Settings].
 (Additional Functions) → [System Settings].
For help, see step 1 in Setting a Password for the Address Book.
2
Press [ ] or [
 ] until [Restrict the Send Function] appears → press [Restrict the Send Function].
 ] or [
 ] until [Restrict the Send Function] appears → press [Restrict the Send Function].
For help, see step 2 in Setting a Password for the Address Book.
3
Press [Restrict New Addresses].
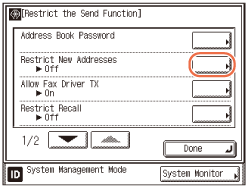
4
Press [On] or [Off] → [OK].
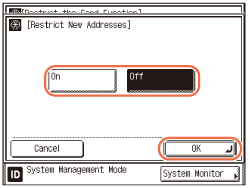
[On]: You cannot specify new destinations.
[Off]: You can specify new destinations.
5
Press  (Reset) to return to the top screen.
 (Reset) to return to the top screen.
Enabling Fax Transmission via the Fax Driver
This mode enables you to send faxes via the fax driver.
|
IMPORTANT
|
|
This setting is available only when the optional Super G3 Fax Board-AG1 is attached to the machine.
|
|
NOTE
|
|
The default setting is ‘On’.
|
1
Press  (Additional Functions) → [System Settings].
 (Additional Functions) → [System Settings].
For help, see step 1 in Setting a Password for the Address Book.
2
Press [ ] or [
 ] until [Restrict the Send Function] appears → press [Restrict the Send Function].
 ] or [
 ] until [Restrict the Send Function] appears → press [Restrict the Send Function].
For help, see step 2 in Setting a Password for the Address Book.
3
Press [Allow Fax Driver TX].
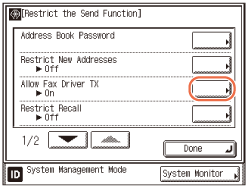
4
Press [On] or [Off] → [OK].
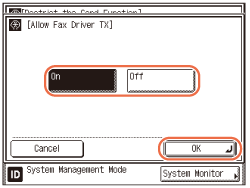
[On]: The machine can send documents via the fax driver.
[Off]: The machine cannot send documents via the fax driver.
5
Press  (Reset) to return to the top screen.
 (Reset) to return to the top screen.
Restricting Recall
This mode enables you to restrict the use of the Recall function.
|
IMPORTANT
|
|
This setting is available only when the Send function (optional for the imageRUNNER 2545/2535/2530/2525/2520) is activated or the optional Super G3 Fax Board-AG1 is attached to the machine.
|
|
NOTE
|
|
The default setting is ‘Off’.
|
1
Press  (Additional Functions) → [System Settings].
 (Additional Functions) → [System Settings].
For help, see step 1 in Setting a Password for the Address Book.
2
Press [ ] or [
 ] until [Restrict the Send Function] appears → press [Restrict the Send Function].
 ] or [
 ] until [Restrict the Send Function] appears → press [Restrict the Send Function].
For help, see step 2 in Setting a Password for the Address Book.
3
Press [Restrict Recall].
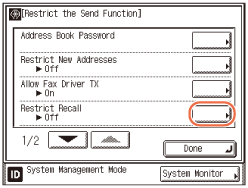
4
Press [On] or [Off] → [OK].
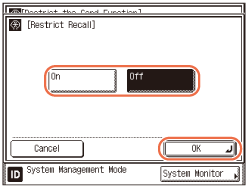
[On]: You cannot use the Recall function.
[Off]: You can use the Recall function.
5
Press  (Reset) to return to the top screen.
 (Reset) to return to the top screen.
Entering a Fax Number Twice to Confirm It
This mode helps to prevent you from sending documents to the wrong destination when specifying the fax number using  -
-  (numeric keys). If you set this mode to ‘On,’ you will be asked to enter the fax number again after pressing
  (Start).
 -
-  (numeric keys). If you set this mode to ‘On,’ you will be asked to enter the fax number again after pressing
  (Start).
|
IMPORTANT
|
|
This setting is available only when the optional Super G3 Fax Board-AG1 is attached to the machine.
|
|
NOTE
|
|
The default setting is ‘Off’.
|
1
Press  (Additional Functions) → [System Settings].
 (Additional Functions) → [System Settings].
For help, see step 1 in Setting a Password for the Address Book.
2
Press [ ] or [
 ] until [Restrict the Send Function] appears → press [Restrict the Send Function].
 ] or [
 ] until [Restrict the Send Function] appears → press [Restrict the Send Function].
For help, see step 2 in Setting a Password for the Address Book.
3
Press [ ] or [
 ] until [Confirm Entered Fax Numbers] appears → press [Confirm Entered Fax Numbers].
 ] or [
 ] until [Confirm Entered Fax Numbers] appears → press [Confirm Entered Fax Numbers].
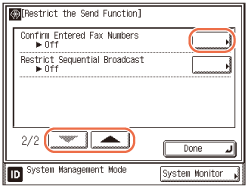
4
Press [On] or [Off] → [OK].
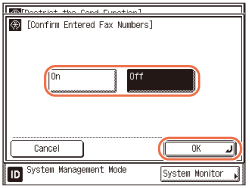
[On]: The confirmation screen appears when you enter a fax number using  -
-  (numeric keys).
 -
-  (numeric keys).
[Off]: The confirmation screen does not appear.
5
Press  (Reset) to return to the top screen.
 (Reset) to return to the top screen.
Restricting Sequential Broadcast
This mode enables you to restrict sending to multiple destinations when one or more fax numbers are included (except for those registered in a group address).
|
IMPORTANT
|
|
This setting is available only when the optional Super G3 Fax Board-AG1 is attached to the machine.
|
|
NOTE
|
|
The default setting is ‘Off’.
|
1
Press  (Additional Functions) → [System Settings].
 (Additional Functions) → [System Settings].
For help, see step 1 in Setting a Password for the Address Book.
2
Press [ ] or [
 ] until [Restrict the Send Function] appears → press [Restrict the Send Function].
 ] or [
 ] until [Restrict the Send Function] appears → press [Restrict the Send Function].
For help, see step 2 in Setting a Password for the Address Book.
3
Press [ ] or [
 ] until [Restrict Sequential Broadcast] appears → press [Restrict Sequential Broadcast].
 ] or [
 ] until [Restrict Sequential Broadcast] appears → press [Restrict Sequential Broadcast].
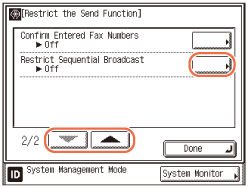
4
Press [Broadcast Confirmation], [Prohibit Broadcast], or [Off] → [OK].
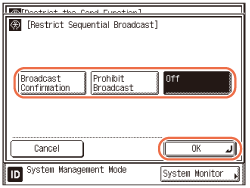
[Broadcast Confirmation]: A confirmation message appears if you try to send documents with sequential broadcasting.
[Prohibit Broadcast]: You cannot send documents with sequential broadcasting.
[Off]: Sending documents with sequential broadcasting is not restricted.
5
Press  (Reset) to return to the top screen.
 (Reset) to return to the top screen.
Restricting Sending Documents to a USB Memory Media Device
This mode enables you to restrict sending documents to a USB memory media device.
|
NOTE
|
|
The default setting is ‘On’.
|
1
Press  (Additional Functions) → [System Settings].
 (Additional Functions) → [System Settings].
For help, see step 1 in Setting a Password for the Address Book.
2
Press [ ] or [
 ] until [Memory Media Settings] appears → press [Memory Media Settings].
 ] or [
 ] until [Memory Media Settings] appears → press [Memory Media Settings].
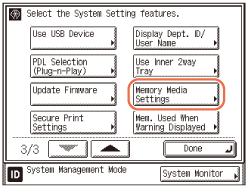
3
Press [Use Scan to Memory Media].
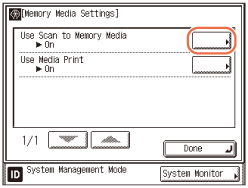
4
Press [On] or [Off] → [OK].
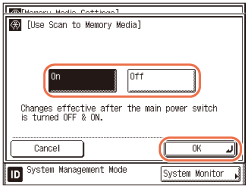
[On]: You can send documents to a USB memory media device.
[Off]: You cannot send documents to a USB memory media device.
5
Restart the machine.
Turn OFF the machine, wait at least 10 seconds, and then turn it ON.