Adjusting the Machine Settings
This section describes how to make adjustments to the machine settings for improved performance.
Improving Print Quality and Density
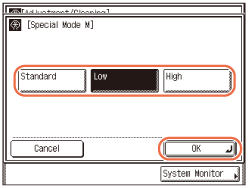
If you notice a degradation in print quality or irregularity in print density, use Special Mode M. This mode enables you to select the machine’s transfer output from three levels. Select a higher output level if you want to copy or print on paper that is hard for toner to be fixed on, such as an index card.
|
NOTE
|
|
The default setting is ‘Standard’.
|
1
Press  (Additional Functions).
(Additional Functions).The Additional Functions menu appears.
2
Press [Adjustment/Cleaning].
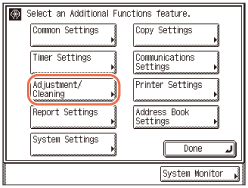
3
Press [ ] or [
 ] until [Special Mode M] appears → press [Special Mode M].
] or [] until [Special Mode M] appears → press [Special Mode M].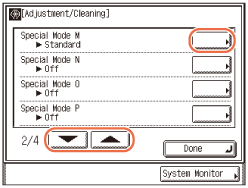
4
Press [Standard], [Low], or [High] to select the desired setting → press [OK].
|
|
[Standard]:
|
Press to set the machine’s transfer output to a moderate level.
|
|
|
[Low]:
|
Press to set the machine’s transfer output to a lower level.
|
|
|
[High]:
|
Press to set the machine’s transfer output to a higher level.
|
The selected mode is set.
5
Press  (Reset) to return to the top screen.
(Reset) to return to the top screen.Preventing Paper Curl or Jams Caused by a High-humidity Environment
When printing on paper that has absorbed moisture, the paper may curl or jam. If the machine is used in a high-humidity environment, use Special Mode N to prevent paper from curling or jamming.
|
IMPORTANT
|
|
Do not use paper that has been exposed to high temperature or humidity for an extended period of time. Printing on such paper may result in frequent paper jams.
|
|
NOTE
|
|
If Special Mode N is enabled, it may take the machine longer to print. If you notice that printing has slowed, disable the mode.
The default setting may vary depending on the country of purchase.
|
1
Press (Additional Functions) → [Adjustment/Cleaning].
(Additional Functions) → [Adjustment/Cleaning].For help, see Improving Print Quality and Density.
2
Press [] or [] until [Special Mode N] appears → press [Special Mode N].
] or [] until [Special Mode N] appears → press [Special Mode N].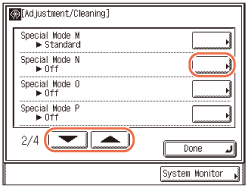
3
Select the desired setting:
To set the machine to automatically select the appropriate curl prevention level:
|
1
|
Press [Auto] → [OK].
The selected mode is set.
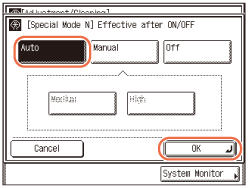 |
To manually select the curl prevention level:
|
1
|
Press [Manual].
 |
|
2
|
Press [Medium] or [High] to select the curl prevention level → press [OK].
[Medium]:
Press to prevent curling of paper that has absorbed moisture.
[High]:
Press to prevent paper curls more effectively than when ‘Medium’ is selected.
The selected mode is set.
|
|
IMPORTANT
|
|
If you enable the mode when paper is not moistened, the print quality may be deteriorated.
|
|
NOTE
|
|
To disable the mode, press [Off] → [OK].
If [High] is selected, printing may become slower.
|
4
Restart the machine.
Turn OFF the machine, wait at least 10 seconds, and then turn it ON.
Preventing Paper Jams when Printing on the Back Side of Printed Paper
When printing on the back side of printed paper, paper may be jammed more frequently because the paper does not separate easily from the drum. In this case, use Special Mode O to prevent paper jams.
|
NOTE
|
|
The default setting is ‘Off’.
|
1
Press (Additional Functions) → [Adjustment/Cleaning].
(Additional Functions) → [Adjustment/Cleaning].For help, see Improving Print Quality and Density.
2
Press [] or [] until [Special Mode O] appears → press [Special Mode O].
] or [] until [Special Mode O] appears → press [Special Mode O].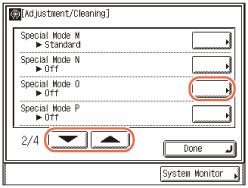
3
Press [On] or [Off] to enable or disable the mode → press [OK].
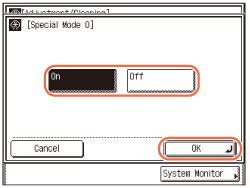
The selected mode is set.
4
Press (Reset) to return to the top screen.
(Reset) to return to the top screen.Preventing Paper Curl Due to Paper Type
You can take advantage of Special Mode P when using paper that curls easily, such as lightweight paper or recycled paper. Special Mode P prevents such types of paper from curling.
|
NOTE
|
|
If both Special Mode N and Special Mode P are enabled, Special Mode N overrides Special Mode P.
The default setting is ‘Off’.
|
1
Press (Additional Functions) → [Adjustment/Cleaning].
(Additional Functions) → [Adjustment/Cleaning].For help, see Improving Print Quality and Density.
2
Press [] or [] until [Special Mode P] appears → press [Special Mode P].
] or [] until [Special Mode P] appears → press [Special Mode P].
3
Press [Off], [Medium], or [High] to select the desired setting → press [OK].
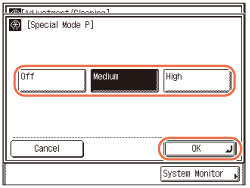
|
|
[Off]:
|
Press to disable the mode.
|
|
|
[Medium]:
|
Press to prevent paper from curling.
|
|
|
[High]:
|
Press to prevent paper curls more effectively than when ‘Medium’ is selected.
|
The selected mode is set.
4
Press (Reset) to return to the top screen.
(Reset) to return to the top screen.Adjusting Print Speed for Higher Print Quality
In some operating environments, it may become difficult for the toner to become fixed on the paper. Special Mode G can solve this problem by reducing the print speed, thus allowing more time for the toner to become fixed on the paper. This mode is useful especially when printing on heavyweight or lightweight paper.
|
NOTE
|
|
The default setting is ‘Off’.
|
1
Press (Additional Functions) → [Adjustment/Cleaning].
(Additional Functions) → [Adjustment/Cleaning].For help, see Improving Print Quality and Density.
2
Press [] or [] until [Special Mode G] appears → press [Special Mode G].
] or [] until [Special Mode G] appears → press [Special Mode G].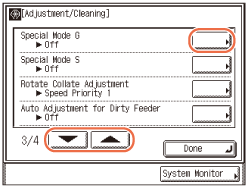
3
Press [On] or [Off] to enable or disable the mode → press [OK].

The selected mode is set.
NOTE:
If Special Mode G is set to ‘On’, printing may become slower.
4
Restart the machine.
Turn OFF the machine, wait at least 10 seconds, and then turn it ON.
Reducing Wait Time for the Next Job
When you continue to make copies after copying on paper such as A4R and A5R, it may take a long time for the machine to resume printing. In this case, use Special Mode S to reduce the wait time for your next job.
|
NOTE
|
|
If this mode is enabled, the previously printed image may re-appear faintly on the next output.
The default setting is ‘Off’.
|
1
Press (Additional Functions) → [Adjustment/Cleaning].
(Additional Functions) → [Adjustment/Cleaning].For help, see Improving Print Quality and Density.
2
Press [] or [] until [Special Mode S] appears → press [Special Mode S].
] or [] until [Special Mode S] appears → press [Special Mode S].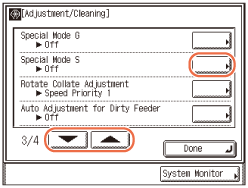
3
Press [On] or [Off] to enable or disable the mode → press [OK].
The selected mode is set.

4
Press (Reset) to return to the top screen.
(Reset) to return to the top screen.Adjusting Output Speed in the Rotate + Collate Mode
Printing with the Rotate + Collate mode involves two different paper sources, and a wait time is required to switch them. You can make this wait time shorter or longer by selecting whether to give priority to the speed or image quality.
|
IMPORTANT
|
|
This setting is not available when the optional Inner Finisher-B1 is attached to the machine.
|
|
NOTE
|
|
The default setting is ‘Speed Priority 1’.
|
1
Press (Additional Functions) → [Adjustment/Cleaning].
(Additional Functions) → [Adjustment/Cleaning].For help, see Improving Print Quality and Density.
2
Press [] or [] until [Rotate Collate Adjustment] appears → press [Rotate Collate Adjustment].
] or [] until [Rotate Collate Adjustment] appears → press [Rotate Collate Adjustment].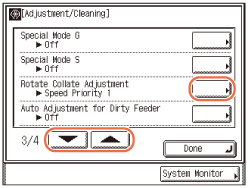
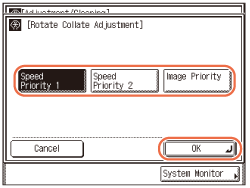
3
Press [Speed Priority 1], [Speed Priority 2], or [Image Priority] to select the desired setting → press [OK].
|
|
[Speed Priority 1]:
|
Press to reduce the wait time. The image quality is degraded.
|
|
|
[Speed Priority 2]:
|
Press to reduce the wait time to a lesser degree. The image quality is moderate.
|
|
|
[Image Priority]:
|
Press to give weight to the image quality over the speed. The wait time may be long, but the image quality is high.
|
The selected mode is set.
4
Press (Reset) to return to the top screen.
(Reset) to return to the top screen.Feeder Smudge Adjustment
If the feeder is dirty, dots or lines may appear on copies or prints. The Auto Adjustment for Dirty Feeder mode prevents dirt and grime in the feeder from appearing on your copies and prints.
|
NOTE
|
|
This mode is available only when the machine is equipped with the feeder (optional for the imageRUNNER 2545/2535/2530/2525/2520).
Some dots or lines may continue to appear even if the mode is enabled. However, copies and prints are significantly clearer than when the mode is disabled.
The default setting is ‘On’.
|
1
Press (Additional Functions) → [Adjustment/Cleaning].
(Additional Functions) → [Adjustment/Cleaning].For help, see Improving Print Quality and Density.
2
Press [] or [] until [Auto Adjustment for Dirty Feeder] appears → press [Auto Adjustment for Dirty Feeder].
] or [] until [Auto Adjustment for Dirty Feeder] appears → press [Auto Adjustment for Dirty Feeder].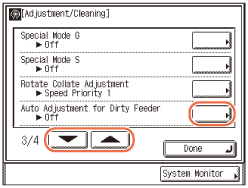
3
Press [On] or [Off] to enable or disable the mode → press [OK].
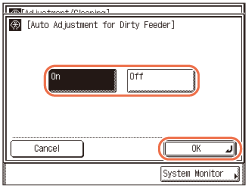
The selected mode is set.
4
Press (Reset) to return to the top screen.
(Reset) to return to the top screen.Adjusting Density for Printing Security Images
Special Mode E enables you to adjust the density of the hidden text and background so that they can be more visible on the prints. This mode is particularly suitable for clearly printing security images, such as printable watermarks.
|
NOTE
|
|
The default setting is ‘Off’.
|
1
Press (Additional Functions) → [Adjustment/Cleaning].
(Additional Functions) → [Adjustment/Cleaning].For help, see Improving Print Quality and Density.
2
Press [] or [] until [Special Mode E] appears → press [Special Mode E].
] or [] until [Special Mode E] appears → press [Special Mode E].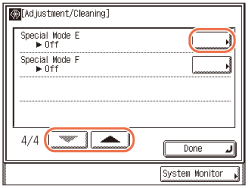
3
Press [On] or [Off] to enable or disable the mode → press [OK].

The selected mode is set.
4
Press (Reset) to return to the top screen.
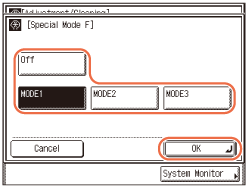
(Reset) to return to the top screen.Preventing Toner from Smudging or Bleeding on Prints
In a high humidity environment, toner may smudge or bleed easily on prints. Special Mode F may be able to solve this problem.
|
NOTE
|
|
The default setting is ‘Off’.
|
1
Press (Additional Functions) → [Adjustment/Cleaning].
(Additional Functions) → [Adjustment/Cleaning].For help, see Improving Print Quality and Density.
2
Press [] or [] until [Special Mode F] appears → press [Special Mode F].
] or [] until [Special Mode F] appears → press [Special Mode F].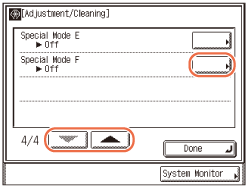
3
Press [Off], [MODE1], [MODE2], or [MODE3] to select the desired setting → press [OK].
|
|
[Off]:
|
Press to disable the mode.
|
|
|
[MODE1]:
|
Press to prevent toner from smudging or bleeding on prints.
|
|
|
[MODE2]:
|
Press to prevent toner from smudging or bleeding on prints more effectively than [MODE1]. Use this mode if the problem persists after [MODE1] was selected.
|
|
|
[MODE3]:
|
Press to prevent toner from smudging or bleeding on prints more effectively than [MODE1] or [MODE2]. Use this mode if the problem persists after [MODE2] was selected.
|
The selected mode is set.
4
Press (Reset) to return to the top screen.
(Reset) to return to the top screen.