Backing Up Stored Data
You can back up inbox data stored in the machine to an USB HDD (USB connected external hard disk) or an SMB server. Stored data backed up in this way can be restored to the machine.
The following data can be backed up and restored:
Mail Box Settings (mail box names, PINs, and auto erase times)
Fax Inbox Settings (fax inbox names and PINs)
Memory RX Inbox Settings (PINs)
Advanced Space attribute information
Attribute information for Advanced Space documents
Mail Box/Fax Inbox/Memory RX Inbox/Advanced Space files
Form for Superimpose Image
|
IMPORTANT
|
|
It may take some time to complete a stored data backup/restore operation. Do not turn the machine's main power OFF until the operation is complete. Otherwise, the machine may malfunction.
If you back up/restore stored data without restarting the machine after changing the language displayed on the touch panel display by pressing [Preferences] (Settings/Registration) from the control panel of the machine, the stored data may not be backed up/restored properly.
You can enter up to 128 characters for the folder name of the backup location for stored data.
The stored data backed up using this function can be restored only to this machine or upgrades of the same model.
If you perform authentication management for the users that use the Advanced Space when backing up, export the user information for the Advanced Space. You can use data on the Advanced Space to restore if you import user information. (See "Registering/Editing the User Information of User Access Control for Advanced Space.")
When restoring backed up data from the 2.5inch/1TB HDD to the standard-equipped hard disk (160GB), some data may not be restored, regardless of the file size of the backup data.
To restore data in the Advanced Space, the machine's HDD capacity must be no less than at the time of backup, regardless of the size of the backed up data.
It is recommended that you insert USB HDD for backing up and restoring data into the USB port located towards the back on the right side of the machine.
USB HDD to be used for backing up and restoring data must meet the following conditions:
Formatted using FAT32
Memory capacity of no less than 32 GB after formatting
External power supply (not bus powered)
Contains a folder with the identical name and path as the specified backup location
If you attach more than one compatible USB HDD to the machine, you cannot backup/restore data.
While backing up to the USB HDD the machine's performance may not be optimal, depending on the remaining capacity of the USB HDD.
If there is a file from a computer stored in an Advanced Space that has been opened externally using SMB, backing up to the USB HDD may take some time, depending on the operating system of the computer.
Backing up to the USB HDD may take some time, depending on the remaining capacity of the USB HDD.
Restore data from the location where the data was backed up.
If the data was backed up to a USB HDD, you can only restore the data from a USB HDD.
If the data was backed up to the SMB server, you can only restore the data from the SMB server.
You cannot backup data to the Advanced Space of another machine that has been made accessible on the network as an SMB server.
If the 2.5inch/1TB HDD is attached, you can backup data from the Advanced Space only to the USB HDD.
|
|
NOTE
|
|
For basic information on the saved data, see "Scan and Store" and "Access Stored Files."
It is recommended that you regularly back up important data.
Make sure not to edit or delete backed up data. If you edit backed up data, you may not be able to correctly back up or restore the data.
To backup/restore stored data, it is necessary to log in as an administrator.
|
Setting the Backup Location for Stored Data
You can specify the address, user name, password, and file path of the SMB server used to backup stored data.
1.
Click [Settings/Registration] → select [Data Management] for <Management Settings> → click [Backup Location Settings].
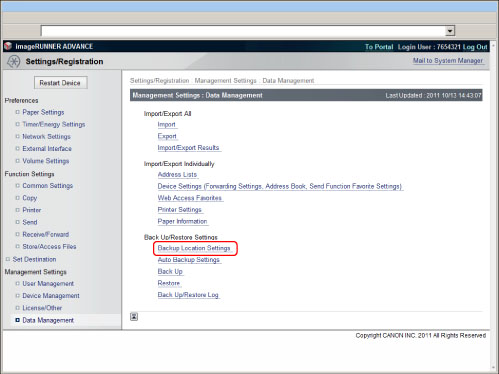
2.
Specify the desired settings → click [OK].
Details of each item are shown below.
|
<USB HDD Settings>
|
|
|
Folder Path:
|
A string that indicates the location of the folder. Specify where to store the backup data on the USB HDD.
|
|
<SMB Server Settings>
|
|
|
Host IP Address:
|
The unique name used to identify the file server on the network. Enter the IP address of the SMB server to back up the inbox data. Enter the IP address of the SMB server to back up the inbox documents to in the following format:
\\Server Name\Name of Shared Folder.
|
|
User Name:
|
Enter the user name for the SMB server used to back up the inbox data.
|
|
Password:
|
Enter the password for the SMB server used to back up the inbox data.
|
|
Confirm:
|
Enter the password again. If the value you enter here is different from the value entered for <Password>, an error dialog box appears.
|
|
Folder Path:
|
A string that indicates the location of the folder. Specify where to store the backup data on the SMB server.
|
|
Encrypt Backup Data:
|
Select and enter a password to encrypt the backup data.
|
|
NOTE
|
|
If you do not enter the correct host IP address, user name, password, and file path, the backup will not be performed.
You can enter up to 128 characters for the host IP address.
You can enter up to 128 characters for the user name.
You can enter 7 to 48 characters for the password.
You can enter up to 255 characters for the file path.
Make sure that the user limit of the folder is set to allow two or more users. If the user limit is set to allow only one user, the data will not be able to be restored correctly.
If you select to encrypt the backup data, the backup process may take longer.
|
Performing the Stored Data Backup
Before upgrading the firmware of the machine, you can back up the stored data stored in the machine to the location specified in "Setting the Backup Location for Stored Data."
You can back up stored data to a destination folder a maximum of 100 times. Immediately after performing the backup, check [Back Up/Restore Log] in [Data Management].
If the number of times exceeds 100, an error is displayed in [Result]. In this case, change the destination folder for backups.
To check the number of backups, select [Data Management] → click [Restore] → [Display Backup Data].
To perform a backup, make sure there is enough space in your hard drive. Before performing a backup, check the screen in step 2 to see if you have enough space.
1.
Click [Settings/Registration] → select [Data Management] for <Management Settings> → click [Back Up].
2.
Click [Execute].

You can confirm the status of the backup process in <Backup Status>.
Select [All] or [Changes] for <Backup Method>. [All] backs up all of the stored data. [Changes] backs up only the stored data updated or added since the last backup.
|
IMPORTANT
|
|
Do not start a backup in the following cases. The backup process will not start normally and an error will occur.
If an operation is performed with the Advanced Space, Network, or Memory Media from the touch panel display
If the Advanced Space is open to the public with <Prohibit Writing from External> set to [Off] (on the Settings/Registration screen, click [Function Settings] → [Store/Access Files] → [Advanced Box Settings] → [Set Details]) and a file is opened from a computer
If <Prohibit Writing from External> is set to [On], the backup can be performed even if a file is opened from the Advanced Space with a computer.
If the message <A server error has occurred.> appears, the network settings of the destination folder for backups may not be correct. For information on network settings, see "Network."
|
|
NOTE
|
|
If you want to schedule a backup, click [Settings/Registration] → [Data Management] → [Auto Backup Settings]. Select either [Back Up All] or [Back Up Changes] and [Everyday] or [Specify Days] → enter the time to perform the backup.
[Changes] for Advanced Space backs up only the data updated or added since all the stored data was backed up. [Changes] always backs up data based on differences from [All] as opposed to the last [Changes] backup.
|
Restoring Backed Up Data
You can restore stored data which has been backed up on a server to the machine.
1.
Click [Settings/Registration] → select [Data Management] for <Management Settings> → click [Restore].
2.
Click [Display Backup Data].
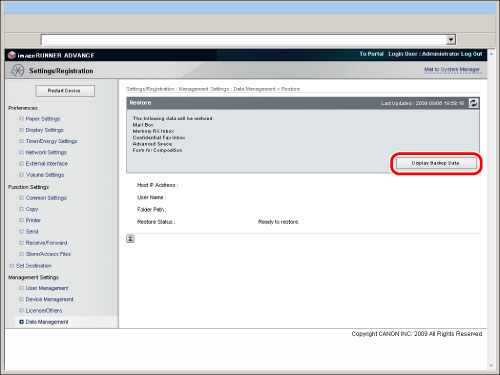
3.
Select the backup data you want to restore → click [Execute].
The stored data will be restored after you restart the machine (the main power of the machine is turned OFF, and then ON again).
|
NOTE
|
|
If you want to display the backup/restore log, click [Settings/Registration] → [Data Management] → [Back Up/Restore Log].
If you want to restore encrypted backup data, enter the same password used when backing up the data.
Depending on the settings of the machine, the backup data may not be completely restored, or some documents may be automatically printed.
Restoration is performed after all of the data stored in the machine, or documents that are being sent, received, or stored, are erased.
|