Automatic Gradation Adjustment
You can recalibrate the machine when you notice irregularities in the colour of the copies or prints, such as when copies turn out to be different from the original in gradation or density.
This is a precise recalibration that is made to the gradation and density settings of the machine. The procedure involves making test pages and placing them on the platen glass for scanning. Once this is complete, the machine automatically corrects the irregularities.
Automatic gradation adjustment may differ, depending on the optional equipment attached to the machine.
If the Duplex Color Image Reader Unit-G1 is attached, two types of gradation adjustments, quick adjustment and full adjustment, can be selected.
Full Adjustment
This is a precise recalibration that is made to the gradation and density settings of the machine. The procedure involves making test pages and placing them on the platen glass for scanning. Once this is complete, the machine automatically corrects the irregularities.
Quick Adjustment
This is a quick and simple adjustment that is made to the gradation and density of the machine. Recalibrations are made internally without outputting any test pages.
If the Duplex Color Image Reader Unit-G1 is not attached, gradation and density adjustments are made internally without outputting any test pages.
|
IMPORTANT
|
|
Auto Adjust Gradation appears in the following situations:
If the Duplex Color Image Reader Unit-G1 is attached
If the imagePASS is installed
If the PCL Printer Kit is activated
If the PS Printer Kit is activated
It is recommended that you select [Full Adjust] when performing an automatic gradation adjustment. Select [Quick Adjust] for a quick, but less complete adjustment between regular full adjustment recalibrations.
Make sure that you place the test pages properly. Accurate recalibrations of the gradation and density settings of the machine cannot be made if the test pages are not scanned correctly.
If the Duplex Color Image Reader Unit-G1 is not attached, only data from the imagePASS, PCL Printer, or PS Printer can be corrected.
|
|
NOTE
|
|
Test pages are not counted as part of the copy or print total page counts.
|
Full Adjustment (If the Duplex Color Image Reader Unit-G1 Is Attached)
1.
Press  (Settings/Registration).
 (Settings/Registration).
 2.
Press [Adjustment/Maintenance] → [Adjust Image Quality] → [Auto Adjust Gradation].
3.
Press [Full Adjust].
4.
Select the paper source → press [OK].
|
IMPORTANT
|
|
Only Plain paper can be used for printing test pages with this machine. You cannot select a paper source loaded with a type of paper other than Plain.
|
5.
Press [Start Printing].
|
NOTE
|
|
If paper appropriate for the test page is not loaded in any paper source, a message asking you to load the appropriate paper appears. Load the appropriate paper in a paper source.
|
6.
Place the first test page on the platen glass → press [Start Scanning].
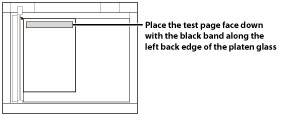
Place the test page face down on the platen glass, with the black bands along the top left back edge of the platen glass by the arrow.

7.
Remove the first test page from the platen glass → press [Start Printing].
8.
Place the second test page on the platen glass → press [Start Scanning].
Place the test page face down on the platen glass, with the black bands along the top left back edge of the platen glass by the arrow.

9.
Remove the second test page from the platen glass → press [Start Printing].
10.
Place the third test page on the platen glass → press [Start Scanning].
Place the test page face down on the platen glass, with the black bands along the top left back edge of the platen glass by the arrow.

11.
Remove the third test page from the platen glass.
Quick Adjustment (If the Duplex Color Image Reader Unit-G1 Is Attached)
1.
Press  (Settings/Registration).
 (Settings/Registration).
2.
Press [Adjustment/Maintenance] → [Adjust Image Quality] → [Auto Adjust Gradation].
3.
Press [Quick Adjust].
4.
Press [Start].
Quick Adjustment (If the Duplex Color Image Reader Unit-G1 Is Not Attached)
1.
Press  (Settings/Registration).
 (Settings/Registration).
 2.
Press [Adjustment/Maintenance] → [Adjust Image Quality] → [Auto Adjust Gradation].
3.
Press [Start].