Printing the TX Terminal ID
You can set to print the terminal ID when sending a fax or I-fax.
The terminal ID is printed at the top of sent documents. Information such as the fax number, name, and I-fax address is printed, enabling the receiver to check the details upon receipt.
|
NOTE
|
|
When using the Fax function with the Remote Fax Kit, TX Terminal ID uses the setting of the remote fax server when sending faxes.
|
1.
Press  (Settings/Registration).
(Settings/Registration). 2.
Press [Function Settings] → [Send] → [Common Settings].
3.
Press [TX Terminal ID].
4.
Select [Print].
Select [Do Not Print] if you do not want to print the terminal ID.
If the fax board is not installed:
Specify each setting → press [OK].
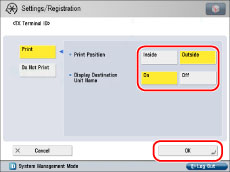
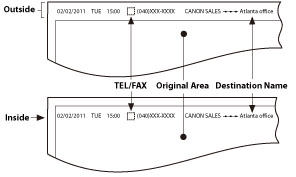
<Print Position>:
|
[Inside]:
|
The Terminal ID information is printed inside the image area on the recipient's paper.
|
|
[Outside]:
|
The Terminal ID information is printed outside the image area on the recipient's paper.
|
<Display Destination Unit Name>:
Select [On] to display the destination name registered in the Address Book in the Terminal ID information.
Example: If you set TX Terminal ID and Display Destination Unit Name to 'On', the information will be printed on the recipient's paper as follows:
If the fax board is installed:
Specify each setting → press [OK].
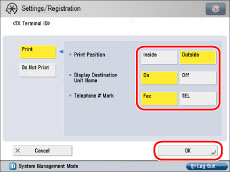
<Print Position>:
|
[Inside]:
|
The Terminal ID information is printed inside the image area on the recipient's paper.
|
|
[Outside]:
|
The Terminal ID information is printed outside the image area on the recipient's paper.
|
<Display Destination Unit Name>:
Select [On] to display the destination name registered in the Address Book in the Terminal ID information.
<Telephone # Mark>:
|
[Fax]:
|
Fax is printed before the fax number.
|
|
[TEL]:
|
TEL is printed before the telephone number.
|
Example: If you set TX Terminal ID and Display Destination Unit Name to 'On', the information will be printed on the recipient's paper as follows: