Printing the TIFF/JPEG File Using the Direct Print Function
1
Start the Remote UI.
2
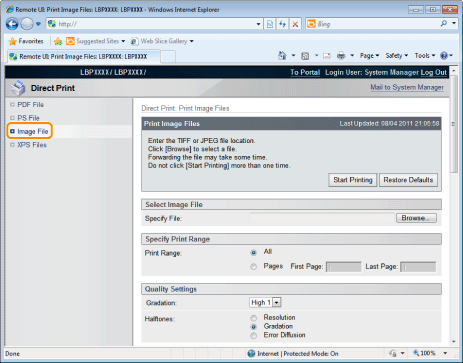
Select [Image File] from the [Direct Print] menu.

3
Specify [Select Image File].
Click [Browse], select the file, and then click [Open].

4
Specify the setting for [Specify Print Range].

[All] | Select if you want to print all the pages. |
[Pages] | Select [Pages], and then enter the starting page number and ending page number if you want to specify the print range. |
5
Specify the setting for [Quality Settings].

[Resolution] | Specify the resolution for printing the data. It is effective to set [600 dpi] when printing photographs at standard quality, and to set [1200 dpi] when printing at a higher quality. | ||||||||
[Gradation] | Specify the gradation process for printing the data. It is effective to set [High 1] when printing photographs at standard quality, and to set [High 2] when printing at a higher quality. | ||||||||
[Halftones] | Specify the halftone display method when printing.
|
6
Specify the setting for [Color Settings].

[Color Mode] | Specify color printing or B&W printing.
| ||||||
[RGB Source Profile] | You can select an RGB profile that is suitable for the features of the monitor that you are using. Set it when printing images drawn with an RGB color model or documents that contain images. In order to enable this setting, set [CMS (Matching)/Gamma] as [CMS].
| ||||||
[CMYK Simulation Profile] | You can set a simulation target when printing CMYK data. The machine converts CMYK data to a device-dependent CMYK color model in accordance with the simulation target selected by the CMYK simulation profile.
| ||||||
[Output Profile] | You can define suitable profiles for data that you are trying to print.
| ||||||
[Matching Method] | Specify the printing method when [RGB Source Profile] is applied. You can select color rendering style on the machine, as shown below.
| ||||||
[Photo Optimizer PRO]* | (It is only displayed when an SD card is used.) Correct the contrast, color balance, saturation and gradation of photos and illustrations to your preference. The setting for this item becomes invalid for B&W data. If the [Color Mode] setting is set as [Black and White], the setting for this item becomes invalid. | ||||||
[Red-Eye Correction]* | (It is only displayed when an SD card is used.) It detects and corrects red eye caused by flash or strobe light when shooting. Also, if only half of a face shows up in a photo, it can be corrected. You can set the amount of correction using the [Red-eye Correction Level].
| ||||||
[Face Brightener]* | (It is only displayed when an SD card is used.) For photo images where a subject's face appears dark due to backlighting, underexposure, etc., the entire image is brightened so their face appears more suitably bright. It can only correct images which are at least 100 pixels both horizontally and vertically. The setting for this item becomes invalid for B&W data. If [Color Mode] is set as [Black and White], the setting for this item becomes invalid. The face brightening effect may differ depending on the data. You can set the amount of [Face Brightener Level] correction.
| ||||||
[Grayscale Conversion] | Select the method for converting color print data to grayscale for printing. This setting is for converting color data to B&W data. The setting for this item becomes invalid for B&W data. If [Color Mode] is set as [Auto (Color/Black and White)], the setting for this item becomes invalid.
|
* LBP843Cx only (It is only displayed when an SD card is used.)
7
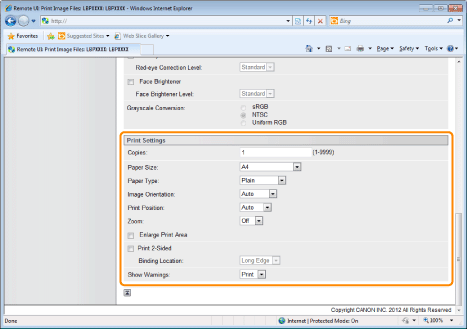
Specify the settings for [Print Settings] as the following, as needed.

[Copies] | Specify the number of copies to be printed. | ||||||
[Paper Size] | Specify the size of paper to print. | ||||||
[Paper Type] | Specify the type of paper to print. | ||||||
[Image Orientation] | Select the orientation of the images from [Auto], [Vertical] or [Horizontal]. | ||||||
[Print Position] | Set the location of the images from [Auto], [Center] or [Top Left]. When [Auto] is selected, if the print location is specified in the TIFF format data, it will print at the specified location. If the print location is not set, it will print centered. Since print location is not specified in JPEG format, if [Auto] is selected, it will print centered. | ||||||
[Zoom] | Specify whether to enlarge or reduce the printing. When it is set to [Auto], it automatically scales them to match with the effective print area of the paper and prints. | ||||||
[Enlarge Print Area] | Specify whether to expand the printable area and print. Depending on the document to be printed, part of the edges of the paper may not be printed. | ||||||
[Print 2-Sided] | When it is set, it will print 2-sided. | ||||||
[Binding Location] | Set the binding position on the long side of the paper (long-edged binding) or the short side of the paper (short-edged binding). If binding is set from the printer side, the position of the "gutter" is automatically adjusted on the front and back sides of the paper. | ||||||
[Show Warnings] | You can select a job processing method for when it detects an Imaging function error. When it is set to [Print], the error description list is printed at the same time.
|
8
Click [Start Printing].
 | Do not keep clicking [Start Printing] while the file is transferring. Sometimes it takes time to transfer a file, but if you keep clicking during the transfer, a file failure may occur and it may be impossible to transfer it. |

→ | When the print job has finished sending, the display switches and the following message is displayed. |
 Press [To Job List] to check the print job that was sent. |
