Printing the XPS File Using the Direct Print Function (LBP843Cx Only)
1
Start the Remote UI.
2
Select [XPS Files] from the [Direct Print] menu.

3
Specify [Specify XPS File].
(1) | Click [Browse], select the file, and then click [Open]. |
(2) | Clear the [Prioritize Print Ticket] check box. |
 | If the [Prioritize Print Ticket] check box is selected, some items cannot be set via the Remote UI. To use all the print settings made via the Remote UI, clear the [Prioritize Print Ticket] check box. |

4
Specify the setting for [Specify Print Range].

[All] | Select if you want to print all the pages. |
[Pages] | Select [Pages], and then enter the starting page number and ending page number if you want to specify the print range. |
5
Specify the settings for [Quality Settings] as the following, as needed.

[Resolution] | Specify the resolution for printing the data. It is effective to set [600 dpi] when printing photographs at standard quality, and to set [1200 dpi] when printing at a higher quality. |
[Gradation] | Specify the gradation process for printing the data. It is effective to set [High 1] when printing photographs at standard quality, and to set [High 2] when printing at a higher quality. |
6
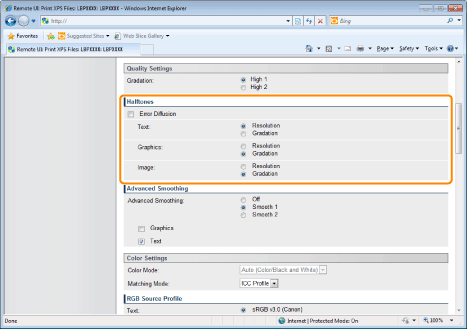
Specify the settings for [Halftones] as the following, as needed.

[Halftones] | Specify the halftone display method when printing. [Error Diffusion] is suitable for printing data with text and thin lines and the curved lines of CAD data, etc.
When [Error Diffusion] is not selected, it is possible to select the halftone display method from [Resolution] or [Gradation] for [Text], [Graphics] or [Image].
|
7
Specify the settings for [Advanced Smoothing] as the following, as needed.

[Advanced Smoothing] | Specify whether to use the smoothing process to smooth the edges of graphics (illustrations created in other applications) or text. [Smooth 2] is better than [Smooth 1] for performing a smoothing process that provides more smoothing. First, set it to [Smooth 1], and if the data is still not smooth, set it to [Smooth 2]. In addition, by selecting [Graphics] and [Text], you can select what to smooth. This item specifies the smoothing process for graphics data and text data. Image data cannot be specified. [Graphics] and [Text] settings on the printer console are suitable only when [Advanced Smoothing] on the printer driver is set to [Printer Default]. The effects of advanced smoothing differ depending on the pattern of the text or the graphics. |
8
Specify the settings for [Color Settings] as the following, as needed.

[Color Mode] | Specify color printing or B&W printing.
| ||||||
[Matching Mode] | It sets which color matching method to apply for each piece of text, diagram or image that make up a print job, or for every color space such as RGB or CMYK. You can select whether to use methods such as ICC profile and gamma for processing. The items that can be set depend on the PDL type.
| ||||||
[RGB Source Profile] | You can select an RGB profile that is suitable for the features of the monitor that you are using. Set it when printing images drawn with an RGB color model or documents that contain images. You can set it for these data types: [Text], [Graphics] or [Image].
| ||||||
[Output Profile] | You can define suitable profiles for data that you are trying to print. You can set it for these data types: [Text], [Graphics] or [Image].
| ||||||
[Matching Method] | Specify the printing method when [RGB Source Profile] is applied. You can select color rendering style on the machine, as shown below. You can set it for these data types: [Text], [Graphics] or [Image].
| ||||||
[Gamma Correction] | It adjusts the brightness of the printed result so that the brightest and darkest parts of the document are not lost. Set it when the print result is brighter than the original (such as a photograph prior to being scanned or a graphic created on a monitor) or when you want to change the brightness of the output. The larger the setting value, the darker it is printed. [1.4] shows no correction You can set it for these data types: [Text], [Graphics] or [Image]. | ||||||
[Photo Optimizer PRO] | Correct the contrast, color balance, saturation and gradation of photos and illustrations to your preference. The setting for this item becomes invalid for B&W data. If [Color Mode] is set as [Black and White], the setting for this item becomes invalid. | ||||||
[Red-Eye Correction] | It detects and corrects red eye caused by flash or strobe light when shooting. Also, if only half of a face shows up in a photo, it can be corrected. The setting for this item becomes invalid for B&W data. If [Color Mode] is set as [Black and White], the setting for this item becomes invalid. You can set the amount of [Red-eye Correction Level] correction.
| ||||||
[Face Brightener] | It can correct photographs in which people's faces are dark due to insufficient backlighting or underexposure so that the entire image is brightened and the people's faces are the preferred brightness. It can only correct images which are at least 100 pixels both horizontally and vertically. The setting for this item becomes invalid for B&W data. If [Color Mode] is set as [Black and White], the setting for this item becomes invalid. The face brightening effect may differ depending on the data. You can set the amount of [Face Brightener Level] correction.
| ||||||
[Grayscale Conversion] | Select the method for converting color print data to grayscale for printing. You can set it for these data types: [Text], [Graphics] or [Image]. This setting is for converting color data to B&W data. The setting for this item becomes invalid for B&W data. If [Color Mode] is set as [Auto (Color/Black and White)] and [Color], the setting for this item becomes invalid.
| ||||||
[Gray Compensation] | Specify whether to print grey data in Bk only. You can set it for these data types: [Text], [Graphics] or [Image]. When it is set to [On], black and grey data is printed in Bk only. You can prevent color registration errors. When it is set to [Off], CMYK 4 color will also be used for black and gray data, and it will be printed in black and gray. The reproduction of dark color gradation will be better than when the check box is selected. |
9
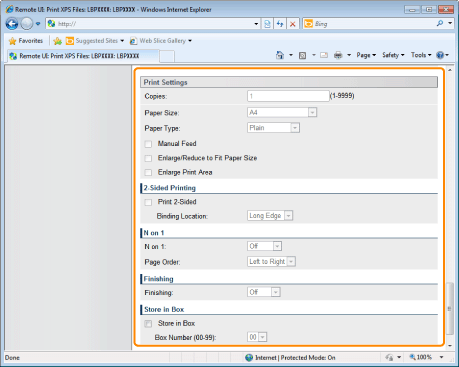
Specify the settings for [Print Settings] as the following, as needed.

[Copies] | Specify the number of copies to be printed. | ||||
[Paper Size] | Specify the size of paper to print. If data is input that is outside the engine's maximum and minimum paper size range when the paper size is automatic, it is printed on the paper size that is set with [Standard Paper Size].
| ||||
[Paper Type] | Specify the type of paper to print. | ||||
[Manual Feed] | You can fix the paper source in the multi-purpose tray. | ||||
[Enlarge/Reduce to Fit Paper Size] | If the check box is selected, it fixes the aspect ratio and scales it to fit with the effective print area of the paper size that is set and prints. However if [Paper Size] is set as [Auto], this item cannot be set. | ||||
[Enlarge Print Area] | Specify whether to expand the printable area and print. Depending on the document to be printed, part of the edges of the paper may not be printed. | ||||
[Print 2-Sided] | Specify 1-sided or 2-sided printing. | ||||
[Binding Location] | Set the binding position on the long side of the paper (long-edged binding) or the short side of the paper (short-edged binding). If binding is set from the printer side, the position of the "gutter" is automatically adjusted on the front and back sides of the paper. | ||||
[N on 1] | You can print multiple pages of the XPS file data arranged on one page. When printing multiple pages side by side, set [Paper Size] to a setting other than [Auto]. | ||||
[Page Order] | The [N on 1] setting enables you to set the order the pages will be arranged on the paper when printing multiple pages on one page. | ||||
[Finishing] | (It is only displayed when an SD card is used.) It collates and prints in page or section units.
| ||||
[Store in Box] | (It is only displayed when an SD card is used.) When storing it in a box, check the [Store in Box] check box before selecting the box where you want to store it. |
10
Click [Start Printing].
 | Do not keep clicking [Start Printing] while the file is transferring. Sometimes it takes time to transfer a file, but if you keep clicking during the transfer, a file failure may occur and it may be impossible to transfer it. |

→ | When the print job has finished sending, the display switches and the following message is displayed. |
 Press [To Job List] to check the print job that was sent. |
