Booklet Mode
This mode enables you to output copies as booklets.
For information on the optional products required to use this function, see "Optional Products Required for Each Function."
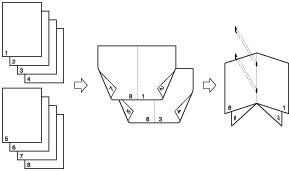
Saddle Stitch Booklet
This mode enables you to copy one-sided or two-sided originals so that the copies are made in a booklet layout.
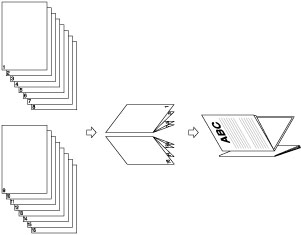
Divided Booklet
This mode enables you to make a large document with many pages into a divided booklet.
Creep (Displacement) Correction
This mode enables you to adjust the position of the images in a booklet by calculating the width of the displacement between the outermost page and center page of the booklet.
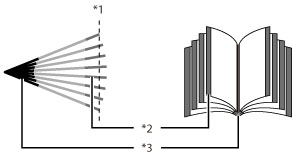
*1 Trimmed
*2 After the pages are trimmed, the outer margins of all pages are equal.
*3 The inner margins are set so that the inner margins of the outermost pages are wider than the inner margins of the center pages. The placement of the images on each page is adjusted by calculating the amount of displacement between the outermost page and innermost page of the booklet.
Trim
When both the Booklet Trimmer-F1 and Two-Knife Booklet Trimmer-A1 are attached:
The machine trims the fore edges and top/bottom of prints in the Saddle Stitch mode.
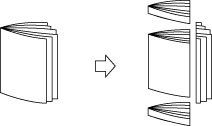
When only the Booklet Trimmer-F1 is attached:
The machine trims the fore edges of prints in the Saddle Stitch mode.

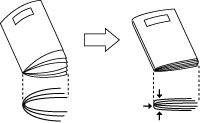
Saddle Press
This mode enables you to compress a saddle stitched booklet spine.
NOTE |
To make sure that the [Saddle Press] setting is effective, you must saddle stitch more than nine sheets of paper (including one cover sheet). |
IMPORTANT |
The Saddle Stitch and Divided Booklet modes can be set only if the Booklet Finisher-W1 PRO/Booklet Finisher-T1 is attached. The Saddle Press mode can be set only if the Booklet Finisher-W1 PRO is attached. The Trim mode can be set only if the Booklet Trimmer-F1 or the Two-Knife Booklet Trimmer-A1 is attached to the Booklet Finisher-W1 PRO. You can set [Trim] only if you select [Saddle Stitch]. Be sure to correctly set the paper type. When printing on special types of paper, such as heavy paper or transparencies, be sure to correctly set the paper type, especially if you use heavy paper. If the type of paper is not set correctly, it could adversely affect the quality of the image. Moreover, the fixing unit may become dirty and require a service repair, or the paper could jam. Make sure to place originals with a vertical (portrait) orientation vertically. If these originals are placed horizontally, the even numbered pages will be printed upside down. The accuracy of folds created in the Saddle Stitch mode may vary, depending on the type and quantity of paper. |
1.
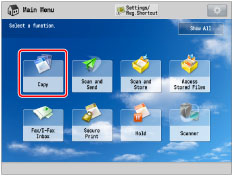
Press  → [Copy].
 → [Copy].
2.
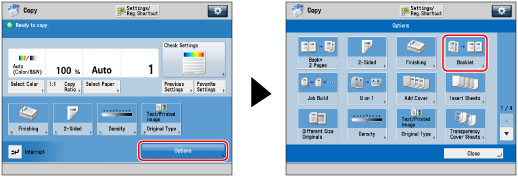
Press [Options] → [Booklet].
3.
Specify the detailed Booklet settings.
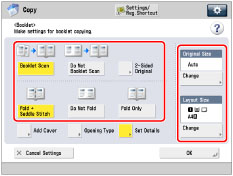
If you place a two-sided original, press [2-Sided Original] → select the type of two-sided original → press [OK].
[Book Type]: | The front and back sides of the original have the same top-bottom orientation. |
[Calendar Type]: | The front and back sides of the original have opposite top-bottom orientations. |
Performing Booklet Scanning:
Press [Booklet Scan] → select the original size → press [OK].
To fold each page of the original to use as two pages of the booklet, press [Do Not Booklet Scan] → select the original size → press [OK].
NOTE |
If you do not use the Booklet Scan mode, you cannot select the layout of two-sided originals. If the Booklet Scan mode is not used, you cannot select [Auto] of the original. You cannot select [2-Sided Original] if A6R is the selected original size. |
Folding and Saddle Stitching:
Press [Fold + Saddle Stitch].
If you do not want to saddle stitch, select [Fold Only].
If you do not want to set the Fold and Saddle Stitch modes, select [Do Not Fold].
NOTE |
The following shows the maximum number of sheets that can be saddle stitched at a time. If you want to saddle stitch the more sheets, set the Divided Booklet mode, otherwise the booklet is not saddle stitched. If the Booklet Finisher-W1 PRO is attached: 25 sheets If the Booklet Finisher-T1 is attached: 16 sheets The following shows the maximum number of sheets that can be folded at one time when [Fold Only] is selected: If the Booklet Finisher-W1 PRO is attached: five sheets If the Booklet Finisher-T1 is attached: one sheet |
Adding Covers:
Press [Add Cover] → [Print].
Press [Leave Blank] if you do not want to copy on the cover.
If you feed cover paper from the Document Insertion Unit-N1, select [Leave Blank].
If you selected [Booklet Scan], you can set <Front Cover>, <Front Inside Cover>, <Back Inside Cover>, and <Back Cover> individually.
To set the paper for the cover, press [Change] → select the paper source → press [OK].
If you want to select the Stack Bypass-B1 when a paper size/type is already selected for the current or reserved job, press [Change MP Tray Paper].
IMPORTANT |
You must select the same paper size for the cover page as that used for the main document. If you load preprinted paper to use as the cover page into the document insertion unit, you must load the paper face up. If you use Heavy 3 or Heavy 4 paper, you can only print on <Front Inside Cover> or <Back Inside Cover>. The following shows the paper weight that you can use when the Booklet Finisher-W1 PRO is attached. For the cover page and main document: 52 g/m2 to 300 g/m2 (14 lb bond to 110 lb cover) The following shows the paper weight that you can use when the Booklet Finisher-T1 is attached. For the main document: 60 g/m2 to 220 g/m2 (16 lb bond to 80 lb cover) For the cover page: 60 g/m2 to 256 g/m2 (16 lb bond to 140 lb index) |
NOTE |
If you are adding a cover, the maximum number of sets that the booklet tray of the Booklet Finisher-T1 can hold is 10. |
Selecting the Finishing Format:
Press [Opening Type] → select the finishing format → press [OK].
[Left Opening]: | A booklet that opens to the left is created. |
[Right Opening]: | A booklet that opens to the right is created. |
NOTE |
You can select [Opening Type] only if you set [Booklet Scan]. |
Selecting the Original Size and Booklet Layout Size:
Press [Change] for <Original Size>.
Select the size of the original you have placed → press [OK].
You can select [Auto] to select the paper size automatically.
Press [Change] for <Layout Size>.
Select the paper size for finishing → press [OK].
If you want to select the Stack Bypass-B1 when a paper size/type is already selected for the current or reserved job, press [Change MP Tray Paper].
4.
Press [Set Details] → specify the detailed Booklet settings.
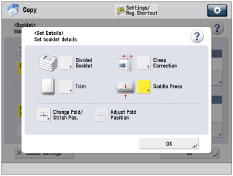
If you do not want to specify the detailed settings, proceed to step 6.
Making a divided booklet:
Press [Divided Booklet] → set the number of sheets to divide → press [OK].
NOTE | |||||||||||||||||||||||||||||||||||||||||||||||
If the Booklet Finisher-W1 PRO is attached, the number of saddle stitched booklets that the auxiliary booklet tray can hold depends on the number of sheets each booklet contains, paper size, and whether the booklet includes cover page used heavy paper (106 g/m2 (29 lb bond) or more).
If the Booklet Trimmer-F1 is attached to the Booklet Finisher-W1 PRO, the tray can hold 30 prints. If the Booklet Finisher-T1 is attached, the number of saddle stitched booklets that the auxiliary booklet tray can hold depends on the paper type, paper weight, and number of sheets each booklet contains.
| |||||||||||||||||||||||||||||||||||||||||||||||
Setting the creep correction:
Press [Creep Correction] → select the correction method → press [OK].
If you select [Manual], press  or
or  to adjust the correction width.
 or
or  to adjust the correction width.
Trimming the edges of the booklet (when both the Booklet Trimmer-F1 and Two-Knife Booklet Trimmer-A1 are attached):
Press [Trim].
NOTE |
You can set [Trim] only if you select [Fold + Saddle Stitch]. |
To trim the edge of the booklet by specifying the finishing size, press [Specify by Finishing Size] → select [Vertical Trim] or [3-Way Trim] then input the desired finishing size → press [OK] → [OK].
NOTE |
If you want to register and edit the configured finishing size, press [Reg.]. |
To trim the edge of the booklet by specifying the trim width, press [Specify by Trim Width] → select [Vertical Trim] or [3-Way Trim] then input the desired trim width → press [OK] → [OK].
To adjust the trim position, press [Adjust Trim Position] → adjust the trim position using [-] or [+] → press [OK] → [OK].
NOTE | ||||
If you enter a value other than 0, you can switch between the positive and negative adjustment amount by pressing [±].
|
Trimming the edges of the booklet (when the Booklet Trimmer-F1 is attached):
Press [Trim].
NOTE |
You can set [Trim] only if you select [Fold + Saddle Stitch]. |
To adjust the trim width, press [Adjust Trim Width] → specify the desired trim width → press [OK].
Adjusting the strength of the saddle press:
Press [Saddle Press] → adjust the strength of the saddle press → press [OK].
NOTE | ||||
You can set [Saddle Press] if you select [Fold + Saddle Stitch]. If you enter a value other than 0, you can switch between the positive and negative adjustment amount by pressing [±].
Increasing the pressure too much may result in a wrinkled or compressed booklet spine, or a paper jam. Increase the pressure level gradually when you adjust the strength of the saddle press. |
Adjusting the saddle stitch position:
Press [Change Fold/Stitch Pos.] → select the paper size for finishing.
Adjust the saddle stitch position using [-] or [+] → press [OK] → [Close].
NOTE |
You can set [Change Fold/Stitch Pos.] only if you select [Fold + Saddle Stitch]. |
Adjust Fold Position:
Press [Adjust Fold Position] → select the paper size for finishing.
Adjust the fold position using [-] or [+] → press [OK] → [Close].
NOTE |
You can set [Adjust Fold Position] only if you select [Fold Only]. |
5.
Press [OK].
6.
Press [OK] → [Close].
7.
Set the Booklet Tray guide to match the paper size.
This step is necessary only if the Booklet Finisher-T1 is attached. This step is unnecessary if the Booklet Finisher-W1 PRO is attached.
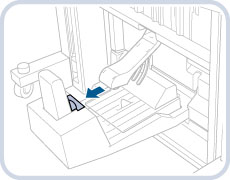 | 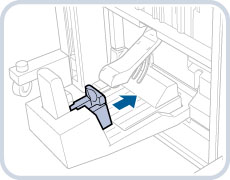 |
305 mm x 457 mm/A3/B4/11" x 17"/LGL | A4R/LTRR |
IMPORTANT |
Make sure to set the Booklet Tray guide to match the paper size. Setting the Booklet Tray guide incorrectly may result in a paper jam. |
IMPORTANT |
Saddle stitching is not performed if there is only one output sheet. The accuracy of folds may vary, depending on the type and quantity of paper. |