Connecting to an SMB/CIFS Network
All computers that use the machine for printing must be enabled for SMB/CIFS network use.
The setup procedures differ depending on your operating system. See the procedures below to set the computers.
Windows Server 2003/Server 2008/Vista/7/Server 2008 R2/8/Server 2012/10: See "Windows Server 2003/Server 2008/Vista/7/Server 2008 R2/8/Server 2012/10."
Mac OS X 10.5/10.6: See the documentation provided with your Mac OS.
IMPORTANT |
The following procedures describe a sample SMB/CIFS setup. Depending on your environment, the actual setup procedure may differ. |
The following is the procedure for specifying an SMB/CIFS network with Windows Server 2003/Server 2008/Vista/7/Server 2008 R2/8/Server 2012/10.
In the following procedures, items displayed on the screens for Windows 8 are used. Depending on your environment, the items you see on the screen may differ.
1.
Display the window for setting the network connection.
Windows Server 2003: From the [Start] menu, select [Control Panel] → [Network Connections].
Windows Vista/Server 2008: From the [Start] menu, right-click [Network] → select [Properties] → click [Manage network connections].
Windows 7/Server 2008 R2: From the [Start] menu, select [Control Panel] → click [Network and Internet] → [Network and Sharing Center].
Windows 8/Server 2012: Place the cursor on the top right (bottom right) of the desktop → select [Settings] → [Control Panel]. Select [Network and Internet] → click [Network and Sharing Center].
Windows 10: Place the cursor on the bottom left of the desktop and right-click → select [Control Panel] → click [Network and Sharing Center].
2.
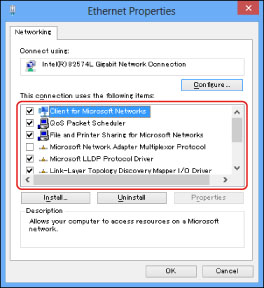
Click the <Connections> local area network name →[Properties].
If you are using Windows Server 2003/Server 2008/Vista, right-click the [Local Area Connection] icon → select [Properties].
If you are using Windows 7/Server 2008 R2/8/Server 2012/10, click [Local Area Connection] → [Properties].
3.
Select [Client for Microsoft Networks], [File and Printer Sharing for Microsoft Networks], and [Internet Protocol (TCP/IP)]/[Internet Protocol Version 4 (TCP/IPv4)].

4.
Double-click [Internet Protocol (TCP/IP)]/[Internet Protocol Version 4 (TCP/IPv4)].
5.
In the [Internet Protocol (TCP/IP) Properties]/[Internet Protocol Version 4 (TCP/IPv4) Properties] dialog box, click [Advanced] on the [General] sheet → click the [WINS] tab.
6.
On the [WINS] sheet, select [Enable NetBIOS over TCP/IP].
7.
Click [OK] repeatedly to close the dialog box.
8.
Restart the computer if prompted.
NOTE |
If you are using Windows Vista, a dialog box may appear while you are performing the procedure. In this case, enter a user name and password. For more information, see the manuals provided with the operating system. |