
Printing a Document Secured by a PIN (Secured Print)
By setting a PIN to a document when printing from a computer, the document is held in an optional SD card installed on the machine, and is not printed until the correct PIN is entered on the operation panel of the machine. This function is called "Secured Print," and the document that is protected by a PIN is called a "secured document." Using Secured Print keeps printouts of confidential documents from being left unattended. Before you can use this function, you need to install an optional SD card on the machine (Installing an SD Card).

Sending a Secured Document from a Computer to the Machine
Follow the procedure below. You can send a document protected by a PIN.
1
Open a document in an application and display the print dialog box.
How to display the print dialog box differs for each application. For more information, see the instruction manual for the application you are using.
2
Select this machine, and click [Preferences] or [Properties].
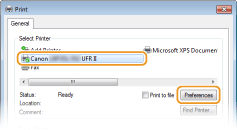
The screen that is displayed differs depending on the application you are using.
3
Select [Secured Print] in [Output Method].
Click [Yes] or [No] on the [Information] pop-up screen.
If you want to use the same user name and PIN every time, click [Yes]. To change the user name and PIN every time, click [No].
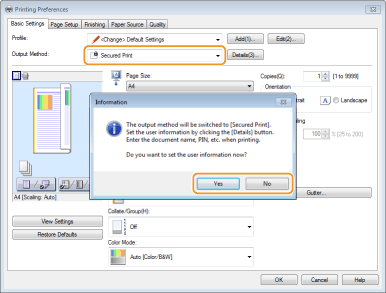
 If you selected [Yes]
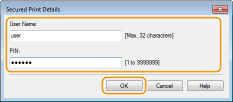
Enter the user name for [User Name] and PIN for [PIN], and click [OK].
The computer name (logon name) of your computer is displayed in [User Name]. If you want to change it, enter up to 32 alphanumeric characters for a new computer name.
Enter a number of up to seven digits to [PIN].
4
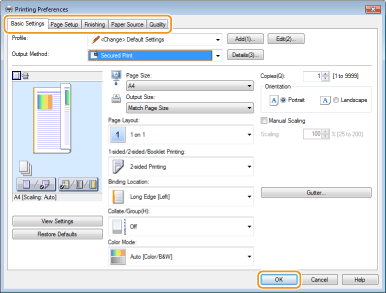
Specify the print settings, and click [OK].
Click the [Basic Settings], [Page Setup], [Finishing], [Paper Source], or [Quality] tab to specify the print settings on each screen as necessary. Various Print Settings
5
Click [Print] or [OK].
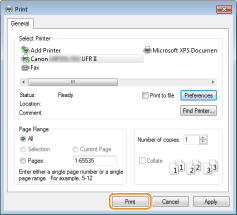
After the secured document is sent to the machine, it is held in the SD card waiting to be printed.
 If you selected [No] at step 3
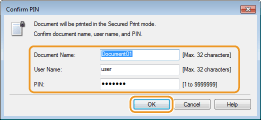
Enter the [Document Name], [User Name], and [PIN] and click [OK].
The document name is automatically set based on the information from the application. If you want to change the document name, enter up to 32 alphanumeric characters for a new document name.
The computer name (logon name) of your computer is displayed in [User Name]. If you want to change the user name, enter up to 32 alphanumeric characters for a new user name.
Enter the [PIN] of up to seven digits.
 |
|
If you install the "Encrypted Print Driver Add-in" that comes with the optional SD CARD-C1 kit on the machine, you can use the encrypted print function with enhanced security. Using the Encrypted Print
|
Printing Out Secured Documents
After you send the secured document to the machine, print it out within one hour. After that, the secured document will be deleted from the SD card and can no longer be printed.
 |
|
You can change the valid time period for secured documents. Changing the Valid Time Period for Secured Documents
|
1
Press  (
( ).
).
 (
( ).
).2
Use  /
/ to select <Secured Print>, and press
  .
.
 /
/ to select <Secured Print>, and press
  .
.
3
Select the secured document to print, and press  .
.
 .
.If the SD card contains only one secured document, this screen is not displayed.


If the user name is displayed
If secured documents from two or more users are being held in the SD card, the user selection screen as shown below is displayed prior to the screen shown above. Select your user name, and press  .
.
 .
.
4
Enter the PIN, and press  .
.
 .
.
Printing starts.
To cancel print jobs, use the operation panel. Canceling Prints
Changing the Valid Time Period for Secured Documents
By default, the machine is set to delete secured documents one hour after receiving them unless they are printed. You can change this time value within a defined range.
1
Press  (
( ).
).
 (
( ).
).2
Use  /
/ select <Control Menu>, and press
  .
.
 /
/ select <Control Menu>, and press
  .
.3
Select <Sec. Print Del. Time>, and press  .
.
 .
.4
Select how long the SD card holds secured documents, and press  .
.
 .
.The secured document is erased from the SD card when the time selected here elapses.
