Print Settings for Direct Print
When you want to change the settings for Direct Print according to the document to print, specify the following settings.

 |
When you specify the print settings for XPS filesClear the [Prioritize Print Ticket] check box. If the check box is selected, some items are unavailable.
 |
 |
Icons* in the description* Icons are omitted for the settings that are displayed regardless of the file format.
|
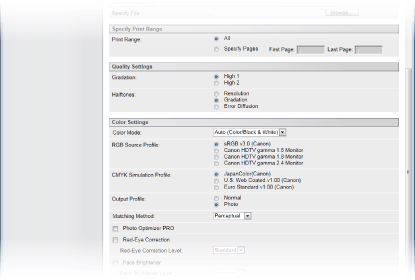
[Specify Print Range]

 [Print Range]


Specify the range (pages) to print.
|
[All]
|
Select to print all pages.
|
|
[Specify Pages]
|
Select to specify the print range. This setting is unavailable for JPEG files.
|
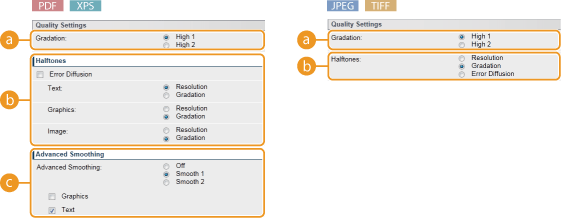
[Quality Settings]

 [Gradation]


Set the gradation for print data processing.
|
[High 1]
|
This print mode is suitable for printing photos or the like at average quality.
|
|
[High 2]
|
Specify this setting to print photos or the like at high quality.
|
 [Halftones]


You can select the printing method to reproduce halftones (the intermediate range between the lighter and darker areas of an image). For PDF files and XPS files, you can set [Resolution] or [Gradation] for each of image types contained in one document: [Text], [Graphics], and [Image].
|
[Error Diffusion]
|
With this check box selected, you can print in a mode suitable for printing data with text and thin lines and the curved lines of CAD data, etc. This is applied to all image data types, so you cannot select [Resolution] or [Gradation].
 The stability of the texture and fixed toner may be reduced when [Error Diffusion] is used.
|
|
[Resolution]
|
Prints text with clear edges to produce a fine print. This is suitable for printing text and thin lines.
|
|
[Gradation]
|
Prints gradations and outlines with a smooth finish. This is suitable for printing figures and graphs that use gradations.
|
|
[Error Diffusion]
|
You can perform finer printing than with [Resolution]. This print mode is suitable for sharply printing edges of fine granularity data such as characters or thin lines.
 The stability of the texture and fixed toner may be reduced when [Error Diffusion] is used.
|
 [Advanced Smoothing]

Make settings for the smoothing mode that enables edges of lines, figures and text to be printed smoothly.
|
[Off]
|
Does not perform smoothing.
|
|
[Smooth 1]
|
Smoothly prints edges of lines, figures, and text.
|
|
[Smooth 2]
|
Edges will be smoother than with [Smooth 1].
|
|
[Graphics]
|
With this check box selected, the smoothing mode is applied to lines and figures when [Smooth 1] or [Smooth 2] is specified.
|
|
[Text]
|
With this check box selected, the smoothing mode is applied to text when [Smooth 1] or [Smooth 2] is specified.
|
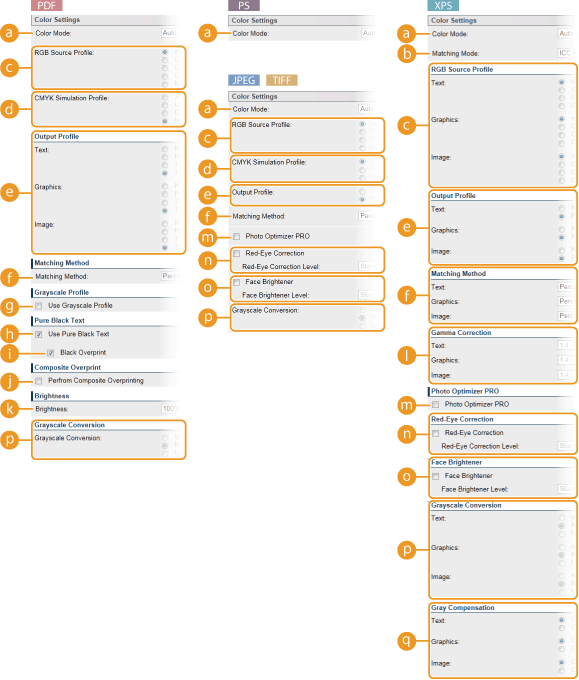
[Color Settings]

 [Color Mode]
Specify whether to print in color or black and white.
|
[Auto (Color/Black & White)]
|
Automatically select color or black and white printing depending on the type of document.
|
|
[Black & White]
|
Print in black and white even when the document is in color.
|
|
[Color]
|
Print in color.
|
 [Matching Mode]
Select the processing mode for color printing.
|
[ICC Profile]
|
Use a profile for color matching.
|
|
[Gamma]
|
Perform color correction by setting a gamma value for brightness adjustment.
|
 [RGB Source Profile]


Select a suitable profile for RGB data that matches the monitor that you are using. For XPS files, you can set this item for each of image types contained in one document: [Text], [Graphics], and [Image].
|
[sRGB v3.0 (Canon)]
|
An RGB profile is used that is similar to an average profile of most Windows PC monitors. When using a monitor that supports sRGB, you can print colors close to the colors displayed on the monitor.
|
|
[Canon HDTV gamma 1.5 to 2.4 Monitor]
|
When you want a brightness adjustment after making comparison between the printed colors and the colors displayed on the monitor, make a necessary setting here. The higher the value, the darker the printed colors.
|
|
[None]
|
Performs color separation from RGB data to CMYK without applying any RGB source profile.
|

For XPS files, this item is available when [Matching Mode] is set to [ICC Profile].
 [CMYK Simulation Profile]


You can select a simulation target when printing CMYK data. The machine converts CMYK data to a device-dependent CMYK color model in accordance with the selected simulation target.
|
[JapanColor(Canon)]
|
Use the JapanColor profile. Printing is performed in colors that are close to the Japanese printing standards.
|
|
[U.S. Web Coated v1.00 (Canon)]
|
Use the U.S. Web Coated profile. Printing is performed in colors that are close to the U.S. printing standards.
|
|
[Euro Standard v1.00 (Canon)]
|
Use the Euro Standard profile. Printing is performed in colors that are close to the European printing standards.
|
|
[None]
|
Prints CMYK data using a device-dependent CMYK color model without applying any CMYK simulation profile.
|

When this item is set to [None], dark color gradation may collapse depending on the data.
 [Output Profile]


You can select suitable profiles for data that you are going to print. For PDF files and XPS files, you can set this item for each of image types contained in one document: [Text], [Graphics], and [Image].
|
[Normal]
|
Color matching is performed so that data is printed in colors close to the colors displayed on the monitor.
|
|
[Photo]
|
Color matching is performed so that the print result is similar to photography.
|
|
[TR Normal]
|
Color matching is performed so that data is printed in colors close to the colors displayed on the monitor and that bleeding of toner into text and fine lines is well controlled.
|
|
[TR Photo]
|
Color matching is performed so that the print result is similar to photography and that bleeding of toner into text and fine lines is well controlled.
|

For XPS files, this item is available when [Matching Mode] is set to [ICC Profile].
 [Matching Method]


Specify which element to be given priority over others in color matching by [RGB Source Profile]. For XPS files, you can set this item for each of image types contained in one document: [Text], [Graphics], and [Image].
|
[Perceptual]
|
Matching is performed with priority given to perceptual.
|
|
[Saturation]
|
Matching is performed with priority given to saturation.
|
|
[Colorimetric]
|
Matching is performed so that color difference between originals and printouts is minimized.
|
 [Use Grayscale Profile]
With this check box selected, gray data is converted to CMYK data according to the machine's grayscale profile.

Printing may be performed only with K (black) toner depending on the setting of [Output Profile] or [Use Pure Black Text].
 [Use Pure Black Text]
With this check box selected, black text is printed with K (black) toner only. Unlike printing with color (CMY) toner, color toner slurring around the edges will not occur. It is recommended that normally you use this setting.
 [Black Overprint]
Set how to print when black text is overlapped on a color background or color figure with [Use Pure Black Text] selected. With this check box selected, first only the color background or figure is printed and then the black text is printed onto the background or figure with black (K) toner alone. With this check box deselected, first the data is printed after the black text is cut out from the color background or figure, leaving the corresponding white blank, and then the black text is printed on the white blank.

With this check box deselected, the print may be fainter or the edges of the text may be rimmed with white.
 [Perfrom Composite Overprinting]
With this check box selected, CMYK data for which overprint is set will be overprinted as composite data.

When [CMYK Simulation Profile] is set to other than [None], overprint is not performed even if this check box is selected.
 [Brightness]
You can adjust the brightness of the whole image in steps of 5%. The smaller the value, the brighter the image.
 [Gamma Correction]
Brightness adjustment can be performed so that the brightness of the brightest and darkest parts of the original is not affected in the print result. [1.4] is the standard setting (no correction), and the larger the setting value, the darker the print will be. You can set this item for each of image types contained in one document: [Text], [Graphics], and [Image].

This item is available when [Matching Mode] is set to [Gamma].
 [Photo Optimizer PRO]


With this check box selected, printing is performed by automatically correcting image contrast, color balance, saturation, and gradation.
 [Red-Eye Correction]


"Red-eye" is a phenomenon that causes the eyes of human subjects of flash/strobe photography to appear unnaturally reddish in color. Set whether to automatically detect red-eye in the image and correct the portions in question so that they appear in natural color. Select the check box, and select the correction level under [Red-Eye Correction Level].
 [Face Brightener]


For a photograph image in which the faces of human subjects are unnaturally dark due to backlight or underexposure, set whether to print the image by correcting its entire brightness so that the subjects' faces become naturally bright. Select the check box, and select the correction level under [Face Brightener Level].
 [Grayscale Conversion]


You can select the method to convert color pint data to black-and-white data. For XPS files, you can specify the conversion method for each image data type: [Text], [Graphics], and [Image].
|
[sRGB]
|
Color data is converted to black-and-white data to generate color-conscious smooth gradation.
|
|
[NTSC]
|
Color data is converted to black-and-white data to generate appearances equivalent to television pictures (NTSC).
|
|
[Uniform RGB]
|
Color data is converted to black-and-white data to equalize all RGB levels based on the brightness only.
|

This item is available when [Color Mode] is set to [Black & White].
 [Gray Compensation]
For black or gray data with color information defining R=G=B, select whether to print with black (K) toner only. You can set this item for each of image types contained in one document: [Text], [Graphics], and [Image].

When you set this item to [Off], printing is performed with the four CMYK color toners.
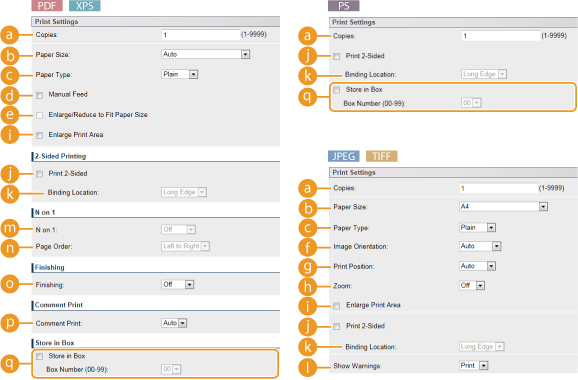
[Print Settings]

 [Copies]
Specify the number of copies.
 [Paper Size]


Specify the size of the paper to print on.

When you want to print a PDF file or XPS file, specify [Auto] to automatically select the optimum paper size. If no optimum size is found, the paper size set in <Standard Paper Size> is selected (Standard Paper Size).
 [Paper Type]


Specify the type of the paper to print on.
 [Manual Feed]

If you select the check box, a document is printed only on the paper loaded in the multi-purpose tray.
 [Enlarge/Reduce to Fit Paper Size]

If you select the check box, printouts are enlarged or reduced printouts according to the Printable Area of the paper. The printouts are enlarged or reduced with the original aspect ratio kept.

If [Paper Size] is set to [Auto], this item is unavailable.
 [Image Orientation]

Specify the print orientation of an image.
|
[Auto]
|
Automatically determines the print orientation based on the width and height of the image.
|
|
[Vertical]
|
Select when printing a vertically-long image.
|
|
[Horizontal]
|
Select when printing a horizontally-long image.
|

If the specified setting of [Vertical] or [Horizontal] does not match the orientation of the image, the reduced image is printed.
 [Print Position]

Specify the position to print the image.
|
[Auto]
|
If the TIFF data contains the information that specifies the print position, the image is printed according to the information, otherwise, it is printed at the center of paper. JPEG data is always printed at the center of paper.
|
|
[Center]
|
Images are printed at the center of paper.
|
|
[Top Left]
|
Images are printed at the top left.
|
 [Zoom]

Enable or disable enlarging/reducing images. The printouts are enlarged or reduced with the image aspect ratio kept.
|
[Off]
|
When the image is within the Printable Area of the paper, it is printed with the size as is. When an image is larger than the printable area, printouts are reduced.
|
|
[Auto]
|
Makes enlarged or reduced printouts according to the printable area of the paper.
|
 [Enlarge Print Area]


If you select the check box, the image is printed by extending the Printable Area fully to the paper size. However, a part of the image may be missing near the edge of the paper or the paper may be partly tainted depending on the original.
 [Print 2-Sided]
Select the check box to print on both sides of the paper.
 [Binding Location]
Select whether to bind the long edge or short edge of the printouts with a binding tool such as a stapler. Printing orientation will be changed depending on the specified binding position. You can also specify the binding margin (Gutter).
|
[Long Edge]
|
Binds the printouts on the long edge.
  |
|
[Short Edge]
|
Binds the printouts on the short edge.
  |
 [Show Warnings]

You can specify how the machine should behave if an error occurs.
|
[Print]
|
Error information is printed and no image is printed.
|
|
[Panel]
|
No image is printed and an error message is displayed on the operation panel.
|
|
[Off]
|
No image is printed and no error is displayed.
|
 [N on 1]

Specify whether or not to print multiple pages onto a single sheet by sequentially allocating them. For example, to print four pages onto a single sheet, select [4 on 1].


If [Paper Size] is set to [Auto], this item is unavailable.
 [Page Order]

Select a page distribution layout.

 [Finishing]

Specify the method to collate the printouts when printing multiple-page documents. This item is displayed when the SD card is installed.
|
[Off]
|
The printouts are not collated. The specified number of copies are printed for each page. For example, if you are printing three copies of a four-page document, the printouts will be arranged in the following page order: 1, 1, 1, 2, 2, 2, 3, 3, 3, 4, 4, 4.
 |
|
[Collate]
|
The printouts are grouped into complete sets in sequential page order. For example, if you are printing three copies of a four-page document, the printouts will be arranged in the following page order: 1, 2, 3, 4, 1, 2, 3, 4, 1, 2, 3, 4.
 |
 [Comment Print]
Select whether to print comments.
|
[Auto]
|
Prints comments in the PDF file.
|
|
[Off]
|
Prints no comments.
|
 [Store in Box]


You can store a document in the SD card installed on the machine without making printouts. Select the check box to store the document in a box specified in [Box Number (00-99)]. You can print the documents in the box from the operation panel as many times as you want. For how to print a document, see Printing a Document Stored in the Machine. This item is displayed when the SD card is installed.