
Sending Faxes 
|
|
|
You need to complete some procedures before using fax functions. Configuring Initial Settings for Fax Functions
|
1
Place the document(s). Placing Documents

2
Press  and tap <Fax>.
and tap <Fax>.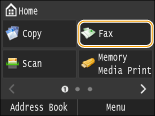
When the logon screen appears, use the numeric keys to enter the user name and password. Then select the authentication server and press  . Logging on to Authorized Send
. Logging on to Authorized Send3
Press  .
.
.If the destinations set by the previous user are still selected, this can cause transmission errors. Always reset the settings before sending.
4
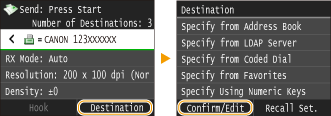
Enter the destination using the numeric keys, and tap <Apply>.
If you enter the wrong characters, press  . (Press to delete each character one by one; press and hold to delete all the input characters at once.)
To use the Address Book to quickly specify destinations: Specifying Registered Destinations


If a confirmation window appears
When <Confirm Entered Fax Number> is set to <On>, the input screen reappears so that you can confirm the destination (Checking Destinations before Sending Documents). Enter the destination again.
Adding a destination
To enter a second or subsequent destination, tap <Destination>  <Specify Using Numeric Keys>. You can specify up to 10 destinations.
 To delete destinations
If you specified multiple destinations, you can delete destinations as necessary.
|
1
|
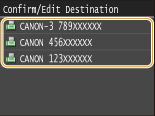
Select <Destination>
 |
|
2
|
Select a destination you want to delete.
 |
|
3
|
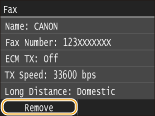
Tap <Remove>.
 |
|
4
|
Tap <Yes>.
|
|
|
If you want to easily and quickly delete destinations without displaying a list of destinationsBefore tapping <Destination> in step 1, you can tap
 / / to toggle the destinations you specified. Display a destination you want to delete, and press to toggle the destinations you specified. Display a destination you want to delete, and press |
To send overseas
Enter the international access code, the country code, the area code, and the fax number to specify the destination.
|
1
|
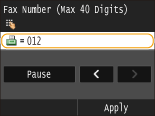
Enter the international access code.
 |
|
2
|
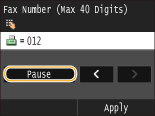
Tap <Pause>.
<p> (pause) is inserted between numbers. In this case, 012 will be dialed first, then 2 seconds later, the next number will be dialed.
 Inputting pauses is optional; however, consecutive numbers that are input without pauses may not be recognized correctly.
Pauses can be inserted continuously.
One pause inserts 2 seconds of waiting time. This time can be changed as necessary. Set Pause Time
|
|
3
|
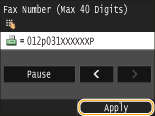
Enter the country code, the area code, and the fax number.
 |
|
4
|
Tap <Pause> to insert a pause at the end of the fax number as necessary.
The waiting time inserted here is fixed to 10 seconds. This time cannot be changed.
 |
|
5
|
Tap <Apply>.
 |
5
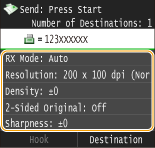
Specify the scanning settings as necessary.
Tap the item you want to set. Various Fax Settings
6
Press  to start sending.
to start sending.Scanning of the document starts.
To cancel sending, tap <Cancel> <Yes>. Canceling Sending Documents (Fax/I-Fax)
When placing documents in the feeder in step 1
When scanning is complete, the faxes are sent.
When placing documents on the platen glass in step 1
Follow the procedures below.
|
1
|
Select the document size.
When there is only one page to be scanned, proceed to step 3.
|
|
2
|
Place the next document on the platen glass, and press
.Repeat this step until you finish scanning all of the pages.
|
|
3
|
Tap <Start Sending>.
The faxes are sent.
|
 |
|
If you always want to send faxes with the same settings: Changing Default Settings
If you want to register a combination of settings to use when needed: Registering Frequently Used Fax Settings
If you want to sound an alarm when the handset is off the hook: Off-Hook Alarm
|