Printer Settings
 |
|
All the settings about the printer are listed with short descriptions. Default settings are marked with a dagger (
 ). ). |
 |
Asterisks (*)Settings marked with an asterisk (*) are only available when the optional paper feeder (drawer 2) is attached.
Priority of settingsIf a print setting is specified both from the printer driver and the operation panel of the machine, the specification from the printer driver overrides that from the operation panel. The specification from the operation panel becomes effective in some specific cases, such as when printing from UNIX or other operating system that does not support printer drivers.
 |
Prioritize Driver Settings When Printing
Select whether printing is performed in accordance with the printer driver's settings for paper size and type taking priority over the settings made for each paper source under <Paper Settings> in the Home screen. By selecting <On>, you can print from the paper source specified in the printer driver, regardless of the paper settings on the machine. An error message can be set to display if the loaded paper size is largely different from that set in the printer driver.
|
Multi-Purpose Tray
Off
On
Force Output
Display Error
Drawer 1
Off
On
Force Output
Display Error
Drawer 2*
Off
On
Force Output
Display Error
|
<Menu>  <Printer Settings> <Prioritize Driver Settings When Printing> Select the paper source <On> Select <Force Output> or <Display Error>

 Paper Sources
Select the paper source for which you want to enable.
 <Force Output>
Continue printing even when the paper size setting in the printer driver and the loaded paper are largely different.
 <Display Error>
When the paper size setting in the printer driver and the loaded paper are largely different, an error message is displayed and printing is stopped.
 |
|
If the printer driver's settings do not match the size and type of loaded paper with <On> selected, a paper jam or printing error may occur.
|
Copies
Set the number of copies to print.
|
1
to 99 |
<Menu> <Printer Settings> <Copies> Set the number of copies to print <Apply>
2-Sided Printing
Select whether to make 2-sided printouts.
|
Off
On |
<Menu> <Printer Settings> <2-Sided Printing> Select <Off> or <On>
Default Paper
Set the default paper size and type. Printing will be performed with paper of the size and type set here when you want to print from an OS not supporting printer drivers or from a mobile device or other device not supporting paper size and type settings. Paper
<Menu> <Printer Settings> <Default Paper> Select the paper size Select the paper type
Paper Size Override
Select whether to switch between printing on A4 and LTR size paper if one of these paper sizes is loaded but the other is not. Configuring Printer Settings on the Machine
|
Off
On |
Print Quality
You can change settings related to print quality.
Density
Adjust the toner density. Adjusting Print Density
|
17 Levels
Fine Adjust
High
17 Levels
Medium
17 Levels
Low
17 Levels
|
|
|
|
The settings specified for <Density> are disabled when <Toner Save> is enabled.
|
Toner Save
You can save toner consumption. Select <On> when you want to check the layout or other appearance characteristics before proceeding to final printing of a large job.
|
Off
On |
<Menu> <Printer Settings> <Print Quality> <Toner Save> Select <Off> or <On>
Resolution
Specify the resolution to be used for print data processing.
|
1200 dpi
600 dpi
|
<Menu> <Printer Settings> <Print Quality> <Resolution> Select <1200 dpi> or <600 dpi>
Barcode Adjustment Mode
If bar codes printed with this machine cannot be read, set this item. The improvement effect is weakest with <Mode 1> and strongest with <Mode 3>.
|
Off
Mode 1
Mode 2
Mode 3
|
<Menu> <Printer Settings> <Print Quality> <Barcode Adjustment Mode> Select the mode
|
|
|
Print density will be lighter when you select stronger improvement.
When printing from the computer, the setting in the printer driver takes precedence. When the setting of [Graphics Mode] in the printer driver is changed to [UFR II Mode] and [Barcode Adjustment Mode] is changed to [Printer Default], the setting in the operation panel takes precedence.
When you set this item to one of <Mode 1> to <Mode 3>, <Special Printing Mode A> is automatically set to <Off>. Special Printing Mode A
|
Layout
Specify the page layout settings such as binding position and margin values.
Binding Location
If you are binding the printouts with a binding tool such as a stapler, use this item to specify whether to bind on the long or short edge. Specify the setting of this item in combination with <Gutter>, which specifies the binding margin to apply to the binding position.
|
Long Edge
Short Edge
|
<Menu> <Printer Settings> <Layout> <Binding Location> Select <Long Edge> or <Short Edge>
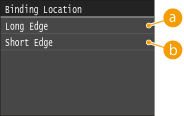
<Long Edge>
Specify this to bind on the long edge of paper.

<Short Edge>
Specify this to bind on the short edge of paper.

Gutter
Shift the print position to adjust the binding margin to apply to the binding edge specified by <Binding Location>. The value "0.00" exerts no effect on the binding margin.
|
-1.90 to 0.00
to +1.90 (inches) or -50.0 to 00.0 to +50.0 (mm) |
<Menu> <Printer Settings> <Layout> <Gutter> Specify the binding margin <Apply>
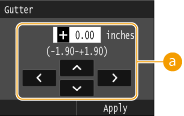
Entering the setting value
Specify the print position shift direction and shift width. Whether the setting value is a "+" or "-" value determines the binding edge along which to adjust the binding margin. You can adjust the binding margin in units of 0.01" (0.5 mm). Use  /
/ to move the cursor, and
  /
/ to switch between "+" / "-" and to increase or decrease the value.
/ to move the cursor, and / to switch between "+" / "-" and to increase or decrease the value.|
Setting Value
|
Long Edge
|
Short Edge
|
|
A value with a "+" sign
|
Left edge of paper
 |
Top edge of paper
 |
|
A value with a "-" sign
|
Right edge of paper
 |
Bottom edge of paper
 |
Offset Short Edge/Offset Long Edge
Irrespective of the paper source, you can shift the print position in units of 0.01" (0.5 mm) for all print jobs.
|
-2.00 to 0.00
to +2.00 (inches) or -50.0 to 00.0 to +50.0 (mm) |
<Menu> <Printer Settings> <Layout> Select the combination of adjustment direction and printing side Specify the offset value <Apply>
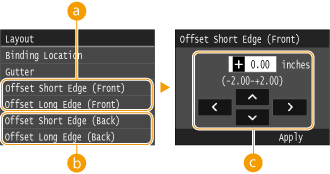
<Offset Short Edge (Front)>/<Offset Long Edge (Front)>
Shifts the print position on the side of paper facing up.
<Offset Short Edge (Back)>/<Offset Long Edge (Back)>
Shifts the print position on the side of paper facing down.
Entering the setting value
For <Offset Short Edge (Front)>/<Offset Short Edge (Back)>, specify a value with a "+" sign to shift the print position in the left-to-right direction. For <Offset Long Edge (Front)>/<Offset Long Edge (Back)>, specify a value with a "+" sign to shift the print position in the up-to-down direction. To shift in the reverse direction, specify a value with a "-" sign. Use / to move the cursor, and / to switch between "+" / "-" and to increase or decrease the value.
/ to move the cursor, and / to switch between "+" / "-" and to increase or decrease the value.|
|
<Offset Short Edge (Front)>
<Offset Short Edge (Back)> 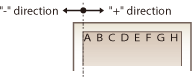 |
|
<Offset Long Edge (Front)>
<Offset Long Edge (Back)>  |
 |
|
To shift the print position, change the setting of [Graphics Mode] on the printer driver to [UFR II Mode].
|
Auto Error Skip
Printing stops if a certain error occurs in the process. However, if you set this item to <On>, the certain error will be skipped and printing can continue. Normally, set this item to <Off>.
|
Off
On |
<Menu> <Printer Settings> <Auto Error Skip> Select <Off> or <On>
Timeout
Set the time period after which the current print job is automatically canceled in the case of a print data reception interruption.
|
5 to 15
to 300 (sec.) |
<Menu> <Printer Settings> <Timeout> Set the time period <Apply>
Personality
Specify the mode in which the machine should operate when the format of document data is unknown.
|
Auto
PDF
XPS
|
<Menu> <Printer Settings> <Personality> Select the Personality mode
UFR II
You can change the settings that become effective when printing from the UFR II printer driver.
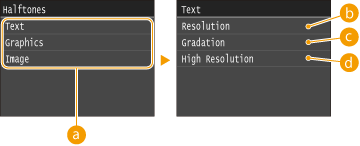
Halftones
You can select the printing method to reproduce halftones (the intermediate range between the lighter and darker areas of an image) for optimal image quality. For each document, you can make settings by type of image.
|
Text
Resolution
Color Tone
Gradation
High Resolution
Graphics
Resolution
Color Tone
Gradation
High Resolution
Image
Resolution
Color Tone
Gradation
High Resolution
|
<Menu> <Printer Settings> <UFR II> <Halftones> Select the type of image Select the halftone reproduction method

Type of image
Select the object for which to change the setting. <Text> represents letters and characters, <Graphics> represents lines and figures, and <Image> represents photos and images.
<Resolution>
Produces a fine print with clear edges of text. It is suitable for printing characters and fine lines.
<Color Tone>
Produces a sharp print with strong contrast of lightness and darkness. It is suitable for printing image data such as photo image data.
 <Gradation>
Produces a print with smooth gradation or smooth edges. It is suitable for printing figures or graphs containing gradation areas.
 <High Resolution>
As compared to <Resolution>, this produces a finer print but quality stability is slightly lower. It is suitable to obtain a print of character data or fine line data or CAD data with sharp edges.
You can change settings for PDF files.
Enlarge/Reduce to Fit Paper Size
Specify whether to print in an enlarged/reduced size to fit to the Printable Area of the paper. Note that size enlargement/reduction will not affect the aspect ratio of the document.
|
Off
On
|
<Menu> <Printer Settings> <PDF> <Enlarge/Reduce to Fit Paper Size> Select <Off> or <On>
Enlarge Print Area
Specify whether to enlarge the Printable Area as much as the paper size permits.
|
Off
On
|
<Menu> <Printer Settings> <PDF> <Enlarge Print Area> Select <Off> or <On>
|
|
|
If you specify <On>, it may occur that edge-adjacent portions of page are not printed or that printouts come out partially smudged depending on the document.
|
N on 1
Specify whether to shrink multiple pages and print them on one page in such arrangement that the first page is positioned at top left. For example, to print 4 pages onto a single sheet, select <4 on 1>.
|
Off
2 on 1
4 on 1
6 on 1
8 on 1
9 on 1
16 on 1
|
<Menu> <Printer Settings> <PDF> <N on 1> Select the shrinkage ratio
Print Comments
Specify whether to print comments. If you specify <Auto>, comments in PDF files will be printed.
|
Off
Auto
|
<Menu> <Printer Settings> <PDF> <Print Comments> Select <Auto> or <Off>
Halftones
You can select the printing method to reproduce halftones (the intermediate range between the lighter and darker areas of an image) for optimal image quality. For each document, you can make settings by type of image.
|
Text
Resolution
Gradation
High Resolution
Graphics
Resolution
Gradation
High Resolution
Image
Resolution
Gradation
High Resolution
|
<Menu> <Printer Settings> <PDF> <Halftones> Select the type of image Select the halftone reproduction method

Type of image
Select the object for which to change the setting. <Text> represents letters and characters, <Graphics> represents lines and figures, and <Image> represents photos and images.
<Resolution>
Produces a fine print with clear edges of text. It is suitable for printing characters and fine lines.
<Gradation>
Produces a print with smooth gradation or smooth edges. It is suitable for printing figures or graphs containing gradation areas.
<High Resolution>
As compared to <Resolution>, this produces a finer print but quality stability is slightly lower. It is suitable to obtain a print of character data or fine line data or CAD data with sharp edges.
Grayscale Conversion
Specify the type of grayscale conversion of color print data.
|
sRGB
NTSC
Uniform RGB
|
<Menu> <Printer Settings> <PDF> <Grayscale Conversion> Select the type of grayscale conversion
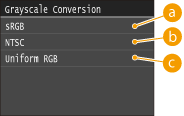
<sRGB>
Color data is converted to monochrome with emphasis on color differences so that a smooth gradation is achieved.
<NTSC>
Color data is converted to monochrome so that the resulting image looks like a television picture (of the NTSC system).
<Uniform RGB>
Color data is converted to monochrome so that R, G, and B are uniformly converted to the same gray level.
XPS
You can change settings for XPS files.
Halftones
You can select the printing method to reproduce halftones (the intermediate range between the lighter and darker areas of an image) for optimal image quality. For each document, you can make settings by type of image.
|
Text
Resolution
Gradation
High Resolution
Graphics
Resolution
Gradation
High Resolution
Image
Resolution
Gradation
High Resolution
|
<Menu> <Printer Settings> <XPS> <Halftones> Select the type of image Select the halftone reproduction method
Type of image
Select the object for which to change the setting. <Text> represents letters and characters, <Graphics> represents lines and figures, and <Image> represents photos and images.
<Resolution>
Produces a fine print with clear edges of text. It is suitable for printing characters and fine lines.
<Gradation>
Produces a print with smooth gradation or smooth edges. It is suitable for printing figures or graphs containing gradation areas.
<High Resolution>
As compared to <Resolution>, this produces a finer print but quality stability is slightly lower. It is suitable to obtain a print of character data or fine line data or CAD data with sharp edges.
Grayscale Conversion
Specify the type of grayscale conversion of color print data.
|
Text
sRGB
NTSC
Uniform RGB
Graphics
sRGB
NTSC
Uniform RGB
Image
sRGB
NTSC
Uniform RGB
|
<Menu> <Printer Settings> <XPS> <Grayscale Conversion> Select the type of image Select the type of grayscale conversion

Type of image
Select the object for which to change the setting. <Text> represents letters and characters, <Graphics> represents lines and figures, and <Image> represents photos and images.
<sRGB>
Color data is converted to monochrome with emphasis on color differences so that a smooth gradation is achieved.
<NTSC>
Color data is converted to monochrome so that the resulting image looks like a television picture (of the NTSC system).
<Uniform RGB>
Color data is converted to monochrome so that R, G, and B are uniformly converted to the same gray level.
Compressed Image Output
As time passes after a print job starts, image quality may decrease depending on the print data. Specify how the machine is to behave when image quality has significantly decreased.
|
Output
Display Error
|
<Menu> <Printer Settings> <XPS> <Compressed Image Output> Select <Output> or <Display Error>
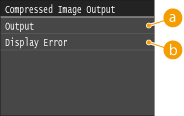
<Output>
The machine continues the print job regardless of the degree of decrease in image quality.
<Display Error>
When image quality has significantly decreased, the machine displays an error message and stops the print job.