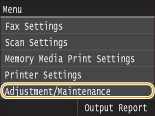
Adjustment/Maintenance
 |
|
All the settings about adjustment and maintenance are listed with short descriptions. Default settings are marked with a dagger (
 ). ). |
Adjust Copy Image
Adjust the gradation and density in copies. Adjusting the Gradation and Density for Copy Jobs
Display Timing for Cartridge Preparation Notification
Set the display timing for the message notifying you that the amount remaining in the toner cartridges is low.
|
Auto
Custom
|
<Menu>  <System Management Settings> <Display Timing for Cartridge Preparation Notification> <Custom> Enter toner level <Apply>
Printer Density
Adjust this if the printed text or thin lines are faded.
|
Nine Levels
|
<Menu> <Adjustment/Maintenance> <Printer Density> Tap  /
/  to adjust the toner density <Apply>
/ to adjust the toner density Toner Save
You can save toner when performing copying, printing received faxes, or report printing.
|
Off
On
|
<Menu> <Adjustment/Maintenance> <Toner Save> Select <Off> or <On>
Special Processing
If the print results on special types of paper are not satisfactory, the following settings may improve the quality of the printouts.
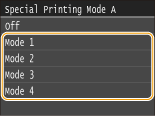
Special Printing Mode A
Streaks may appear on printouts depending on the paper type or the environmental conditions. In this case, setting this item may solve the problem. The improvement effect is weakest with <Mode 1> and strongest with <Mode 4>.
|
Off
Mode 1
Mode 2
Mode 3
Mode 4
|
<Menu> <Adjustment/Maintenance> <Special Processing> <Special Printing Mode A> Select the mode
 |
|
When printing from the computer, the setting in the printer driver takes precedence. When the setting of [Graphics Mode] in the printer driver is changed to [UFR II Mode], the setting in the operation panel takes precedence. Smudges Appear on Printouts
This item cannot be set when <Barcode Adjustment Mode> is set to one of <Mode 1> to <Mode 3>. Barcode Adjustment Mode
Print density will be lighter when you select stronger improvement. It may also result in less sharp edges and rougher details.
If the problem cannot be solved in spite of this item having been set, set <Special Printing Mode D> to <On>. Special Printing Mode D
|
Special Printing Mode U
Toner smudges and splatters may appear around printed characters, graphics, etc. depending on the paper type or the environmental conditions (more specifically when you print on heavy paper or use the machine in an environment with low humidity). In this case, setting this item to <On> may solve the problem.
|
Off
On
|
<Menu> <Adjustment/Maintenance> <Special Processing> <Special Printing Mode U> <On>

|
|
|
When you set this item to <On>, print quality may be lower depending on the paper type or the operating environment (more specifically when you print on thin paper or use the machine in an environment with high humidity).
|
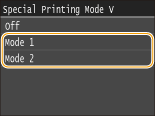
Special Printing Mode V
If the printed paper curls when you are using paper having absorbed moisture, set this item. The improvement effect is stronger with <Mode 2> than with <Mode 1>.
|
Off
Mode 1
Mode 2
|
<Menu> <Adjustment/Maintenance> <Special Processing> <Special Printing Mode V> Select the mode
|
|
|
Printing speed becomes slower when you select stronger improvement.
|
Special Printing Mode Z
Blurred smudges may appear on copied paper depending on the paper type or the environmental conditions. In this case, setting this item may solve the problem. The improvement effect is weakest with <Mode 1> and strongest with <Mode 3>.
|
Off
Mode 1
Mode 2
Mode 3
|
<Menu> <Adjustment/Maintenance> <Special Processing> <Special Printing Mode Z> Select the mode

|
|
|
This item is only effective for copy job output.
Print density will be lighter when you select stronger improvement. It may also result in less sharp edges and rougher details.
If the problem cannot be solved in spite of this item having been set, set <Special Printing Mode D> to <On>. Special Printing Mode D
|
Special Printing Mode B
Streaks may appear on printouts immediately after you replace the toner cartridge or when you print for the first time after a long time. In this case, setting this item may solve the problem. The improvement effect is weakest with <Mode 1> and strongest with <Mode 3>.
|
Off
Mode 1
Mode 2
Mode 3
|
<Menu> <Adjustment/Maintenance> <Special Processing> <Special Printing Mode B> Select the mode

|
|
|
Printing speed becomes slower when you select stronger improvement.
|
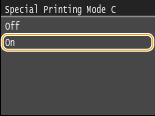
Special Printing Mode C
When printing received fax documents or reports or lists, blurred smudges may appear on printouts depending on the paper type or the environmental conditions. In this case, setting this item to <On> may solve the problem.
|
Off
On
|
<Menu> <Adjustment/Maintenance> <Special Processing> <Special Printing Mode C> <On>
|
|
|
This item is only effective for printing received fax documents or reports or lists.
If you set this item to <On>, the printing speed becomes slower.
If the problem cannot be solved in spite of this item having been set, set <Special Printing Mode D> to <On>. Special Printing Mode D
|
Special Printing Mode D
Streaks may appear on printouts depending on the paper type or the environmental conditions. Setting this item to <On> may solve the problem. Also, setting this item to <On> will reduce the operating noise during printing.
|
Off
On
|
<Menu> <Adjustment/Maintenance> <Special Processing> <Special Printing Mode D> <On>
|
|
|
If you set this item to <On>, the printing speed becomes slower.
|
Clean Fixing Assembly
Clean the fixing unit after a toner cartridge is replaced or if black streaks appear on printouts. Fixing Unit
Clean Feeder
Clean the feeder rollers if documents become dirty after being fed through the feeder. Feeder