 <Preferences>
  <Paper Settings>
 <Preferences>
  <Paper Settings>
 <Preferences>
  <Paper Settings>
 <Preferences>
  <Paper Settings>

 <Preferences>
  <Paper Settings>
|
1
|
Press
 . . |
||||||||||||||||
|
2
|
Press <Preferences>
 <Paper Settings>. <Paper Settings>. |
||||||||||||||||
|
3
|
Press <Paper Type Management Settings>
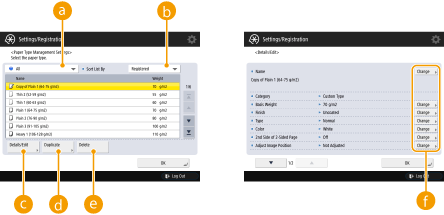
 specify the settings. specify the settings.  Paper type drop-down list Paper type drop-down listEnables you to select the paper type to display.
 <Sort List By> <Sort List By>Enables you to change the display order of the list.
 <Details/Edit> <Details/Edit>Displays details for the selected paper type on the <Details/Edit> screen. If you select a custom paper type, you can edit it.
 <Duplicate> <Duplicate>Duplicates the selected paper type as a custom paper type.
 <Delete> <Delete>Deletes the selected custom paper type.
 <Change> <Change>Appears on the <Details/Edit> screen for the custom paper type and enables you to change the settings for the following items.
<Name>: Change <Name> of the registered custom paper.
<Basis Weight>: Change <Basis Weight> of the registered custom paper.
<Finish>: Change <Finish> when you register uncoated paper, recycled paper, transparencies, labels, etc. as custom paper.
<Type>: Change <Type> when you register pre-punched paper, etc. as custom paper.
<Color>: Change <Color> of the registered custom paper.
<2nd Side of 2-Sided Page>: Specify whether the backside of the custom paper (second side of 2-sided paper) has already been printed on. If the backside of the paper has not been printed on, select <Off>.
<Adjust Image Position>: This setting enables you to adjust the image location, by checking whether the register marks on the test print align with the image at the leading edge toward the feeding direction of the test print paper.
<Adjust Creep Correction>: Change the <Adjust Creep Correction> value of the registered custom paper when adjusting the creep (displacement) correction width for each page when the Booklet mode is set.
<Adjust Gloss>: Change the glossiness of the registered custom paper. When using plain paper or coated paper, etc., you can adjust the glossiness of output images by calibrating the temperature of the fixing unit.
<Adj. Secondary Transfer Voltage>: Adjust the Secondary Transfer Voltage (the voltage that transfers toner to the paper) for the registered custom paper if image blurring occurs.
<Toner Amount Reduction Mode>: Adjust the total amount of toner according to each paper type. If this setting is set to <On>, you can restrict the total amount of toner while maintaining reflected CMYK correction values entered for color adjustment, etc. As a result, you may be able to reduce issues with certain types of paper, such as adverse effects on image quality due to uneven glossiness, as well as feeding problems and poor toner fixing.
|
||||||||||||||||
|
4
|
Press <OK>.
|

 <Preferences>
  <Paper Settings>
 <Preferences>
  <Paper Settings>
 <Preferences>
  <Paper Settings>