Printing Documents Retained in the Machine (Forced Hold Printing)
 |
|
To avoid leaving printed material, accidental information leakage, misprinting, etc., the administrator sets to store the document before printing. To print the stored document, see the followings.
|
 |
|
The Forced Hold mode needs to be set in advance. <Print>
 <Forced Hold> <Forced Hold>Note that documents are automatically deleted after a specified period of time passes. Please consult your administrator regarding the length of this time period.
|
1
Press <Print> on the Main Menu. <Main Menu> Screen
2
Select a document.

 Document list
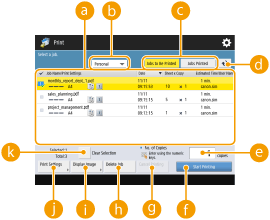
Documents which match the document type selected in the drop-down list  and their related information are displayed in a list format.
 and their related information are displayed in a list format.
When a document is selected,  which indicates "selected" is displayed. When multiple documents are selected, the numbers in the center of
  are displayed as 1, 2, 3 ... in the order selected. When you press a selected document, the selection is canceled.

You can print from here if the printer driver output method is set to [Secured Print].
 <Personal>/<Shared>/<Group>
<Personal>: Displays the documents sent by the user who is logged in.
<Shared>: Documents held based on specific conditions according to forced hold settings are displayed. All users can display/print these documents.
<Group>: Displays documents that have the same group information as the user who is logged in. Uses Department IDs to identify groups.
 <Jobs to Be Printed>/<Jobs Printed>
When selecting an unprinted document, confirm that <Jobs to Be Printed> is selected.
 Update button
Updates the document list.
 <No. of Copies>
To change the number of sets to be printed, enter the number of sets to change.
 <Start Printing>
Executes printing.
 <Cancel Printing>
Cancels printing.
 <Delete Job>
Deletes documents.
 <Display Image>
You can see the contents of the document to be printed.
 <Print Settings>
You can edit the printing settings such as number of copy.

You can print a sample set with the settings specified in Print Settings by pressing <Print Sample>.
Depending on changed settings, the document may not be printed correctly.
 <Select All (Max 100 jobs)>/<Clear Selection>
If a document is not selected in  , <Select All (Max 100)> is displayed, which enables you to select all the documents in the document list. When documents are selected, <Clear Selection> is displayed enabling you to cancel the entire selection.
 , <Select All (Max 100)> is displayed, which enables you to select all the documents in the document list. When documents are selected, <Clear Selection> is displayed enabling you to cancel the entire selection.
Depending on settings specified in the printer driver, you may not be able to change the settings in <Print Settings> or to display the preview by <Display Image>.
3
Press <Start Printing>.
Printing starts.
Printing More Safely with Encrypted Secure Print
By using Encrypted Secure Printing, you can send encrypted printing data to a machine from your computer. This enables you to reduce the risk of information leaks when sending printed data, and to print more safely. Use this especially when printing highly confidential documents.
 |
|
The document with Encrypted Secure Printing is displayed along with
To print the encrypted document, you must enter the password. The password must be the same as the password you set on the printer driver.
For information on setting items, see "Help" by clicking [Help] on the printer driver setting screen (Windows only).
Encrypted Secure Print cannot be used with Mac OS.
To use encrypted secure printing, install the "Encrypted Secured Print Driver Add-in for Client PC" to the printer driver. Make sure to read the Readme.txt file before installing the add-in.
For information on sending encrypted secure print documents from a computer, see the help for "Encrypted Secured Print Driver Add-in for Client PC" and the Readme.txt file.
|