Adjusting Color Tone
You can perform auto adjustment if the color of the printing result is significantly different from the color of the original document when you copy or print an image.

 |
If you perform this operation in a location where the room environment (temperature and humidity) dramatically changes, the color may vary. |
1
Press  (Settings/Registration)
  <Adjustment/Maintenance>
  <Adjust Image Quality>
  <Auto Correct Color Tone Settings>.
 (Settings/Registration)
  <Adjustment/Maintenance>
  <Adjust Image Quality>
  <Auto Correct Color Tone Settings>.
2
Press <Auto Correct Color Tone>  <Yes>.
 <Yes>.
If you have not performed auto gradation adjustment (full adjustment), press <No> to execute it.
3
Press <Start Correcting>.
To perform color adjustment based on an adjustment standard registered in advance, select the adjustment standard in <Change Corr. Pattern>.

For information on creating a new adjustment standard, see Creating a Color Adjustment Standard.
4
Select the paper source, and press <OK>  <Start Printing>.
 <Start Printing>.
A test page is printed.
5
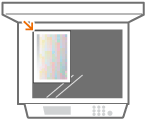
Place the test page on the platen glass.

Place the test page sheet in the machine in a manner that its side on which the four color stripes are printed faces down and the gray stripe faces toward the left edge of the machine.
6
Press <Start Scanning>.
The machine starts scanning the test page.
Creating a Color Adjustment Standard
You can create and register an adjustment standard of your choice. Up to four adjustment standards can be registered.
1
Press  (Settings/Registration)
  <Adjustment/Maintenance>
  <Adjust Image Quality>
  <Auto Correct Color Tone Settings>.
 (Settings/Registration)
  <Adjustment/Maintenance>
  <Adjust Image Quality>
  <Auto Correct Color Tone Settings>.
2
Press <Register Correction Pattern>  <Yes>.
 <Yes>.
If you have not performed auto gradation adjustment (full adjustment), press <No> to execute it.
3
Select the destination to register the new adjustment standard  press <Next>.
 press <Next>.
4
Select the paper, press <Next>  select the paper source, and press <OK>.
 select the paper source, and press <OK>.
5
Press <Start Printing>.
A test page is printed.
6
Place the test page on the platen glass.

Place the test page sheet in the machine in a manner that its side on which the four color stripes are printed faces down and the gray stripe faces toward the left edge of the machine.
7
Press <Start Scanning>.
The machine starts scanning the test page.