Configuring Scan Settings in Simple Mode
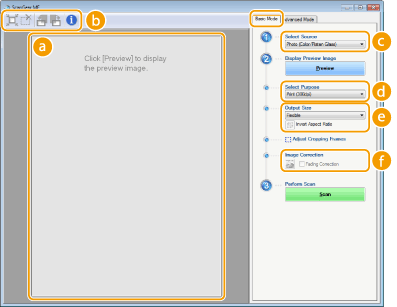
Simple Mode is a collection of basic scan settings in ScanGear MF designed for easy operation. In other words, Simple Mode is a digest version of ScanGear MF. Configure settings in the order indicated from  to
to  on the screen, and click [Scan]. By doing so, you can configure basic settings and scan.
 to
to  on the screen, and click [Scan]. By doing so, you can configure basic settings and scan.
 Preview area
You can preview the document that is placed on the platen glass. If you click [Preview], a preview image is displayed in this area and the cropping frame is displayed with a dotted line.
 Toolbar
Control the image in the preview area.
 (Auto Crop)
The cropping frame that fits the scanned image is automatically set. Each time you click the icon, the cropping frame is reduced. You can move the frame, or change its size with your mouse.

Manually setting multiple scanning areas
You can manually add cropping frames. You can also specify cropping areas in the document so that each of them can be scanned as separate images. Drag the cropping frames to specify the areas you want to scan. You can specify up to ten areas. Click [Scan] to scan the areas in the cropping frames as separate images.
 (Clear Crop Frame)
Clears the selected cropping frame.
 (Left Rotate)/
 (Right Rotate)
Rotates the preview image 90 degrees to the left or right.
 (Information)
Displays the current settings of the scanned image, such as the color mode and size of the scan area.
 [Select Source]
Select the image type to scan documents. Available items vary depending on where you placed the document.
If you placed the document on the platen glass
|
[Photo (Color)]
|
The photo document is scanned as a color image.
|
|
[Magazine (Color)]
|
Print material, such as a magazine, is scanned as a color image. The color unevenness and moire that occurs when scanning print images is reduced.
|
|
[Newspaper (B&W)]
|
The text document or line drawing is scanned as a black and white image (in black and white only, with no intermediate shades of gray).
|
|
[Document (Grayscale)]
|
The text or photograph document is scanned as a grayscale image (in black and white with intermediate shades of gray, similar to a black and white photograph).
|
If you placed the document in the feeder
|
[Document (Color) ADF]
|
The document is scanned as a color image.
|
|
[Document (Grayscale) ADF]
|
The document is scanned as a grayscale image.
|
 [Select Purpose]
Select a setting based on your intended use of the scanned image.
|
[Print (300dpi)]
|
Select when printing the scanned image.
|
|
[Image Display (150dpi)]
|
Select when displaying the scanned image on a computer.
|
|
[OCR (300dpi)]
|
Select when using the scanned image with OCR (optical character recognition) software.
|
 [Output Size]
Select the size of the scanned image when it is printed or displayed on a computer. For example, if you want to output an image that is appropriate for printing on LTR paper, select [LTR], and [Print (300dpi)] for [Select Purpose] ( ).
).
 ).
).Click  to switch between the portrait and landscape orientation. This button is not available when [Flexible] is selected.
 to switch between the portrait and landscape orientation. This button is not available when [Flexible] is selected.
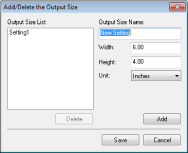
If you select [Add/Delete], you can add new output size settings and delete the added sizes.

Select [Flexible] to change the ratio of width to height. Drag the area you want to scan on the preview image.
 [Image Correction]
Select the [Fading Correction] check box to correct faded colors on an old photograph or other images into vivid colors. This setting is available when a preview image is displayed and you select [Photo (Color)] or [Magazine (Color)] for [Select Source] ( ).
).
 ).
).