Specifying Communications Settings
This section describes the System Settings items related to the e-mail, I-fax, and fax functions.
E-Mail/I-Fax Settings
You can change the e-mail and I-fax transmission settings listed below.
Maximum Data Size For Sending
Sets the maximum data size for outgoing e-mail messages and I-fax documents. If the data size of the document sent from the machine exceeds the specified maximum data size and <Divided TX over Max.Data Size> is set to ‘On’, the document is split up into multiple files by page and sent as different e-mail or I-fax messages.
Divided TX over Max.Data Size
Sets whether to divide a document into separate files when it is sent if its size exceeds the data size you specify.
Default Subject
The subject that you enter here is used as the default subject whenever you do not enter a subject when sending a job.
|
IMPORTANT
|
|
This setting is available only when the Send function (optional for the imageRUNNER 2525/2520) is activated.
|
|
NOTE
|
|
The default settings are:
Maximum TX Data Size: 3 MB
Divided TX over Max.Data Size: Off
Default Subject: Attached Image
|
1
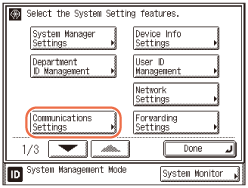
Press  (Additional Functions) → [System Settings] → [Communications Settings].
 (Additional Functions) → [System Settings] → [Communications Settings].
2
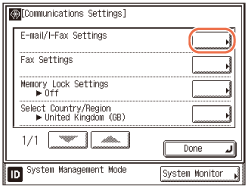
Press [E-mail/I-Fax Settings].
3
Specify each settings.
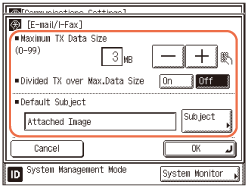
<Maximum TX Data Size>:
Use [-] or [+] to specify the maximum data size for sending.
You can set the Maximum TX Data Size from 0 to 99 MB, in 1 MB increments.
If you enter ‘0’ MB as the data size, there is no size limit on the data that is sent.
<Divided TX over Max.Data Size>:
[On]: When the data size of the document exceeds the size set in <Maximum TX Data Size>, the document is sent as separate files. If the data size of a single page document exceeds the maximum data size for sending, the send job is handled as an error and the document cannot be sent.
[Off]: When the data size of the document exceeds the size set in <Maximum TX Data Size>, the document is not sent.
<Default Subject>:
Press [Subject] → enter the default subject → press [OK].
You can enter up to 40 characters for the default subject.
IMPORTANT:
Be sure to set the maximum data size for sending to a value that does not exceed the maximum data size allowed by the mail server.
If the Language Switch setting is set to ‘On’, some characters are restricted and cannot be entered. To enter all characters, set the Language Switch setting to ‘Off’. (Konfigurace základních nastavení stroje)
NOTE:
You can also enter values for Maximum TX Data Size using  -
-  (numeric keys).
 -
-  (numeric keys).
For instructions on how to enter characters using the on-screen keyboard, see Základní operace.
4
Confirm the settings you specified → press [OK].
5
Press  (Reset) to return to the top screen.
 (Reset) to return to the top screen.
Fax Settings
Setting Sending/Receiving Start Speed
This section describes how to set the send and receive start speeds. This is useful when there is difficulty initiating the sending and receiving of a document.
|
IMPORTANT
|
|
This setting is available only when the optional Super G3 Fax Board-AG1 is attached to the machine.
|
|
NOTE
|
|
The default setting is ‘33600 bps’ for both the Send Start Speed and Receive Start Speed.
|
1
Press  (Additional Functions) → [System Settings] → [Communications Settings].
 (Additional Functions) → [System Settings] → [Communications Settings].
For help, see E-Mail/I-Fax Settings.
2
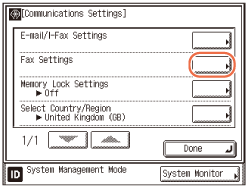
Press [Fax Settings].
3
Select the desired Send Start Speed and Receive Start Speed by pressing each drop-down list → press [OK].
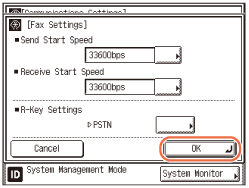
If your document transmission or reception is slow in starting, this may mean that the telephone lines in your area are in poor condition. Select a slower speed. You can select [33600 bps], [14400 bps], [9600 bps], [7200 bps], [4800 bps], or [2400 bps].
4
Press  (Reset) to return to the top screen.
 (Reset) to return to the top screen.
R-Key Setting
If your machine is connected through a PBX (Private Branch Exchange), it is necessary to set the access method. You can set the PBX type to ‘Prefix’ or ‘Hooking’.
|
IMPORTANT
|
|
This setting is available only when the optional Super G3 Fax Board-AG1 is attached to the machine.
|
|
NOTE
|
|
If you select ‘Prefix’ for R-Key Settings, you can set a code of up to 20 digits that will access an outside line. Be sure to enter a pause [P] after the prefix code.
The default setting is ‘PSTN’.
|
1
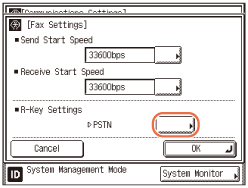
Press  (Additional Functions) → [System Settings] → [Communications Settings] → [Fax Settings] → [R-key Settings].
 (Additional Functions) → [System Settings] → [Communications Settings] → [Fax Settings] → [R-key Settings].
2
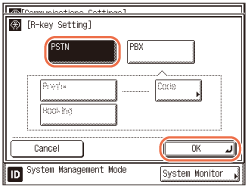
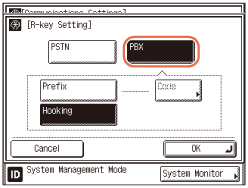
Press [PSTN] or [PBX].
If your machine is connected to an outside line:
|
1
|
Press [PSTN] → [OK].
 |
|
2
|
Proceed to step 4.
|
If your machine is connected through a PBX:
|
1
|
Press [PBX].
 |
|
2
|
Proceed to step 3.
|
3
Select the type of PBX you are using.
If you select [Prefix]:
|
1
|
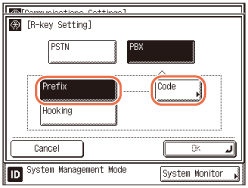
Press [Prefix] → [Code].
 |
|
2
|
Enter the prefix code using
 - -  (numeric keys) → press [OK] → [OK]. (numeric keys) → press [OK] → [OK].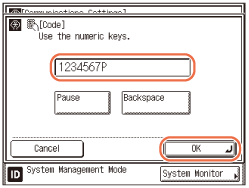 Be sure to enter a pause after the prefix code. If you press [Pause] at the end of the prefix code, <P> is displayed. If you do not insert a pause, the prefix code is not registered.
You can enter up to 20 digits for a prefix code.
Press [Backspace] to delete the number or character immediately to the left of the cursor.
You can press
 (Clear) to clear your entry. (Clear) to clear your entry. |
If you select [Hooking]:
|
1
|
Press [Hooking] → [OK].
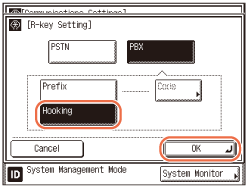 The selected mode is set.
|
4
Press  (Reset) to return to the top screen.
 (Reset) to return to the top screen.
Memory Lock Settings
There may be occasions when you want to use the Memory Lock mode, which stores all incoming documents in the memory until you are ready to print or send them. After the Memory Lock is turned ‘On’, the machine will enter the Memory Lock mode. The documents received when the machine is in the Memory Lock mode are stored in memory until you unlock the memory with a password and print them. You can also set the machine to automatically enter and leave the Memory Lock mode at a specified time.
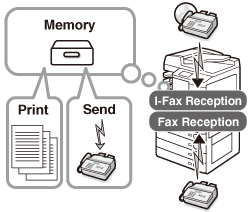
This section explains how to enable and disable the Memory Lock mode and configure the Memory Lock settings such as the password and the timer for turning on and off the Memory Lock.
|
IMPORTANT
|
|
This setting is available only when the Send function (optional for the imageRUNNER 2525/2520) is activated or the optional Super G3 Fax Board-AG1 is attached to the machine.
Additional documents cannot be received in memory if either of the following is true:
When a total of 95 documents have been stored
When a total of approximately 1,000 pages have been stored
|
|
NOTE
|
|
You can check, erase, or redirect the received documents in memory using the System Monitor screen. (Kontrola/změna stavu dokumentů v paměti)
The default setting is ‘Off’.
|
1
Press  (Additional Functions) → [System Settings] → [Communications Settings].
 (Additional Functions) → [System Settings] → [Communications Settings].
For help, see E-Mail/I-Fax Settings.
2
Press [Memory Lock Settings].
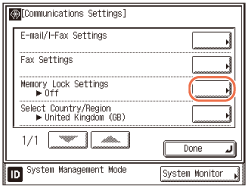
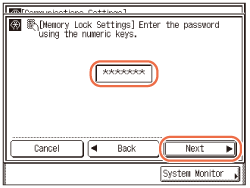
NOTE:
If the screen shown above appears, enter the password using  -
-  (numeric keys) → press [Next].
 -
-  (numeric keys) → press [Next].
3
Press [On] or [Off].
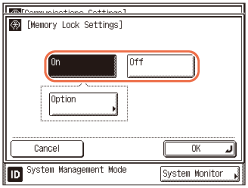
If you want to set the Memory Lock mode:
|
1
|
Press [On] → [Option].
|
|
2
|
Proceed to step 4.
|
If you do not want to set the Memory Lock mode:
|
1
|
Press [Off].
|
|
2
|
Proceed to step 7.
|
4
If you want to set a password for the Memory Lock mode, enter a password using  -
-  (numeric keys) → press [Next].
 -
-  (numeric keys) → press [Next].
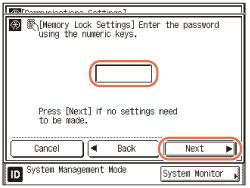
If you do not want to set the Memory Lock with a password, press [Next] without entering any number.
Once the Memory Lock password is set, it is necessary to enter the password when you want to change the Memory Lock Settings, except when you have logged in to the machine by entering the System Manager ID and System Password.
You cannot store a password that only consists of zeros, such as <0000000>.
If you enter fewer than seven digits, the machine stores the password with leading zeros.
Example: If <02> or <002> is entered, <0000002> is stored.
IMPORTANT:
Since there is no way to check a stored password, make sure that you write it down, and keep it in a safe place.
NOTE:
If you make a mistake when entering the password, press  (Clear) → enter the correct password.
 (Clear) → enter the correct password.
5
Specify the memory lock settings.
If you want to print the reports which are set to be printed automatically in Report Settings:
|
1
|
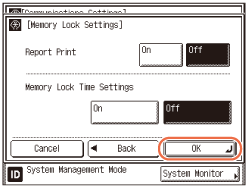
Press [On] for <Report Print>.
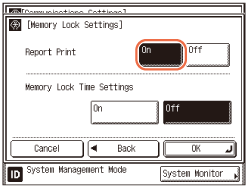 If you do not want to print these reports, press [Off].
|
If you want to specify the Memory Lock Time Settings:
|
1
|
Press [On] for <Memory Lock Time Settings> → press [Next].
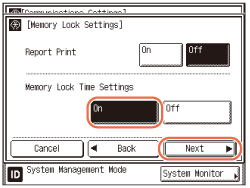 If you do not want to set the Memory Lock Time, press [Off] → go to step 6.
NOTE:
If [Off] is selected, the Memory Lock mode will not start automatically at a specified time. The machine enters the Memory Lock mode only when you manually set Memory Lock to ‘On’ from the Memory Lock Settings screen.
|
|
2
|
Press [Memory Lock Start Time] → specify the time to enter the Memory Lock mode using
 - -  (numeric keys). (numeric keys).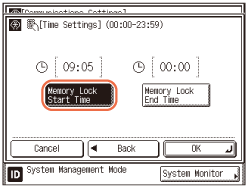 |
|
3
|
Press [Memory Lock End Time] → specify the time to exit the Memory Lock mode using
 - -  (numeric keys) → press [OK]. (numeric keys) → press [OK].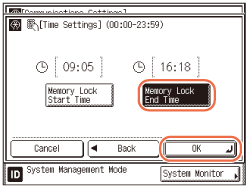 Enter all four digits of the time (including zeros), using 24-hour notation.
Examples: 9:05 a.m. → 0905
4:18 p.m. → 1618
|
|
4
|
Go to step 7.
|
NOTE:
If you make a mistake when entering the time, press  (Clear) → enter another four digit number.
 (Clear) → enter another four digit number.
If you do not want to specify the time, press [Cancel].
If you set the same time for Memory Lock Start Time and Memory Lock End Time, the machine will remain in the Memory Lock mode through the entire day.
6
When all settings are complete, press [OK].
7
Press  (Reset) to return to the top screen.
 (Reset) to return to the top screen.
Selecting Country or Region
Select the country or region where the machine is located.
|
IMPORTANT
|
|
Changes made to Select Country/Region become effective when the machine is restarted. To restart the machine, turn it OFF, wait at least 10 seconds, and then turn it ON. For instructions on how to turn the machine ON and OFF, see Chapter 2, “Before You Start Using the Machine,” in the User’s Guide.
|
1
Press  (Additional Functions) → [System Settings] → [Communications Settings].
 (Additional Functions) → [System Settings] → [Communications Settings].
For help, see E-Mail/I-Fax Settings.
2
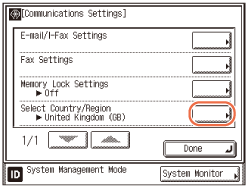
Press [Select Country/Region].
3
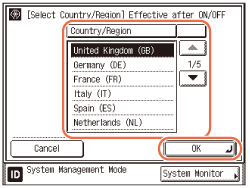
Select the country or region → press [OK].
4
Restart the machine.
Turn OFF the machine, wait at least 10 seconds, and then turn it ON.