Restricting Access from Computers on the Network
Restricting unauthorized access to the machine is highly important for enhanced information security in a digitalized office. To protect the machine from unauthorized access, you can use IP addresses and/or MAC addresses.
|
IMPORTANT
|
|
Changes made to IP Address Range Settings and Receiving MAC Address Settings become effective when the machine is restarted. To restart the machine, turn it OFF, wait at least 10 seconds, and then turn it ON. For instructions on how to turn the machine ON and OFF, see Chapter 2, “Before You Start Using the Machine,” in the User’s Guide.
|
Setting the IP Address Range
You can control access to the machine by specifying (a range of) IP addresses. The machine can be set to filter access by either accepting or rejecting the set (range of) IP addresses.
|
IMPORTANT
|
|
Once you specify the IP addresses or IP address ranges with access permission, you can set or browse machine settings using the Remote UI only from the computers whose IP addresses are permitted.
Once you specify the IP addresses or IP address ranges with access permission, the machine receives the print, fax, and remote scan jobs only from the computers with the allowed IP addresses.
|
Setting IPv4 Address Range
1
Press  (Additional Functions) → [System Settings] → [Network Settings].
 (Additional Functions) → [System Settings] → [Network Settings].
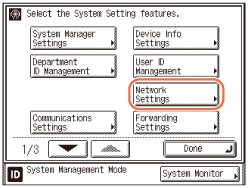
2
Press [TCP/IP Settings] → [IPv4 Settings] → [IP Address Range Settings].
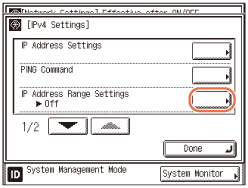
3
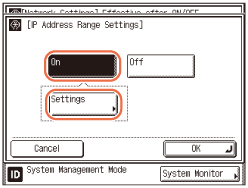
Select whether or not to restrict IP addresses.
If you want to restrict the access (such as print or fax jobs) from computers by specifying an IP address or a range of IP addresses:
|
1
|
Press [On] → [Settings].
 |
|
2
|
Proceed to step 4.
|
If you do not want to restrict the access (such as print jobs) from computers by specifying an IP address or a range of IP addresses:
|
1
|
Press [Off] → [OK].
|
|
2
|
Proceed to step 8.
|
4
Press [Register].
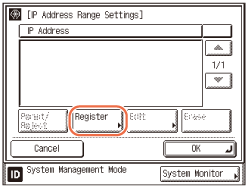
5
Specify the IP address (or the IP address range) to be permitted or rejected.
If you want to permit or reject a single IPv4 address:
|
1
|
Press [Single Address] → enter the desired IPv4 address using
 - -  (numeric keys) → press [OK]. (numeric keys) → press [OK].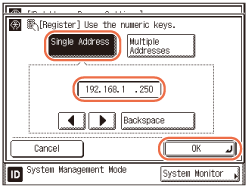 |
If you want to permit or reject a range of IPv4 addresses:
|
1
|
Press [Multiple Addresses] → press [First Address] → enter the first IPv4 address in the range using
 - -  (numeric keys) → press [Last Address] → enter the last IPv4 address in the range → press [OK]. (numeric keys) → press [Last Address] → enter the last IPv4 address in the range → press [OK].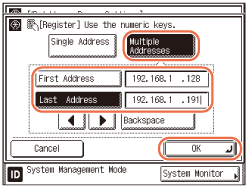 IMPORTANT:
You can register up to 10 IPv4 addresses or IPv4 address ranges.
An IPv4 address of <0.0.0.0> cannot be specified.
The value of [First Address] for [Multiple Addresses] should be smaller than or equal to that of [Last Address].
|
6
Select the IP address or the range of IP addresses that is to be permitted or rejected → press [Permit/Reject].
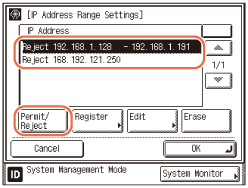
[Permit]: Allows the access to the machine from the specified IPv4 addresses or IPv4 address ranges.
[Reject]: Rejects the access to the machine from the specified IPv4 addresses or IPv4 address ranges.
IMPORTANT:
If the usage of an application protocol is not permitted on your device, it cannot be used even after its IPv4 address is permitted on the machine. On your device, configure the settings to permit the protocol.
NOTE:
If you want to delete an IPv4 address or IPv4 address range, select the address or address range on the IP Address Range Settings screen → press [Erase] → press [Yes] to delete.
If you want to edit an IPv4 address or IPv4 address range, select the address or address range on the IP Address Range Settings screen → press [Edit] → edit the address or address range in the same manner as to register them → press [OK].
7
Press [OK] → [OK].
8
Restart the machine.
Turn OFF the machine, wait at least 10 seconds, and then turn it ON.
Setting IPv6 Address Range
1
Press  (Additional Functions) → [System Settings] → [Network Settings].
 (Additional Functions) → [System Settings] → [Network Settings].
For help, see step 1 in Setting IPv4 Address Range.
2
Press [TCP/IP Settings] → [IPv6 Settings].
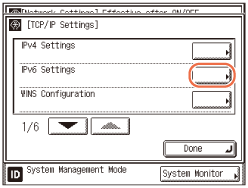
3
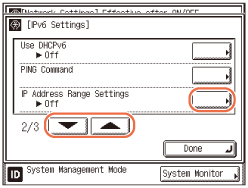
Press [ ] or [
 ] until [IP Address Range Settings] appears → press [IP Address Range Settings].
 ] or [
 ] until [IP Address Range Settings] appears → press [IP Address Range Settings].
4
Select whether or not to restrict IP addresses.
If you want to restrict the access (such as print or fax jobs) from computers by specifying an IP address or a range of IP addresses:
|
1
|
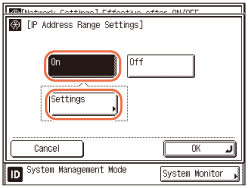
Press [On] → [Settings].
 |
|
2
|
Proceed to step 5.
|
If you do not want to restrict the access (such as print jobs) from computers by specifying an IP address or a range of IP addresses:
|
1
|
Press [Off] → [OK].
|
|
2
|
Proceed to step 9.
|
5
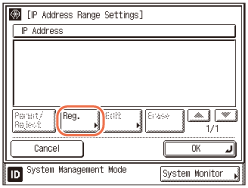
Press [Reg.].
6
Specify the IP address, IP address range, or prefix address to be permitted or rejected.
If you want to permit or reject a single IPv6 address:
|
1
|
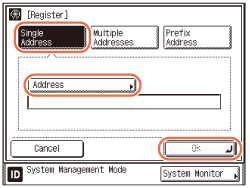
Press [Single Address].
 |
|
2
|
Press [Address] → enter the desired IPv6 address → press [OK].
|
|
3
|
Press [OK].
|
If you want to permit or reject a range of IPv6 addresses:
|
1
|
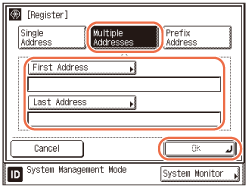
Press [Multiple Addresses].
 |
|
2
|
Press [First Address] → enter the first IPv6 address in the range → press [OK].
|
|
3
|
Press [Last Address] → enter the last IPv6 address in the range → press [OK].
|
|
4
|
Press [OK].
|
If you want to specify the prefix and prefix length for the IPv6 address:
|
1
|
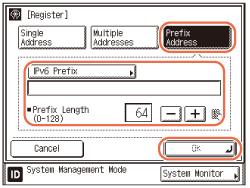
Press [Prefix Address].
 |
|
2
|
Press [IPv6 Prefix] → enter the prefix value for the IPv6 address → press [OK].
|
|
3
|
Enter the prefix length → press [OK].
|
IMPORTANT:
A total of 10 IPv6 addresses, address ranges, or address prefixes can be set.
You cannot specify a multicast address or an address composed entirely of zeros for an IPv6 address.
If you enter ‘0’ in [Prefix Length], no IPv6 addresses are permitted.
If you enter ‘128’ in [Prefix Length], the IPv6 addresses of the machine are not permitted.
If you want to enter a range of addresses, make sure that the number entered in [First Address] is less than the number entered in [Last Address].
7
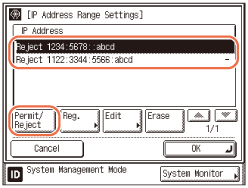
Select the IP address or the range of IP addresses that is to be permitted or rejected → press [Permit/Reject].
|
|
[Permit]:
|
Allows the access to the machine from the specified IPv6 addresses or IPv6 address ranges.
|
|
[Reject]:
|
Rejects the access to the machine from the specified IPv6 addresses or IPv6 address ranges.
|
IMPORTANT:
If the usage of an application protocol is not permitted on your device, it cannot be used even if its IPv6 address is permitted on the machine. Configure the settings of the device to permit the protocol.
NOTE:
If you want to delete an IPv6 address or IPv6 address range, select the address or address range on the IP Address Range Settings screen → press [Erase] → press [Yes] to delete.
If you want to edit an IPv6 address or IPv6 address range, select the address or address range on the IP Address Range Settings screen → press [Edit] → edit the address or address range in the same manner as to register them → press [OK].
8
Press [OK] → [OK].
9
Restart the machine.
Turn OFF the machine, wait at least 10 seconds, and then turn it ON.
Setting the MAC Address Filter
If the machine is connected to an IPv4 network, you can use the MAC Address Filter function to protect the machine from unauthorized access.
|
IMPORTANT
|
|
A total of 10 MAC addresses can be set for this function.
|
1
Press  (Additional Functions) → [System Settings] → [Network Settings].
 (Additional Functions) → [System Settings] → [Network Settings].
For help, see step 1 in Setting IPv4 Address Range.
2
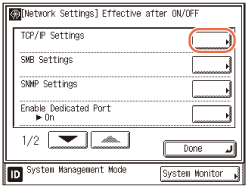
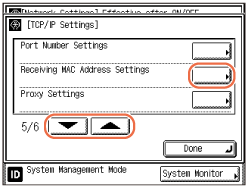
Press [TCP/IP Settings].
3
Press [ ] or [
 ] until [Receiving MAC Address Settings] appears → press [Receiving MAC Address Settings].
 ] or [
 ] until [Receiving MAC Address Settings] appears → press [Receiving MAC Address Settings].
4
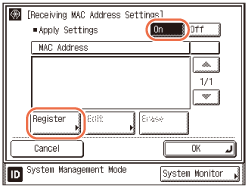
Select whether or not to use the MAC address filter.
If you want to enable a MAC address filter:
|
1
|
Press [On] for <Apply Settings>.
 |
|
2
|
Press [Register].
|
|
3
|
Proceed to step 5.
|
IMPORTANT:
If you select [On] for <Apply Settings>, the machine can be accessed only from MAC addresses specified later in step 5. Be sure to have the correct MAC addresses with you before specifying them on the machine. If an incorrect MAC address is entered, you will be unable to access the machine via the network.
If you want to disable the MAC address filter:
|
1
|
Press [Off] for <Apply Settings>.
|
|
2
|
Proceed to step 6.
|
5
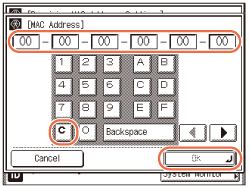
Press [C] → specify the MAC addresses to allow access to → press [OK].
6
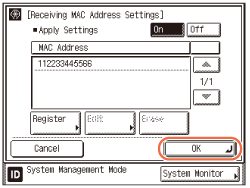
Press [OK].
NOTE:
If you want to delete a MAC address, select the MAC address on the Receiving MAC Address Settings screen → press [Erase] → press [Yes] to delete.
If you want to edit a MAC address, select the MAC address on the Receiving MAC Address Settings screen → press [Edit] → edit the address in the same manner as to register them → press [OK].
7
Restart the machine.
Turn OFF the machine, wait at least 10 seconds, and then turn it ON.