Setting Auto Online / Offline
To use the Network Scan function, the machine must be connected to a network and separately switched online to the network. This section explains how to switch the machine online and offline to use the Network Scan function.
|
NOTE
|
|
Color Network ScanGear, the application software for remote scanning, is compatible with the Windows operating systems only.
|
Auto Online
If Auto Online is set to ‘On’, the machine automatically goes online when you press  (SCAN/PRINT) → [Remote Scan] on the machine’s control panel.
 (SCAN/PRINT) → [Remote Scan] on the machine’s control panel.
|
NOTE
|
|
The default setting is ‘Off’.
|
1
Press  (Additional Functions) → [System Settings].
 (Additional Functions) → [System Settings].
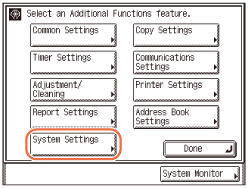
2
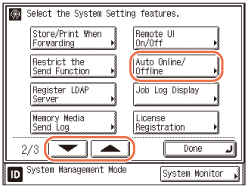
Press [ ] or [
 ] until [Auto Online/Offline] appears → press [Auto Online/Offline].
 ] or [
 ] until [Auto Online/Offline] appears → press [Auto Online/Offline].
3
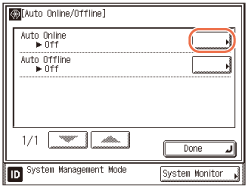
Press [Auto Online].
4
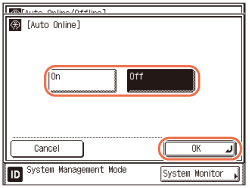
Press [On] or [Off] → [OK].
5
Press  (Reset) to return to the top screen.
 (Reset) to return to the top screen.
Auto Offline
If the machine is connected to a network that is online, scanning may not be possible. By setting Auto Offline to ‘On’, the machine automatically goes offline when the Auto Clear mode initiates, or when two minutes have passed if the Auto Clear time is not set.
|
NOTE
|
|
The default setting is ‘Off’.
|
1
Press  (Additional Functions) → [System Settings].
 (Additional Functions) → [System Settings].
For help, see step 1 in Auto Online.
2
Press [ ] or [
 ] until [Auto Online/Offline] appears → press [Auto Online/Offline].
 ] or [
 ] until [Auto Online/Offline] appears → press [Auto Online/Offline].
For help, see step 2 in Auto Online.
3
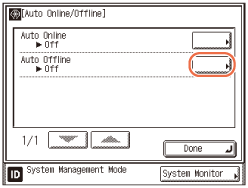
Press [Auto Offline].
4
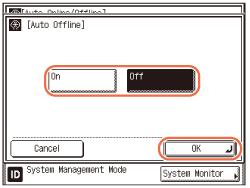
Select [On] or [Off] → press [OK].
NOTE:
If Auto Offline is set to ‘On’, the machine automatically goes offline once the Auto Clear mode initiates. If the Auto Clear mode is not set (the Auto Clear Time is set to ‘0’), the machine automatically goes offline after approximately two minutes. (Basisinstellingen van de machine configureren)
5
Press  (Reset) to return to the top screen.
 (Reset) to return to the top screen.