Setting DNS Server
If your network has a DNS server, you can take advantage of the DNS Dynamic Update function. Follow the procedure below to configure the settings for the DNS server.
|
IMPORTANT
|
|
Changes made to DNS Server settings become effective when the machine is restarted. To restart the machine, turn it OFF, wait at least 10 seconds, and then turn it ON. For instructions on how to turn the machine ON and OFF, see Chapter 2, “Before You Start Using the Machine,” in the User’s Guide.
|
IPv4
1
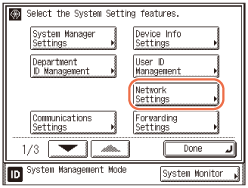
Press  (Additional Functions) → [System Settings] → [Network Settings].
 (Additional Functions) → [System Settings] → [Network Settings].
2
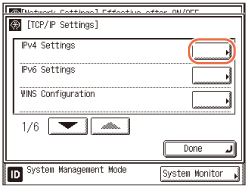
Press [TCP/IP Settings] → [IPv4 Settings].
3
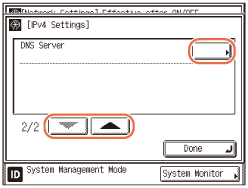
Press [ ] or [
 ] until [DNS Server] appears → press [DNS Server].
 ] or [
 ] until [DNS Server] appears → press [DNS Server].
4
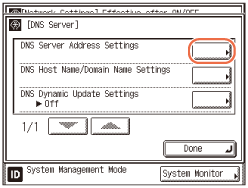
Press [DNS Server Address Settings].
5
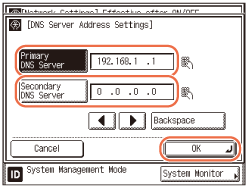
Specify the IPv4 address of a DNS server.
|
1
|
Press [Primary DNS Server] → enter the IP address of the DNS server using
 - -  (numeric keys). (numeric keys). |
|
2
|
Press [Secondary DNS Server] → enter the IP address of the DNS server using
 - -  (numeric keys). (numeric keys).If you do not want to set up a secondary DNS server, enter <0.0.0.0>.
|
|
3
|
Press [OK].
|
IMPORTANT:
If you set [BOOTP] or [DHCP] to ‘On’ on the IP Address Settings screen, the IP address of a DNS server you set manually will be overwritten. (Setting IPv4 Address)
6
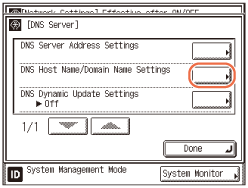
Press [DNS Host Name/Domain Name Settings].
7
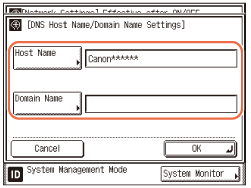
Specify the host name and domain name.
|
1
|
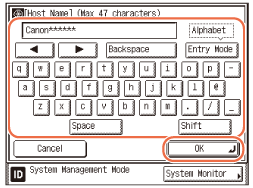
Press [Host Name] → enter the name of the machine as the host name → press [OK].
 |
|
2
|
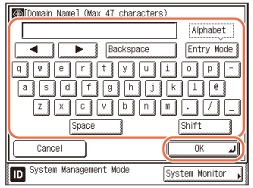
Press [Domain Name] → enter the network domain name of the machine → press [OK].
 |
|
3
|
Press [OK].
|
IMPORTANT:
If you set [BOOTP] or [DHCP] to ‘On’ on the IP Address Settings screen, the host name and domain name you set manually will be overwritten. (Setting IPv4 Address)
8
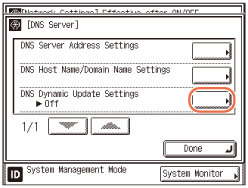
Press [DNS Dynamic Update Settings].
9
Press [On] or [Off] → [OK].
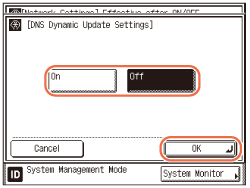
If your environment includes a dynamic DNS server and you want to automatically register the IPv4 address, host name, and domain name set for the machine in the DNS server using dynamic DNS updating, press [On].
Otherwise, press [Off].
IMPORTANT:
The DNS dynamic update function enables the machine to register the IP address, host name, and domain name of the machine to the DNS server automatically. This function is available in environments with a dynamic DNS server.
To use the DNS dynamic update function, enter the IP address of the DNS server, the host name, and the domain name of this machine.
NOTE:
If you have a DHCP server running Windows 2000 Server that uses the DHCP service and want to register the machine’s DNS record, configure the following settings in the DHCP server:
Under the DHCP server, right-click the [Scope] icon → click [Properties]. In the [DNS] sheet of the displayed dialog box, select [Automatically update DHCP client information in DNS] → [Update DNS only if DHCP client requests].
If you have a DHCP server running Windows Server 2003 or Windows Server 2008 that uses the DHCP service and want to register the machine’s DNS record, configure the following settings in the DHCP server:
Under the DHCP server, right-click the [Scope] icon → click [Properties]. In the [DNS] sheet of the displayed dialog box, select [Enable DNS dynamic updates according to the settings below] → [Dynamically update DNS A and PTR records only if requested by the DHCP clients].
10
Restart the machine.
Turn OFF the machine, wait at least 10 seconds, and then turn it ON.
IPv6
1
Press  (Additional Functions) → [System Settings] → [Network Settings].
 (Additional Functions) → [System Settings] → [Network Settings].
For help, see step 1 in IPv4.
2
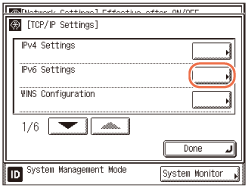
Press [TCP/IP Settings] → [IPv6 Settings].
3
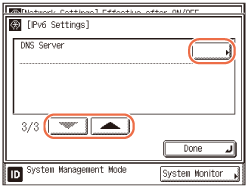
Press [ ] or [
 ] until [DNS Server] appears → press [DNS Server].
 ] or [
 ] until [DNS Server] appears → press [DNS Server].
4
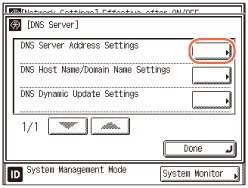
Press [DNS Server Address Settings].
5
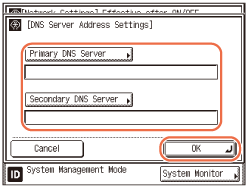
Specify the IPv6 address of a DNS server.
|
1
|
Press [Primary DNS Server] → enter the DNS server address → press [OK].
|
|
2
|
Press [Primary DNS Server] → enter the DNS server address → press [OK].
If you do not want to specify a secondary DNS server, leave [Secondary DNS Server] blank. |
|
3
|
Press [OK].
|
IMPORTANT:
You cannot enter a multicast address or address composed entirely of zeros in [Primary DNS Server] or [Secondary DNS Server].
If you set <Use DHCPv6> to ‘On’ in IPv6 Address Settings, the IPv6 address of a DNS server you set manually will be overwritten. (Setting IPv6 Address)
6
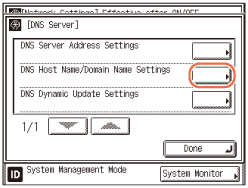
Press [DNS Host Name/Domain Name Settings].
7
Specify the host name and domain name.
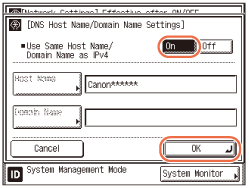
If you want to set the same host name or domain name used with IPv4 communication for IPv6 communication:
|
1
|
Press [On] for <Use Same Host Name/Domain Name as IPv4> → press [OK].
 |
If you want to set the host name or domain name for IPv6 communication:
|
1
|
Press [Off] for <Use Same Host Name/Domain Name as IPv4>.
 |
|
2
|
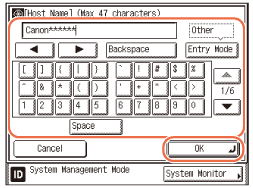
Press [Host Name] → enter the name of the machine as the host name → press [OK].
 |
|
3
|
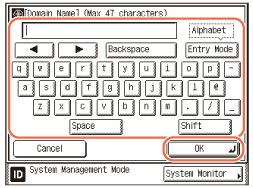
Press [Domain Name] → enter the network domain name of the machine → press [OK].
 |
|
4
|
Press [OK].
|
IMPORTANT:
If you set <Use DHCPv6> to ‘On’ in IPv6 Address Settings, the domain name you set manually will be overwritten. (Setting IPv6 Address)
8
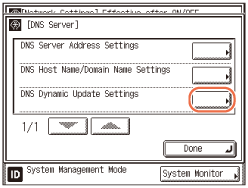
Press [DNS Dynamic Update Settings].
9
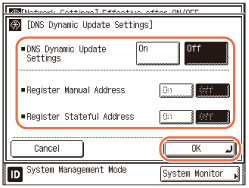
Specify the DNS Dynamic Update function.
|
1
|
If your environment includes a dynamic DNS server and you want to automatically register the IPv6 address, host name, and domain name set for the machine in the DNS server using dynamic DNS updating, press [On] for <DNS Dynamic Update Settings>.
|
|
2
|
If you want to register a manual address in the DNS server using dynamic DNS updating, press [On] for <Register Manual Address>. Otherwise, press [Off].
|
|
3
|
If you want to register a stateful address in the DNS server using dynamic DNS updating, press [On] for <Register Stateful Address>. Otherwise, press [Off].
|
|
4
|
Press [OK].
|
IMPORTANT:
Windows 2000 Server and Windows Server 2003 do not support DHCPv6 servers.
10
Restart the machine.
Turn OFF the machine, wait at least 10 seconds, and then turn it ON.