Importing and Exporting Data
You can save (export) setting information such as the Address Book and Additional Functions setting data as a file. You can store the exported file as a backup and load (import) the data into the machine when necessary.
|
IMPORTANT
|
|
The importing/exporting operation may take a few minutes to complete. Do not turn the machine’s main power OFF until the operation is complete. Otherwise, the machine may malfunction.
During an exporting operation, the page does not change until the operation is complete. Do not click [Start Export] while the computer indicates that the operation is still being processed.
The Import/Export function is available only when the Remote UI is in the System Manager Mode.
The importing/exporting operation is performed based on the language displayed on the touch panel display of the machine. For example, if the language displayed on the touch panel display and the language of the Address Book data to import do not match, the importing operation cannot be properly performed.
|
Exporting Address Book Data
You can save (export) the Address Book data stored in the machine as a file.
1
Click [Add.Func.] → [Import/Export] in the [Add.Func.] menu.
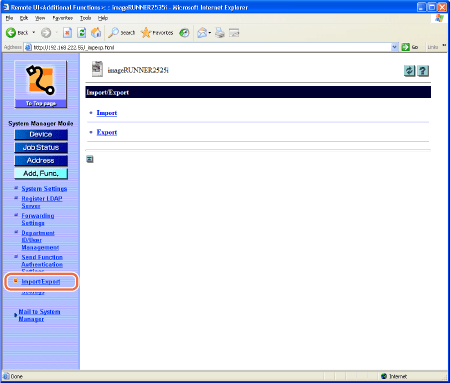
The Import/Export page is displayed.
2
Click [Export] on the page shown in step 1.
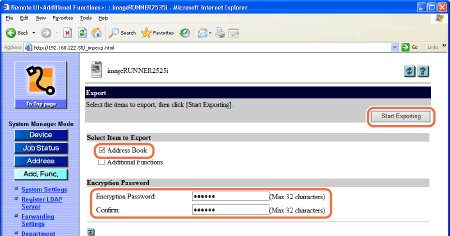
The Export page is displayed.
3
Select the check box for [Address Book].
4
Enter the encryption password twice to confirm it, and then click [Start Exporting].
5
Follow the instructions on the computer screen to specify the location to save the file.
The file is saved in the specified location.
Importing Address Book Data
You can load (import) the Address Book data into the machine from a saved (exported) file.
|
IMPORTANT
|
|
When you load (import) the Address Book data, the addresses registered in the machine are overwritten by the new data.
The machine imports/exports the Address Book data based on the index numbers displayed on the address list on the Address Book page on the Remote UI. An address entry is overwritten if the imported Address Book data contains an address entry with the same index number.
Do not load the Address Book when the machine has Delayed Send jobs.
If the machine is in the Sleep mode, press the machine’s control panel power switch to clear the Sleep mode before performing an Import operation.
|
1
Click [Add.Func.] → [Import/Export] in the [Add.Func.] menu.
For help, see the screen shot in step 1 in Exporting Address Book Data.
The Import/Export page is displayed.
2
Click [Import] on the page shown in step 1.
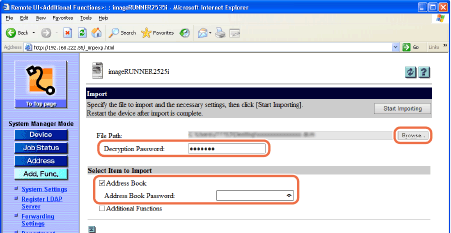
The Import page is displayed.
3
Select the check box for [Address Book].
If the address book password is set, enter it in the [Address Book Password:] text box.
4
Click [Browse] → select the file to import → click [OK].
5
Enter the decryption password, and then click [Start Importing].
6
Click [OK] on the Import confirmation screen.
The Remote UI starts importing the data and when it is complete, the page returns to the Importing Address Book Data page.
IMPORTANT:
Do not import any files while the machine is processing other jobs.
Exporting Additional Functions Setting Data
You can save (export) the Additional Functions setting data stored in the machine as a file.
|
NOTE
|
|
The Additional Functions settings you can export are displayed on the page shown in step 3.
|
1
Click [Add.Func.] → [Import/Export] in the [Add.Func.] menu.
For help, see the screen shot in step 1 in Exporting Address Book Data.
The Import/Export page is displayed.
2
Click [Export] on the page shown in step 1.
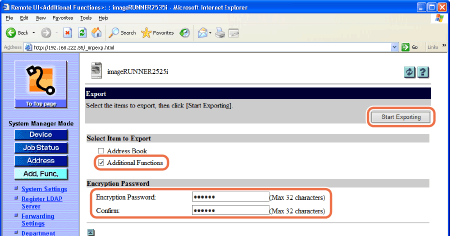
The Export page is displayed.
3
Select the check box for [Additional Functions].
If the address book password is set, enter it in the [Address Book Password:] text box.
4
Enter the encryption password twice to confirm it, and then click [Start Exporting].
5
Follow the instructions on the computer screen to specify the location to save the file.
The file is saved in the specified location.
Importing Additional Functions Setting Data
You can load (import) the Additional Functions setting data into the machine from a saved (exported) file.
|
IMPORTANT
|
|
If the machine is in the Sleep mode, press the machine’s control panel power switch to clear the Sleep mode before performing an Import operation.
|
|
NOTE
|
|
The Additional Functions settings you can import are displayed on the page shown in step 3 in Exporting Additional Functions Setting Data.
|
1
Click [Add.Func.] → [Import/Export] in the [Add.Func.] menu.
For help, see the screen shot in step 1 in Exporting Address Book Data.
The Import/Export page is displayed.
2
Click [Import] on the page shown in step 1.
The Import page is displayed.
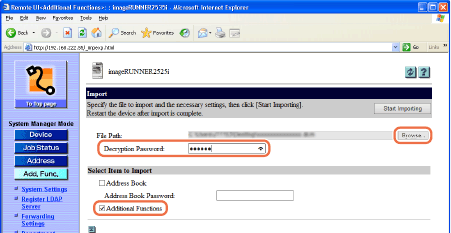
3
Select the check box for [Additional Functions].
4
Click [Browse] → select the file to import → click [OK].
5
Enter the decryption password, and then click [Start Importing].
6
Click [OK] on the Import confirmation screen.
The Remote UI starts importing the data and when it is complete, the page returns to the Importing Address Book Data page.
The machine will be automatically restarted to enable the imported settings.
IMPORTANT:
When Additional Functions settings data is imported, the System Manager ID, Department IDs, Address Book password, and network settings are automatically overwritten.
The Remote UI cannot be used to perform other operations until the machine is restarted.
Do not import any files while the machine is processing other jobs.