Managing the Department IDs and User IDs
You can specify the Department ID Management and User Management settings on the Remote UI.
|
IMPORTANT
|
|
Be sure to disable User Management when the optional Copy Card Reader-F1 is attached to the machine.
Specifying the Department ID Management and User Management settings are available only when the Remote UI is in the System Manager Mode.
|
Enabling Department ID Management and User Management
You can enable either or both the Department ID management and User Management, depending on your needs.
|
IMPORTANT
|
|
Be sure to confirm the System Manager ID and System Password are properly set to log in to the Remote UI in the System Manager Mode before enabling Department ID Management. (To specify the System Manager's ID and System Password:)
Before enabling Department ID/User Management, register at least one Department ID/User ID beforehand. (Managing the Department IDs, Managing the User IDs)
First register a User ID as the System Manager, and then register other User IDs as the End Users before enabling User Management. (To register a new User ID:)
|
1
Click [Add.Func.] → [Department ID/User Management] in the [Add.Func.] menu.
NOTE:
The list of the Department IDs switches to the list of the User IDs by clicking [Change List View]. The [Change List View] button appears when both Department ID Management and User Management are enabled and at least one ID is registered for each mode.
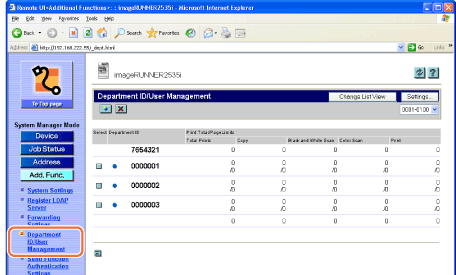
The page above displays the list of the Department IDs.
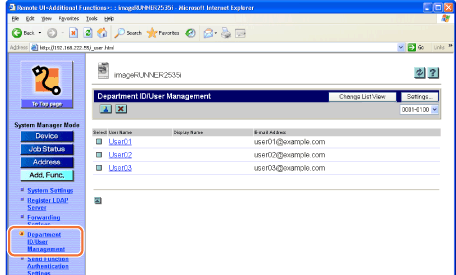
The page above displays the list of the User IDs.
2
Click [Settings] on the page shown in step 1.
The Department ID/User Management Settings page appears.
3
Select the [Enable Department ID Management] and/or [Enable User Management] check box, and specify the necessary settings → click [OK].
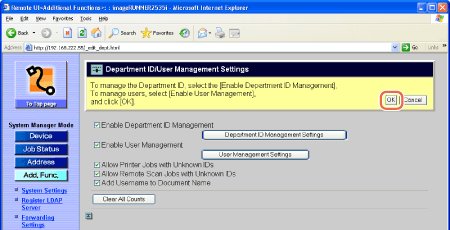
The settings are as follows:
|
|
Enable Department ID Management:
|
Select this check box to enable Department ID Management. When it is enabled, the users must enter their Department ID and password (when it is set) to log in to the machine and the Remote UI.
|
IMPORTANT:
Before selecting this check box, make sure that at least one Department ID is registered.
|
|
Department ID Management Settings:
|
Click this button to register a Department ID. (Managing the Department IDs)
|
|
Enable User Management:
|
Select this check box to enable User Management. When it is enabled, the users must enter their User ID and password (when it is set) to log in to the machine and the Remote UI.
|
IMPORTANT:
Before selecting this check box, make sure that at least one User ID is registered.
|
|
User Management Settings:
|
Click this button to register a User ID. (Managing the User IDs)
|
|
Allow Printer Jobs with Unknown IDs:
|
Select this check box to allow the machine to accept print jobs from unknown IDs.
|
|
|
Allow Remote Scan Jobs with Unknown IDs:
|
Select this check box to allow the machine to accept remote scan jobs from unknown IDs.
|
|
|
Add Username to Document Name:
|
Select this check box to add the User ID to the name of the sent document.
|
|
|
Clear All Counts:
|
Click this button to reset the counters to zero for all Department IDs.
|
|
NOTE
|
|
For instructions on how to specify the settings above on the machine’s control panel, see Protecting the Machine from Unauthorized Access.
|
Managing the Department IDs
You can register, edit, or delete the Department IDs.
1
Click [Add.Func.] → [Department ID/User Management] in the [Add.Func.] menu.
NOTE:
The list of the Department IDs switches to the list of the User IDs by clicking [Change List View]. The [Change List View] button appears when both the Department ID Management and the User Management are enabled and at least one ID is registered for each mode.
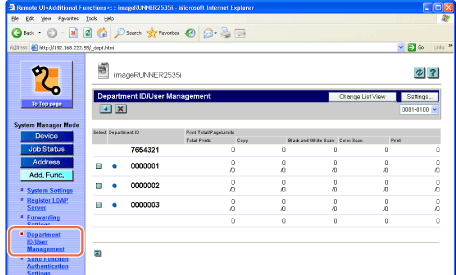
The page above displays the list of the Department IDs.
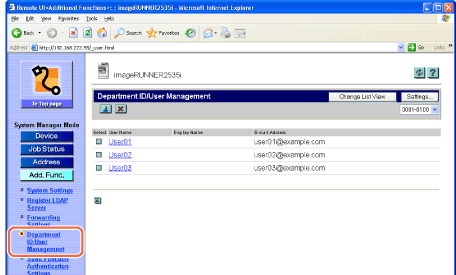
The page above displays the list of the User IDs.
2
Edit the Department IDs.
To register a new Department ID:
NOTE:
You can register up to 1,000 Department IDs.
|
1
|
Click [Settings] on the page shown in step 1.
The Department ID/User Management Settings page is displayed.
|
||||||||||
|
2
|
Click [Department ID Management Settings].
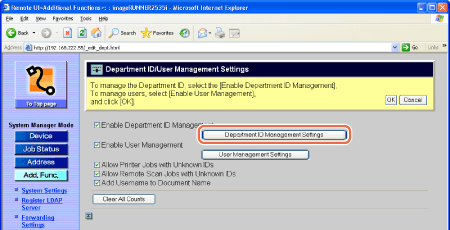 The Register New Department page is displayed.
You can also display the Register New Department page by clicking [
|
||||||||||
|
3
|
Specify the necessary settings on the Register New Department page → click [OK].
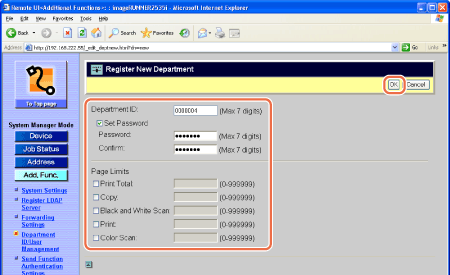 The settings are as follows:
IMPORTANT:
When the optional Copy Card Reader-F1 is attached to the machine, do not register a new Department ID.
NOTE:
For instructions on how to specify the settings above on the machine’s control panel, see Protecting the Machine from Unauthorized Access.
The maximum number of digits you can register for the Department ID is seven. If you enter fewer than seven digits, the machine automatically adds zeros to the beginning.
Example: If <321> is entered, the Department ID will be displayed as <0000321>. <Print Total> is the sum of <Copy> and <Print>.
|
To edit the Department ID:
|
1
|
On the Department ID list shown in step 1, click [
The Edit Department ID page is displayed.
|
|
2
|
Edit the settings as necessary → click [OK].
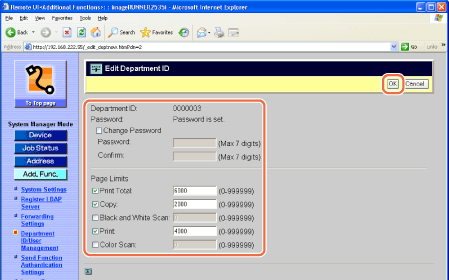 |
To delete the Department ID:
|
1
|
On the Department ID list shown in step 1, click [
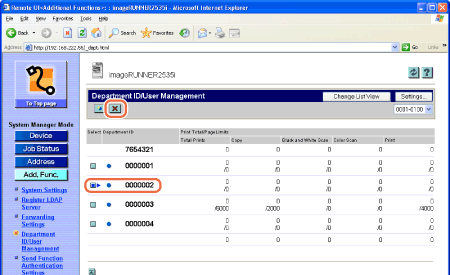 The selected Department ID is deleted.
IMPORTANT:
When the optional Copy Card Reader-F1 is attached to the machine, do not delete a Department ID.
|
Managing the User IDs
You can register, edit, or delete the User IDs.
|
IMPORTANT
|
|
First register a User ID as the System Manager, and then register other User IDs as the End Users before enabling User Management.
If the User Types of all the User IDs are set to 'User' (End User), every user is regarded as the System Manager and will be able to log in to the machine and the Remote UI in the System Manager Mode.
If you enable both Department ID Management and User Management, be sure to assign a Department ID (and the password for the Department ID) to each User ID. Users can log in to the machine and the Remote UI by entering the User ID that belongs to a Department ID.
User IDs can be registered, edited, or deleted only on the Remote UI, while User Management can be enabled and disabled both on the machine’s control panel and on the Remote UI.
|
1
Click [Add.Func.] → [Department ID/User Management] in the [Add.Func.] menu.
For help, see the screen shot in step 1 in Managing the Department IDs.
2
Edit the User IDs.
To register a new User ID:
NOTE:
You can register up to 1,000 User IDs.
|
1
|
Click [Settings] on the page shown in step 1 in Managing the Department IDs.
The Department ID/User Management Settings page is displayed.
|
||||||||||||||||||||||
|
2
|
Click [User Management Settings].
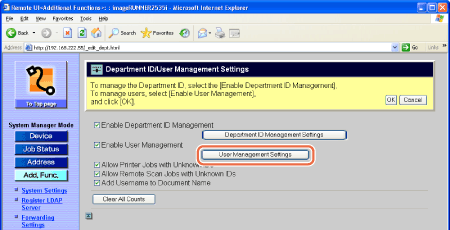 The Register New User page is displayed.
You can also display the Register New User page by clicking [
|
||||||||||||||||||||||
|
3
|
Specify the necessary settings on the Register New User page → click [OK].
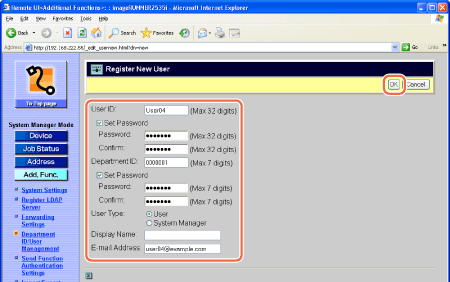 The settings are as follows:
IMPORTANT:
If you enable both Department ID Management and User Management, be sure to assign a Department ID (and the password for the Department ID) to each User ID. Users can log in to the machine and the Remote UI by entering their User ID that belongs to a Department ID.
IMPORTANT:
When the optional Copy Card Reader-F1 is attached to the machine, do not register a new User ID.
The settings above can be specified only on the Remote UI.
|
To edit the User ID:
|
1
|
Click the User ID you want to edit on the list of the User IDs shown in step 1 in Managing the Department IDs.
The Edit User page is displayed.
|
|
2
|
Edit the settings as necessary → click [OK].
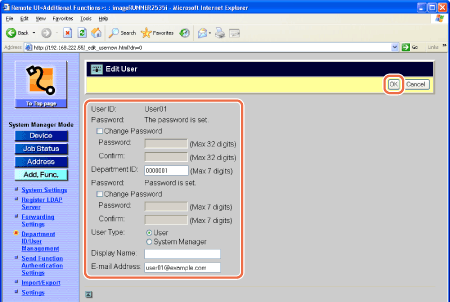 |
To delete the User ID:
|
1
|
Click [
For help, see the screen shot in step 1 in Managing the Department IDs.
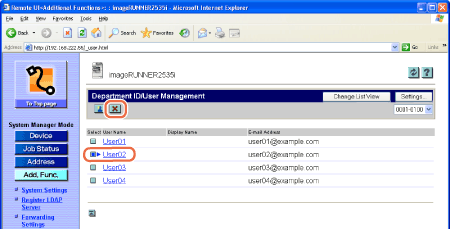 The selected User ID is deleted.
IMPORTANT:
When the optional Copy Card Reader-F1 is attached to the machine, do not delete a User ID.
|