Specifying the SNMPv3 Settings
Specify the settings for SNMPv3 as described below.
|
IMPORTANT
|
|
Specifying the settings for SNMPv3 is available only when the Remote UI is in the System Manager Mode.
Specifying the settings for SNMPv3 is available only when TLS communication is enabled. See the following information on the settings for TLS communication.
|
|
NOTE
|
|
The settings for SNMPv3 can be specified only on the Remote UI, while the settings for SNMPv1 can be specified both on the machine’s control panel and the Remote UI. For more information on the settings for SNMPv1, see Connecting the Machine to a TCP/IP Network.
|
Enabling SNMPv3
Enable SNMPv3 as described below.
1
Click [Add.Func.] → [Settings] in the [Add.Func.] menu.
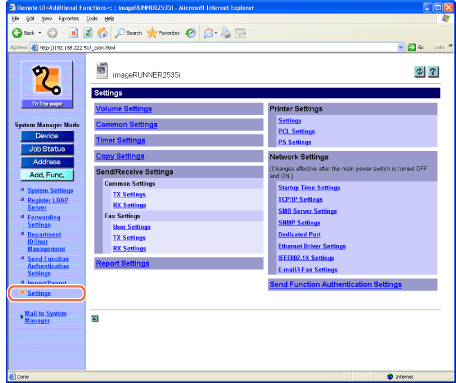
The Settings page is displayed.
2
Click [SNMP Settings] on the page shown in step 1.
The SNMP Settings page is displayed.
3
Select the check box for [Use SNMP v. 3] → click [OK].
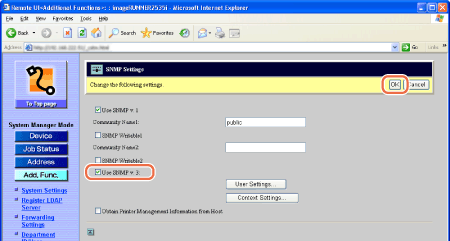
NOTE:
You can enable both SNMPv1 and SNMPv3 at the same time, depending on your needs. For more information on settings for SNMPv1, see Connecting the Machine to a TCP/IP Network.
4
Restart the machine.
Turn OFF the machine, wait at least 10 seconds, and then turn it ON.
IMPORTANT:
The setting for [Use SNMP v.3] becomes effective after the machine is restarted, while restarting the machine is not necessary to enable the settings for [User Settings] and [Context Settings].
Specifying the User Information for SNMPv3
Specify the user information for SNMPv3 as described below.
1
Click [Add.Func.] → [Settings] in the [Add.Func.] menu.
For help, see the screen shot in step 1 in Enabling SNMPv3.
The Settings page is displayed.
2
Click [SNMP Settings].
For help, see the screen shot in step 1 in Enabling SNMPv3.
The SNMP Settings page is displayed.
3
Click [User Settings].
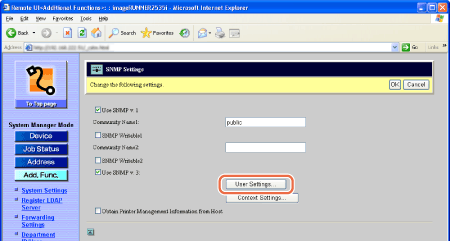
The User Settings page is displayed.
4
Select the function.
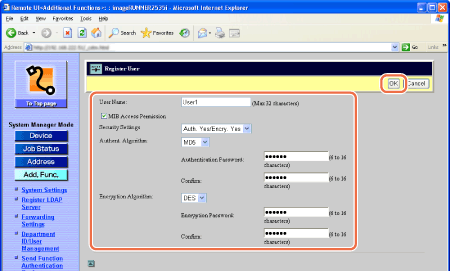
To register a new user:
NOTE:
A default user “initial” is registered. Edit it as necessary.
User Name: initial
MIB Access Permission: ON
Security Settings: Auth. Yes/Encry. Yes
Authent. Algorithm: MD5
Authentication Password: initial
Encryption Algorithm: DES
Encryption Password: initial
You can register up to five users (including the default user “initial”).
|
1
|
Click [Register].
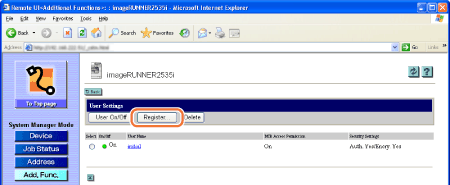 The Register User page is displayed.
|
||||||||||||||||||
|
2
|
Specify the necessary information → click [OK].
|
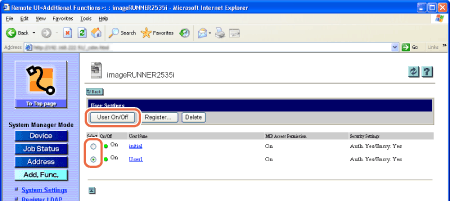
To enable/disable a user:
|
1
|
Select the button for the user you want to enable/disable under <Select> in the user list → click [User On/Off].
 |
To edit a user:
|
1
|
Click the user name you want to edit in the user list in the User Settings page. The Edit User page is displayed.
|
|
2
|
Edit the information as necessary → click [OK].
|
To delete a user:
|
1
|
Select the button for the user you want to delete under <Select> in the user list in the User Settings page → click [Delete].
The selected user is deleted.
|
Specifying the Context Settings for SNMPv3
Specify the context settings for SNMPv3 as described below.
1
Click [Add.Func.] → [Settings] in the [Add.Func.] menu.
For help, see the screen shot in step 1 in Enabling SNMPv3.
The Settings page is displayed.
2
Click [SNMP Settings].
For help, see the screen shot in step 1 in Enabling SNMPv3.
The SNMP Settings page is displayed.
3
Click [Context Settings].
For help, see the screen shot in step 3 in Specifying the User Information for SNMPv3.
The Context Settings page is displayed.
4
Select the function.
To register a new context:
|
NOTE
|
|
You can register up to five contexts.
A default context “NULL” is registered. It is not shown in the context list and cannot be deleted.
|
|
1
|
Click [Register].
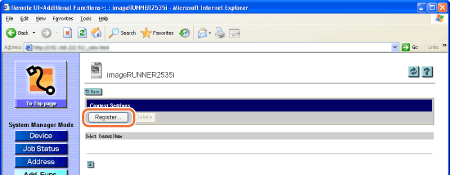 The Register Context page is displayed.
|
|
2
|
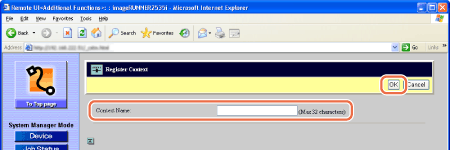
Enter the context name up to 32 characters → click [OK].
 |
To edit a context:
|
1
|
Click the context name you want to edit in the context list in the Context Settings page.
The Edit Context page is displayed.
|
|
2
|
Edit the context name → click [OK].
|
To delete a context:
|
1
|
Select the button for the context you want to delete under <Select> in the context list in the Context Settings page → click [Delete].
The selected context is deleted.
|