[Start]
Basic Windows Operations
Displaying the Printer Folder
Windows Vista
[Start] select [Control Panel] [Printer].
[Start]
Windows 7/Server 2008 R2
[Start] select [Devices and Printers].
[Start]
Windows 8/Server 2012
Right-click the lower-left corner of the screen select [Control Panel] [View devices and printers].
Right-click the lower-left corner of the screen
Windows 8.1/Server 2012 R2
Right-click [Start] select [Control Panel] [View devices and printers].
Right-click [Start]
Windows 10
Right-click [ ] select [Control Panel] [Hardware and Sound] [Devices and printers].
Right-click [
] Windows Server 2008
[Start] select [Control Panel] double-click [Printers].
[Start]
Enabling [Network discovery]
To view the computers on your network, enable [Network discovery].
Windows Vista
[Start] select [Control Panel] [View network status and tasks] select [Turn on network discovery] under [Network discovery].
[Start]
Windows 7/Server 2008 R2
[Start] select [Control Panel] [View network status and tasks] [Change advanced sharing settings] select [Turn on network discovery] under [Network discovery].
[Start]
Windows 8/Server 2012
Right-click the lower-left corner of the screen select [Control Panel] [View network status and tasks] [Change advanced sharing settings] select [Turn on network discovery] under [Network discovery].
Right-click the lower-left corner of the screen
Windows 8.1/Server 2012 R2
Right-click [Start] select [Control Panel] [View network status and tasks] [Change advanced sharing settings] select [Turn on network discovery] under [Network discovery].
Right-click [Start]
Windows 10
Right-click [] select [Control Panel] [View network status and tasks] [Change advanced sharing settings] select [Turn on network discovery] under [Network discovery].
Right-click [
] Windows Server 2008
[Start] select [Control Panel] double-click [Network and Sharing Center] select [Turn on network discovery] under [Network discovery].
[Start]
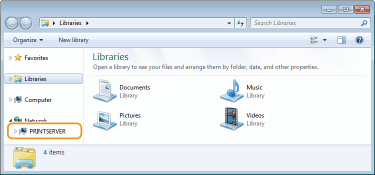
Displaying Shared Printers in the Print Server
1
Open Windows Explorer.
Windows Vista/7/Server 2008
[Start] select [All Programs] or [Programs] [Accessories] [Windows Explorer].
[Start]
Windows 8/Server 2012
Right-click the lower-left corner of the screen select [File Explorer].
Right-click the lower-left corner of the screen
Windows 8.1/Server 2012 R2
Right-click [Start] select [File Explorer].
Windows 10
Click [] select [File Explorer].
Click [
] 2
Select the print server from [Network] or [My Network Places].
To view computers on the network, you may need to turn on network discovery or search the network for computers.
Shared printers are displayed.
1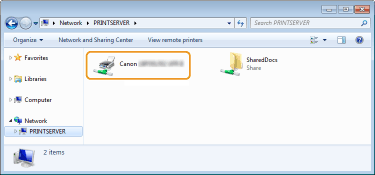
Printing a Test Page in Windows
You can check whether the printer driver is operational by printing a test page in Windows.
1
Load A4 size paper in the paper drawer or multi-purpose tray. Loading Paper
2
Open the printer folder. Displaying the Printer Folder
3
Right-click your printer icon and click [Printer properties] or [Properties].
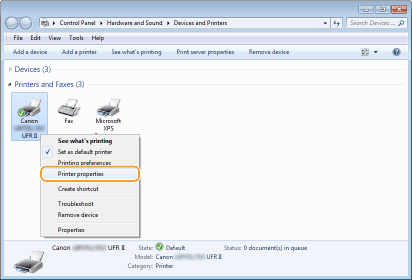
4
Click [Print Test Page] in [General] tab.
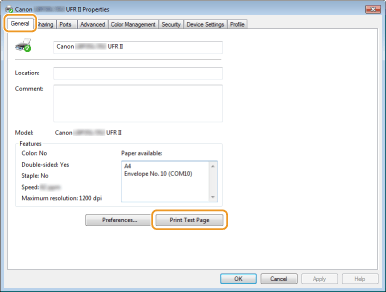
The test page is printed.
Checking the Bit Architecture
If you are not sure whether your computer is running 32-bit or 64-bit Windows, follow the procedure below.
1
Display [Control Panel].
Windows Vista/7/Server 2008
[Start] select [Control Panel].
[Start]
Windows 8/Server 2012
Right-click the lower-left corner of the screen select [Control Panel].
Right-click the lower-left corner of the screen
Windows 8.1/Server 2012 R2
Right-click [Start] select [Control Panel].
Windows 10
Proceed to step 2.
Proceed to step 2.
2
Display [System].
Windows Vista/7/8/Server 2008 R2/Server 2012
Click [System and Maintenance] or [System and Security] [System].
Click [System and Maintenance] or [System and Security]
Windows 10
Click [] select [Settings] [System] [About].
Click [
] Windows Server 2008
Double-click [System].
Double-click [System].
3
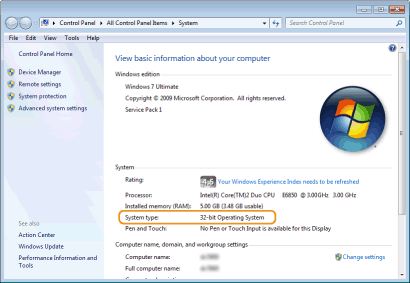
Check the bit architecture.
For 32-bit versions
[32-bit Operating System] is displayed.
[32-bit Operating System] is displayed.
For 64-bit versions
[64-bit Operating System] is displayed.
[64-bit Operating System] is displayed.
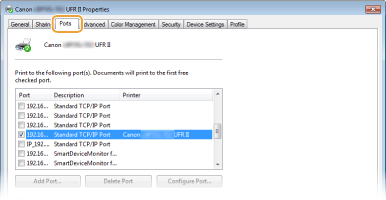
Checking the Printer Port
1
Open the printer folder. Displaying the Printer Folder
2
Right-click your printer icon and click [Printer properties] or [Properties].
3
In the [Ports] tab, check that the port is selected correctly.
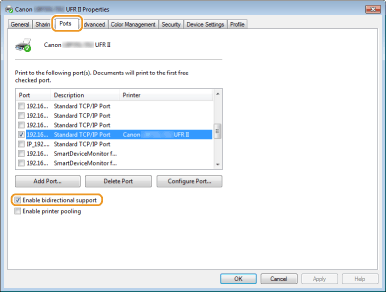
Checking Bidirectional Communication
1
Open the printer folder. Displaying the Printer Folder
2
Right-click your printer icon and click [Printer properties] or [Properties].
3
In the [Ports] tab, make sure that the [Enable bidirectional support] check box is selected.
Displaying [Local Area Connection Properties]
Windows Vista
|
1
|
Open the [Start] menu, select [Control Panel], and click [View network status and tasks]
|
|
2
|
Right-click the [Local Area Connection] icon, and click [Properties] in the pop-up menu.
|
Windows 7/Server 2008 R2
|
1
|
Open the [Start] menu, select [Control Panel], and click [View network status and tasks]
|
|
2
|
Right-click the [Local Area Connection] icon, and click [Properties] in the pop-up menu.
|
Windows 8/Server 2012
|
1
|
Right-click the lower left corner of the screen
|
|
2
|
Right-click the [Local Area Connection] icon, and click [Properties] in the pop-up menu.
|
Windows Server 2008
|
1
|
Open the [Start] menu, select [Control Panel], double-click the [Network and Sharing Center] tab, and then click [Manage network connections].
|
|
2
|
Right-click the [Local Area Connection] icon, and click [Properties] in the pop-up menu.
|
Windows 8.1/Server 2012 R2
|
1
|
Right-click the [Start]
|
|
2
|
Right-click the [Local Area Connection] icon, and click [Properties] in the pop-up menu.
|
Windows 10
|
1
|
Right-click [
] |
|
2
|
Right-click the [Ethernet] icon, and click [Properties] in the pop-up menu.
|