Printing from USB Memory (USB Direct Print)
You can print image files (PDF, TIFF, JPEG, and XPS) stored in a USB memory device by connecting it directly to the machine. Using this function, you can print without using a computer.

Available File Formats
You can print the following types of image files. Printing may not be performed properly depending on the data.
PDF file *
JPEG file
TIFF file
XPS file
|
* Version 1.7 is supported.
|
 |
|
The maximum size of a printable file is 2 GB.
|
Available USB Memory Devices
You can use FAT32 formatted USB memory devices (memory capacity: up to 32 GB).
|
|
|
Do not use non-standard USB memory devices. You may not be able to print the files properly depending on the USB memory device.
Do not connect anything other than a USB memory device. USB memory devices cannot be connected via a USB hub or an extension cable.
Do not use USB memory devices with special functions such as built-in security functions.
|
 |
|
The USB port of the machine supports USB 2.0.
If a folder in a USB memory device has many files, scanning image files to print will take some considerable time. Use your computer to delete unnecessary files on your USB memory device or move them to a different folder.
|
1
Connect a USB memory device to the USB port on the right side of the machine.
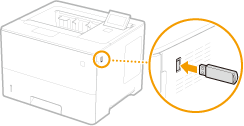
The following screen is automatically displayed.
If the screen is not displayed, press  (
( ).
).
().
Do not shock or shake the USB memory device or the machine while the device is connected to the machine.
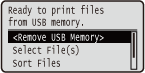
2
Use  /
/ to select <Select File(s)>, and press
  .
.
/ to select <Select File(s)>, and press .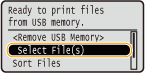
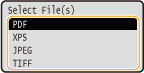
3
Select the type of the file to print, and press .
.
4
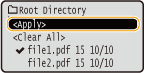
Select the file to print, and press .
.You can select up to 10 files.
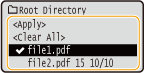
To clear a selection, select the file you have selected (marked with  ), and press . To clear all selections, select <Clear All>, and press .
. To clear all selections, select <Clear All>, and press .To display the contents of a folder, select a folder, and press or  . To return to the folder in the upper level, press
  or
or  .
.
or . To return to the folder in the upper level, press or .
Folders and files in lower levels or with longer names may not be displayed.
When you move to another folder, the previous file selections will be cleared.
5
Select <Apply>, and press .
.
 When printing an XPS Document Using a Print Ticket
When a file to print is in XPS format, it can be printed according to the print ticket (print settings) attached to the file.
|
1
|
Select <Use Print Ticket>, and press
.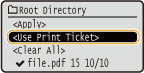 |
||
|
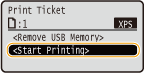
2
|
Select <Start Printing>, and press
.
|

6
Specify the print settings as necessary.
Select the desired setting item, press , and specify the setting.
, and specify the setting.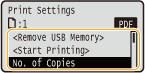
Icons* in the description
 Settings for printing PDF files
 Settings for printing XPS files
 Settings for printing JPEG files
 Settings for printing TIFF files
|
|
* Icons are omitted for the settings that are displayed regardless of the file format.
|
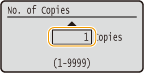
<No. of Copies>
Specify the number of copies from 1 to 9999. Use the numeric keys to enter a quantity, and press .
.
<Print Range>/<Print Range (TIFF)>
Specify the range (pages) to print. Use  /
/ to select <Designation Method>
  select the method to designate the print range .
/ to select <Designation Method> .
 <All>
<All>
Prints all pages.
 <Specify Pages>
Prints only the specified pages. To specify the pages, select <Page Range>  enter <First Page> and <Last Page> using the numeric keys select <Apply> .
.<Resolution>
Specify the resolution for processing print data. Use / to select the resolution, and press .
/ to select the resolution, and press .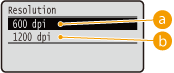
<600 dpi>
This print mode is suitable for printing at a high speed.
<1200 dpi>
Edges of characters and graphics can be clearly reproduced at high resolution. This print mode is suitable for printing data that contains many small characters.
<2-Sided Printing>
Select whether to print on both sides of paper. Use / to select the setting, and press .
/ to select the setting, and press .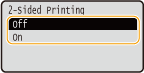
<2-Sided Printing> may not be available with some sizes or types of paper. Paper
<Binding Location>
Specify whether to bind the long edge or short edge of the 2-sided printouts with a binding tool such as a stapler. Use / to select the binding position, and press .
/ to select the binding position, and press .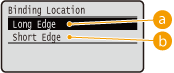
<Long Edge>
Binds the printouts on the long edge.
<Short Edge>
Binds the printouts on the short edge.
<Select Paper>
Select the paper source in which the paper to print is already loaded. Use / to select the paper source, and press .
/ to select the paper source, and press .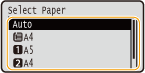
When you want to print a PDF file or XPS file, specify <Auto> to automatically select the optimum paper source.
A paper source with custom size paper loaded cannot be selected.
<Halftones>
You can select the method to reproduce halftones (the intermediate range between the lighter and darker areas of an image).
PDF files and XPS filesHalftones can be specified for each image data type in a single document. Use / to select the image data type select the method to reproduce halftones .
/ to select the image data type .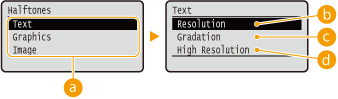 JPEG files and TIFF files
Use / to select the method to reproduce halftones, and press .
/ to select the method to reproduce halftones, and press .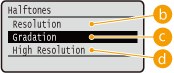
Image data type
Select the image data type for which you want to change the settings. Select <Text> for characters, <Graphics> for lines and figures, or <Image> for images such as photos.
<Resolution>
Prints gradation and lines with a smooth finish. This print mode is suitable for printing figures and charts with gradation.
 <Gradation>
Prints vivid images with a tonal contrast effect. This print mode is suitable for printing image data such as photos.
 <High Resolution>
Performs fine printing by sharply reproducing the edges of characters. This print mode is suitable for printing data of characters and thin lines with a clear finish.
<Match Paper Size>
Automatically makes enlarged or reduced printouts according to the Printable Area of the paper. The printouts are enlarged or reduced with the original's aspect ratio kept. Use / to select the setting, and press .
/ to select the setting, and press .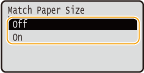
This setting is not available if <Auto> is set in <Select Paper>.
<Zoom>
Enable or disable enlarging/reducing images. The printouts are enlarged or reduced with the image's aspect ratio kept. Use / to select the setting, and press .
/ to select the setting, and press .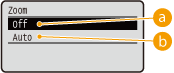
<Off>
When the image is within the Printable Area of the paper, it is printed with the size as is. When an image is larger than the printable area, printouts are reduced.
<Auto>
Makes enlarged or reduced printouts according to the Printable Area.
<Enlarge Print Area>
Specify whether or not to print the image by extending the Printable Area fully to the paper size. Use / to select the setting, and press .
/ to select the setting, and press .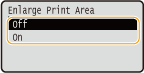
If you select <On>, some portions of the image may be missing near the edge of the paper or the paper may be partly tainted depending on the original.
<N on 1>
Select whether to print multiple pages onto a single sheet by sequentially allocating them from the top left. For example, to print four pages onto a single sheet, select <4 on 1>. Use / to select the setting, and press .
/ to select the setting, and press .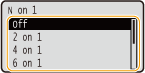
This setting is not available if <Auto> is set in <Select Paper>.
<Finishing>
Specify the method to collate the printouts when printing multiple-page documents. Use / to select whether or not to collate the printouts, and press .
/ to select whether or not to collate the printouts, and press .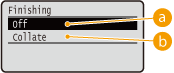
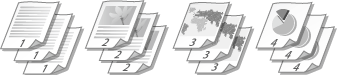
<Off>
The printouts are not collated. The specified number of copies are printed for each page. For example, if you are printing three copies of a four-page document, the printouts will be arranged in the following page order: 1, 1, 1, 2, 2, 2, 3, 3, 3, 4, 4, 4.
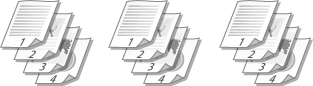
<Collate>
The printouts are grouped into complete sets in sequential page order. For example, if you are printing three copies of a four-page document, the printouts will be arranged in the following page order: 1, 2, 3, 4, 1, 2, 3, 4, 1, 2, 3, 4.
<Image Orientation>
Specify the print orientation of an image. Use / to select the print orientation, and press .
/ to select the print orientation, and press .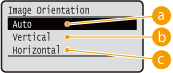
<Auto>
Automatically determines the print orientation based on the width and height of the image.
<Vertical>
Select when printing a vertically-long image.
<Horizontal>
Select when printing a horizontally-long image.
If the specified setting of <Vertical> or <Horizontal> does not match the orientation of the image, the reduced image is printed.
<Print Position>
Specify the position to print the image. Use / to select the print position, and press .
/ to select the print position, and press .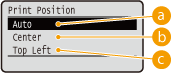
<Auto>
If the TIFF data contains the information that specifies the print position, the image is printed according to the information, otherwise, it is printed at the center of paper. JPEG data is always printed at the center of paper.
<Center>
Images are printed at the center of paper.
<Top Left>
Images are printed at the top left.
7
Select <Start Printing>, and press .
.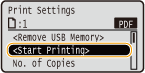
Printing starts.
To cancel printing, use the operation panel. Canceling Prints
8
|
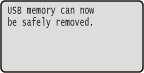
1
|
Select <Remove USB Memory>, and press
. |
||
|
2
|
Select <Yes>, and press
.
|
||
|
3
|
Disconnect the USB memory device.
|
|
|
|
If you select <Sort Files> on the screen in step 1, you can change the order of displaying files when you select the file to print.
|
|
TIPS
|
|
If you always want to print with the same settings: Changing Default USB Print Settings
|