Adding a New Text Stamp
You can add new text stamps to Desktop Editor.
1.
Click  for
for  (Stamp) on the ribbon, and select [Manage Stamps].
for (Stamp) on the ribbon, and select [Manage Stamps].Or, follow one of the steps described below.
Click  (Manage Stamps) on the ribbon
Click the  (Manage Stamps) on the ribbon
(Manage Stamps) on the ribbonSelect the [File] menu > [Settings/Management] > [Manage Stamps]
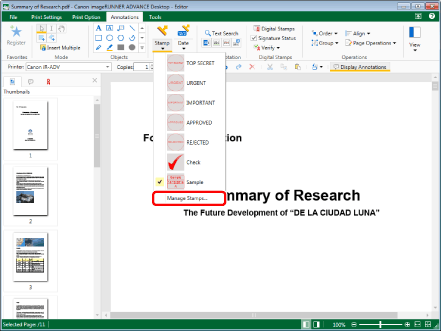
The [Manage Stamps] dialog box is displayed.
|
NOTE
|
|
If commands are not displayed on the ribbon of Desktop Editor, see the following to display them.
This operation can also be performed with the tool buttons on the toolbar. If tool buttons are not displayed in the toolbar of Desktop Editor, see the following to display them.
|
2.
Click [Add].
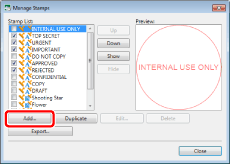
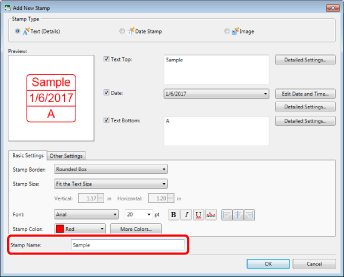
The [Add New Stamp] dialog box is displayed.
3.
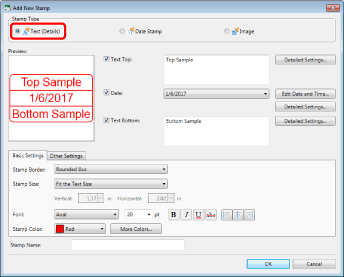
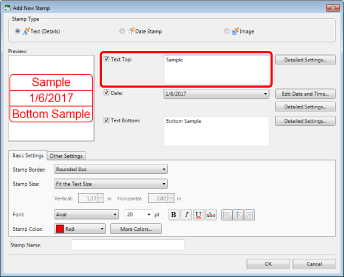
Select [Text (Details)] in [Stamp Type].
4.
Enter the text in [Text Top].
If you do not want to display the text, deselect this check box.
|
NOTE
|
|
You can enter a maximum of three lines of text, each with up to 50 characters.
|
5.
Select the date display format from the list displayed when you click  in [Date].
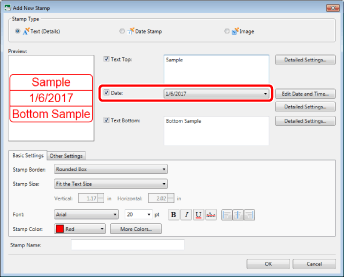
If you do not want to display the date, deselect the check box, and proceed to step 8.
|
NOTE
|
|
The display format of the date depends on the settings of your computer.
|
6.
Click [Edit Date and Time].
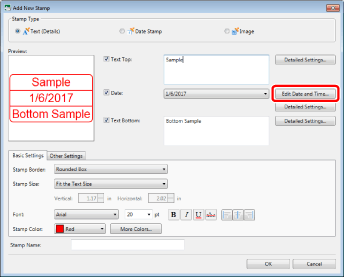
The [Edit Date and Time] dialog box is displayed.
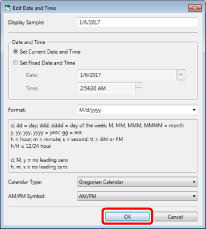
7.
Edit the date display format, and click [OK].
The [Add New Stamp] dialog box is displayed again.
|
NOTE
|
|
For information on how to edit the date display format, see the following.
|
8.
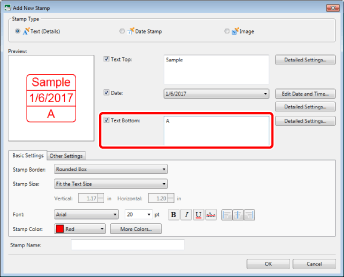
Enter the text in [Text Bottom].
If you do not want to display the text, deselect this check box.
|
NOTE
|
|
You can enter a maximum of three lines of text, each with up to 50 characters.
|
9.
Configure the layout of the stamp.
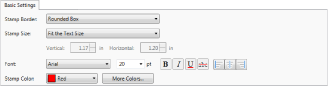
[Basic Settings] Tab
|
[Stamp Border]
|
Select the stamp border you want to use from the list displayed when you click
|
|
[No border]
|
Select this when you do not want to use a border for stamps.
|
|
[Round]
|
Selecting this option uses the round border for enclosing the text used in stamps.
|
|
[Oval]
|
Selecting this option uses the oval border for enclosing the text used in the stamp.
|
|
[Box]
|
Selecting this option uses the box type border for enclosing the text used in stamps.
|
|
[Rounded Box]
|
Selecting this option uses the rectangular border with rounded corners for enclosing the text used in the stamp.
|
|
[Stamp Size]
|
Select the method for determining the stamp size from the list displayed when you click
|
|
[Fit the Text Size]
|
The stamp size is automatically set according to the font size of the text. The stamp size is displayed below [Stamp Size] but cannot be edited.
|
|
[Specify a Value (in)]
|
Specify the stamp size using a numerical value.
|
|
[Font]
|
Configure the font of text.
|
|
[Font]
|
Select the font to use from the list displayed when you click
|
|
[Font Size]
|
Select the font size to use from the list displayed when you click
|
|
[Bold]
|
Makes the string bold.
|
|
[Italic]
|
Makes the string italic.
|
|
[Underline]
|
Underlines the string.
|
|
[Strikethrough]
|
Adds a strikethrough to the string.
|
|
[Left]
|
Aligns the text to the left.
|
|
[Center]
|
Aligns the text in the center.
|
|
[Right]
|
Aligns the text to the right.
|
|
[Stamp Color]
|
Select the stamp color you want to use from the list displayed when you click
|
|
[More Colors]
|
If you click this, the [Color] dialog box is displayed. On the [Color] dialog box, you can set a color that is not listed in [Stamp Color].
|
|
NOTE
|
|
[Stamp Size] is changed to [Fit the Text Size] when the stamp is inserted and cannot be edited.
|
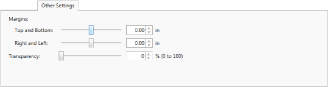
[Other Settings] Tab
|
[Margins]
|
Specify the margin in the stamp border. To change the margin, move the slider to the left or right, or enter a numeric value between -0.51 inches and 0.51 inches. You can also use
|
|
[Top and Bottom]
|
The slider position and the numeric value indicate the top and bottom margin in the stamp border. These items are displayed when [Oval], [Box], or [Rounded Box] is selected in [Stamp Border].
|
|
[Right and Left]
|
The slider position and the numeric value indicate the left and right margin in the stamp border. These items are displayed when [Oval], [Box], or [Rounded Box] is selected in [Stamp Border].
|
|
[Tp, Btm, R, L]
|
The slider position and the numeric value indicate the top, bottom, left, and right margin in the stamp border. These items are displayed when [Round] is selected in [Stamp Border].
|
|
[Transparency]
|
The slider position and the numeric value indicate the degree of transparency of the stamp. To change the degree of transparency, move the slider to the left or right, or enter a numeric value. You can also use
|
10.
To configure separate display settings for an item, click [Detailed Settings] for the item.
The [Detailed Settings] dialog box is displayed.
11.
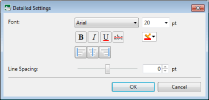
Configure the properties of the text.
|
[Font]
|
Configure the font of text.
|
|
[Font]
|
Select the font to use from the list displayed when you click
|
|
[Font Size]
|
Select the font size to use from the list displayed when you click
|
|
[Bold]
|
Makes the string bold.
|
|
[Italic]
|
Makes the string italic.
|
|
[Underline]
|
Underlines the string.
|
|
[Strikethrough]
|
Adds a strikethrough to the string.
|
|
[Font Color]
|
Select the font color you want to use from the list displayed when you click
|
|
[Left]
|
Aligns the text to the left.
|
|
[Center]
|
Aligns the text in the center.
|
|
[Right]
|
Aligns the text to the right.
|
|
[Line Spacing]
|
The slider position and the numeric value indicate the text spacing. To change the spacing, move the slider to the left or right, or enter a numeric value between -50 point and 50 point. You can also use
|
|
NOTE
|
|
The font size cannot be changed when [Specify a Value (in)] is selected in [Stamp Size] on the [Basic Settings] tab of the [Add New Stamp] dialog box.
If you select [More Colors] in [Font Color], the [Color] dialog box is displayed and you can set a color that is not listed in [Font Color].
[Line Spacing] is not displayed in the [Detailed Settings] dialog box of [Date].
|
12.
Click [OK].
The [Add New Stamp] dialog box is displayed again.
13.
Enter a name in [Stamp Name].
|
NOTE
|
|
Enter the stamp name using 31 characters or less.
You cannot set the same name as an existing stamp.
If you do not enter a name in [Stamp Name], a name is automatically set from the text entered in [Text Top]/[Text Bottom].
|
14.
Confirm the preview display and click [OK].
The [Manage Stamps] dialog box is displayed again.
The stamp added in [Stamp List] is displayed.
15.
Click [Close].