Pasting Digital Stamps
You can use Desktop Editor to attach a digital stamp to a document. By attaching a digital stamp with a digital certificate attached to a document, changes after the digital stamp is attached can be detected.
The operation for attaching a digital stamp is performed in the Digital Stamps Mode of Desktop Editor.
|
NOTE
|
|
For information on the screen transition of Desktop Editor, see the following.
Desktop supports the following digital certificates.
Digital certificates issued with Windows 7/Windows 8.1/Windows 10/Windows Server 2008/Windows Server 2012
VeriSign digital certificates
Self-signed certificates created with Desktop Editor
For details on how to obtain a digital certificate, consult the system administrator.
For details on how to create self-signed certificates with Desktop Editor, see the following.
The following edits can be made to digital stamps that have been tentatively placed.
Move
Change Size
Delete
Undo
Redo
You can undo or redo up to 12 operations by clicking the [Undo]/[Redo] tool button.
You need to prepare a digital certificate which is to be added to a digital stamp.
Annotations cannot be selected or edited while the Digital Stamps Mode is running.
Unsigned digital stamps that were added with a previous version of Desktop are handled as image stamps.
|
1.
Click  (Digital Stamps) on the ribbon.
 (Digital Stamps) on the ribbon.
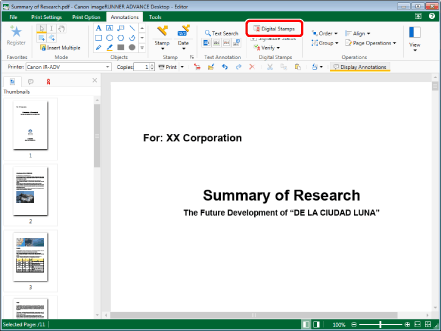
The Digital Stamps Mode starts and the [Digital Stamps] tab is displayed on the ribbon.
|
NOTE
|
|
This operation can also be performed with the tool buttons on the toolbar. If tool buttons are not displayed on the toolbar of Desktop Editor, see the following to display them.
While the Digital Stamps Mode is running, tabs other than the [Digital Stamps] tab are not displayed on the ribbon.
The [Annotation List] tab on the Navigation Window is hidden while the Digital Stamps Mode is running.
|
2.
Select a digital stamp to paste in the list of digital stamps on the ribbon.
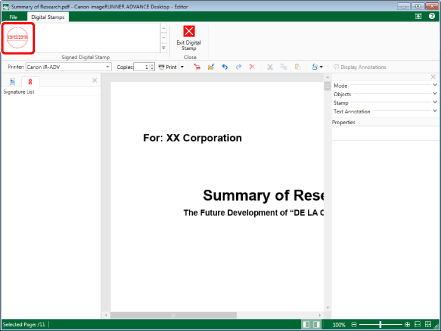
The preview and properties of the selected digital stamps are displayed on the Details Window.
|
NOTE
|
|
If the Details Window is not displayed, see the following.
|
3.
Configure the digital stamp settings if necessary.

|
[Edit Date and Time]
|
If you click this, the [Edit Date and Time] dialog box is displayed and you can change the properties of the stamped image. For information on the properties you can set, see the following.
|
|
[Fix size at insertion]
|
Deselect this to adjust the paste size of the digital stamp.
To paste a digital stamp with the registered size, select this check box.
|
|
[Edit Stamped Image]
|
If you click this, the [Edit Stamped Image] dialog box is displayed and you can change the properties of the stamped image. For information on the properties you can set, see the following.
|
|
[Restore Original Value]
|
Restores the digital stamp properties to the values set when the digital stamp was registered. Only available before the digital stamp is inserted.
|
|
NOTE
|
|
If date information is not inserted in the digital stamp, [Edit Date and Time] cannot be clicked.
If the [Fix size at insertion] check box is selected in [System Settings] and you select a digital stamp from the digital stamp list on the ribbon, the [Fix size at insertion] check box on the Details Window is selected.
[File] menu > [Option] > [System Settings] > [Editor] > [Annotations] > [Fix size at insertion]
The changed digital stamp size is retained when it is inserted the next time. Because of this, even if the font size is changed in the [Edit Stamped Image] dialog box, the digital stamp is displayed in the preview at the same size it was during the previous time. Perform one of the following operations to change the size of the digital stamp.
Deselect the [Fix size at insertion] check box on the Details Window, and change the size of the tentatively placed digital stamp.
Register a new stamped image of the digital stamp at the desired size, and attach it.
Stamped images registered by users can be edited. For more information, see the following.
For information on registering new stamped images for digital stamps, see the following.
|
4.
Move the mouse pointer to the Work Window.
The shape of the mouse pointer becomes  , and a preview of the digital stamp is displayed.
|
NOTE
|
|
If you press the [Esc] key on the keyboard, the mouse pointer will return to the original shape and insertion will be cancelled.
|
5.
Set the preview where you want to insert a digital stamp, and click it.
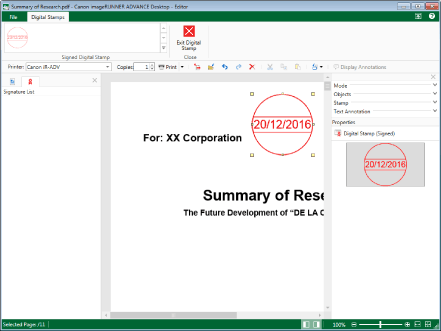
When you specify the settings for attaching a digital stamp with the registered size in step 3, the [Select Certificate] dialog box is displayed. In this case, proceed to step 8.
When you specify the settings for attaching a digital stamp with a size that is different from that registered in step 3, the digital stamp is tentatively placed. In this case, proceed to step 6.
6.
Adjust the size and the location of the digital stamp as necessary.
To change the size:
Drag the  handles in the four corners of the preview.
To adjust the location:
Drag the digital stamp to the desired position.
Or, press the arrow keys on the keyboard.
|
NOTE
|
|
To change the shape of the digital stamp to an oval, drag the handle while holding down the [Shift] key on the keyboard.
You can move an object by five pixels when you use an arrow key on the keyboard.
You can move an object by one pixel when you use an arrow key while holding the [Ctrl] key on the keyboard.
|
7.
Click an area other than the preview on the Work Window, and set the position to paste the digital stamp.
The [Select Certificate] dialog box is displayed.
|
NOTE
|
|
You can also use one of the following operations to set the position of the digital stamp which has been placed tentatively.
Save
Save As
Print
Move pages by selecting a thumbnail in the Navigation Window
Press the [Enter] key on the keyboard.
Exit Digital Stamp
|
8.
Select a certificate to use for the document signature, and click [OK].
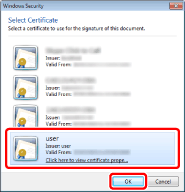
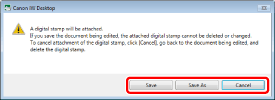
A confirmation message is displayed.
9.
Select whether to attach the digital stamp to the document.
[Save]: The digital stamp is attached to the document, and the document is overwritten. In this case, proceed to step 20.
[Save As]: The [Select Save Destination] dialog box is displayed. In this case, proceed to step 10.
[Cancel]: Attaching the digital stamp is aborted.
|
NOTE
|
|
If you switch to the [Print Settings] tab or [Print Option] tab on the ribbon before starting the Digital Stamps Mode, clicking [Save] will display a confirmation message. To save the file as a PDF document, click [Yes].
The [Select Save Destination] dialog box is displayed when clicking [Save] for a newly created IWB document. In this case, proceed to step 10.
For information on how to save a document as a PDF document in Therefore, see the following.
Saving Documents to Therefore from Desktop Editor (Administrator Guide)
|
10.
Select [Library] or [Windows Folder], and click [OK].

The [Save As] dialog box is displayed.
11.
Select a library or Windows Folder in which to save the document.
12.
Specify [Document Name] or [File name].
13.
Select the format to save the document in in [Document Type] or [Files of type].
To save the document as an IWB document, select [Canon Desktop Document (*.iwb)]. In this case, proceed to step 19.
To save the document as a PDF document, select [PDF File (*.pdf)]. In this case, proceed to step 14.
14.
If you want to save in the PDF format with advanced settings specified, click [Detailed Settings].
The [Detailed Settings for PDF Document] dialog box is displayed.
15.
Specify the detailed settings for the PDF document.
For information on the detailed settings for PDF documents, see the following.
16.
Click [OK].
If you set a password for opening the document, the [Confirm Document Open Password] dialog box is displayed. In this case, proceed to step 17.
If you restricted the printing or editing of the document, the [Confirm Permissions Password] dialog box is displayed. In this case, proceed to step 18.
If a password is not set, the [Save As] dialog box is displayed again. In this case, proceed to step 19.
|
NOTE
|
|
The [Confirm Document Open Password] dialog box is displayed when the [Require a password to open this document] check box is selected.
The [Confirm Permissions Password] dialog box is displayed when the [Restrict editing and printing of the document] check box is selected.
|
17.
Enter the password in [Document Open Password] and click [OK].

If you restricted the printing or editing of the document, the [Confirm Permissions Password] dialog box is displayed. In this case, proceed to step 18.
If document printing or editing is not restricted, the [Save As] dialog box is displayed again. In this case, proceed to step 19.
18.
Enter the password in [Permissions Password] and click [OK].

The [Save As] dialog box is displayed again.
19.
Click [Save].
The digital stamp is attached, and the document is saved with the specified name.
|
NOTE
|
|
When saving a document in the PDF format (*.pdf), a confirmation message is displayed. To save the document as a PDF document, click [Yes].
If one of the following dialog boxes is displayed after you save a document, select an appropriate update process and then click [OK].
[Checked Out Document Confirmation] dialog box
[Modify Shared Document] dialog box
If the [Check in automatically after exiting the application that is editing documents] check box in [System Settings] is deselected, you need to perform check in/check out manually.
[File] menu > [Option] > [System Settings] > [Browser] > [Shared Document Management] > [Check in automatically after exiting the application that is editing documents]
When you attach a digital stamp, the content displayed on the [Signature List] tab on the Navigation Window is updated.
The signature status of a digital stamp is displayed by default. For information on signature status, see the following.
|
20.
Click on the Work Window outside the digital stamp you pasted to deselect the digital stamp.
21.
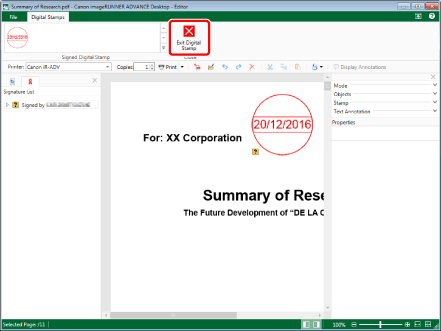
To finish pasting the digital stamp, click  (Exit Digital Stamp) on the ribbon.
 (Exit Digital Stamp) on the ribbon.
|
NOTE
|
|
If you click
 (Exit Digital Stamp) on the ribbon with a digital stamp placed tentatively, a message confirming whether you want to finish pasting the digital stamp is displayed. (Exit Digital Stamp) on the ribbon with a digital stamp placed tentatively, a message confirming whether you want to finish pasting the digital stamp is displayed.If you click [Yes]: The [Select Certificate] dialog box is displayed.
If you click [No]: The Digital Stamps Mode ends.
Digital stamps can be verified. For information on verifying digital stamps, see the following.
|