Registering Destinations
This section describes how to register destinations in the Address Book for PC faxes. You can select multiple destinations that have already been registered and register them together as a group destination, which is useful when sending to multiple destinations at once.
|
NOTE
|
|
A total of 6,000 destinations can be registered: 3,000 for single destinations and 3,000 for group destinations.
You can select multiple group destinations to register them as another group.
You cannot use the Address Book if you do not have permission to access the folder where the Address Book is saved. Log on as a user who has permission to access the folder, or change the save location of the Address Book.
|
Registering Destinations
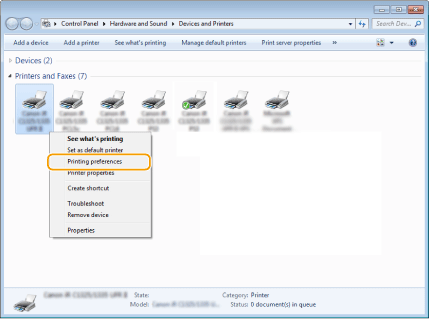
1
Open the printer folder. Displaying the Printer Folder
2
Right-click your fax icon and click [Printing preferences].
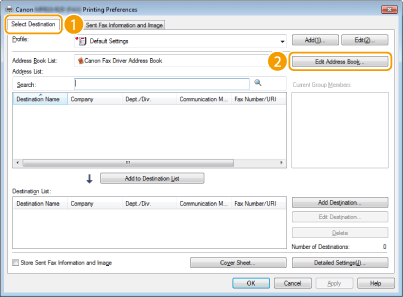
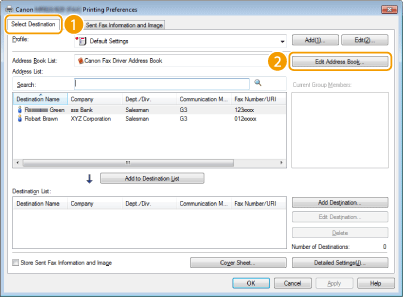
3
Click the [Select Destination] tab  [Edit Address Book].
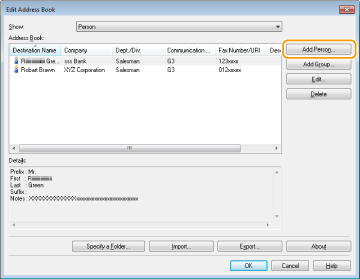
4
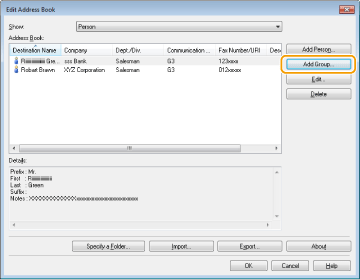
Click [Add Person] in the [Edit Address Book] dialog box.
NOTE:
To change or delete registered destinations, select a destination from [Address Book], and click [Edit] or [Delete].
5
Specify each setting and click [OK].
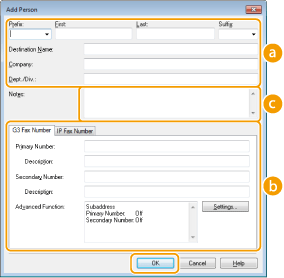
 Address
Enter the recipient name, company name, and department name.
 [Fax Number]
Enter the fax number(s). Hyphens can be inserted between numbers as necessary. If you want to add explanations of the uses for the fax numbers, such as "Home" or "Office", enter them in [Description].
 [Notes]
Enter comments as necessary.
Registering Multiple Destinations as a Group
1
Open the printer folder. Displaying the Printer Folder
2
Right-click your fax icon and click [Printing preferences].
3
Click the [Select Destination] tab [Edit Address Book].
4
Click [Add Group] in the [Edit Address Book] dialog box.
NOTE:
To change or delete registered destinations, select a destination from [Address Book], and click [Edit] or [Delete].
5
Specify each setting and click [OK].
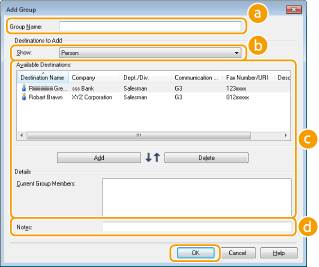 [Group Name]
Enter a group name such as "Sales Department 1."
[Show]Select the type of the destinations to display in [Available Destinations] (), from which you can select the destinations to register in the group.
), from which you can select the destinations to register in the group.[Person]
Displays single destinations.
[Group]
Displays group destinations.
[All]
Displays all the destinations registered in the Address Book.
[Available Destinations]Select the destinations to register in the group, and click [Add]. The selected destinations are displayed in [Current Group Members].
NOTE:
To select multiple destinations, click the destinations while holding down [SHIFT] key or [CTRL] key.
To delete a destination from [Current Group Members], select a destination and click [Delete].
 [Notes]
Enter comments as necessary.