Clearing Jams
If a paper jams, <Paper jammed.> is displayed on the screen. Press  to display simple on-screen solutions. If it is difficult to understand the procedures on the display, see the following sections to clear jams. Carefully read the precautions in Maintenance and Inspections before cleaning paper jams.
to display simple on-screen solutions. If it is difficult to understand the procedures on the display, see the following sections to clear jams. Carefully read the precautions in Maintenance and Inspections before cleaning paper jams.
<Open feeder cover.>
Document Jams in the Feeder (imageRUNNER 1435iF / 1435i Only)
Document Jams in the Feeder (imageRUNNER 1435iF / 1435i Only)
<Remove paper from tray>
Paper Jams in the Multi-Purpose Tray
Paper Jams in the Multi-Purpose Tray
<Open Drawer 1.>
Paper Jams in the Paper Drawer
Paper Jams in the Paper Drawer
|
IMPORTANT
|
When removing the jammed paper, do not turn OFF the machineTurning OFF the machine deletes the data that is being printed. Be especially careful when receiving fax documents.
If paper tearsRemove all the paper fragments to prevent them from becoming jammed.
If paper jams repeatedlyTap the paper stack on a flat surface to even the edges of the paper before loading it into the machine.
Check that the paper is appropriate for the machine.
Check that no jammed paper fragments remain in the machine.
Do not forcibly remove the jammed document or paper from the machineForcibly removing the paper may damage parts. If you are not able to remove the paper, contact your local authorized Canon dealer.
|
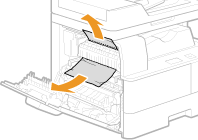
Document Jams in the Feeder (imageRUNNER 1435iF / 1435i Only)
If there are documents placed in the feeder, remove them first. Then, follow the procedure below.
1
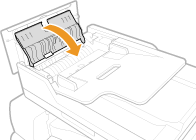
Remove the document jammed under the feeder cover.
|
1
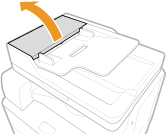
|
Open the feeder cover.
 |
|
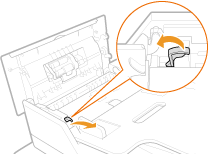
2
|
Move the lever to unlock.
 |
|
3
|
Gently pull out the document.
 |
2
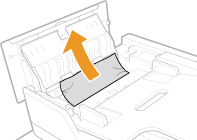
Remove the document jammed under the inner cover.
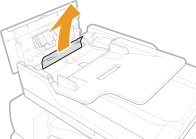
|
1
|
Place your finger in the hole indicated by the green mark, and lift the inner cover.
 |
|
2
|
Gently pull out the document.
 |
|
3
|
Close the inner cover.
 |
3
Return the lever back in place, and close the feeder cover.
4
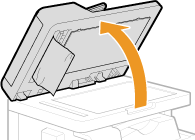
Remove the document jammed in the scanning area.
|
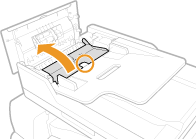
1
|
Open the feeder.
 |
|
2
|
Gently pull out the document.
 |
|
3
|
Gently close the feeder.
|
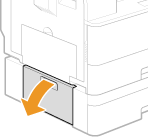
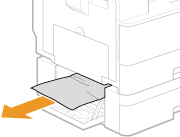
Paper Jams in the Left Side
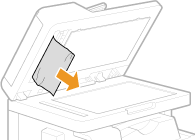
1
Open the left cover.
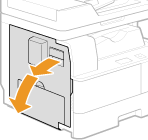
2
Gently pull out the jammed paper.
3
Close the left cover.
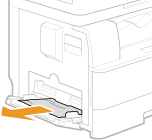
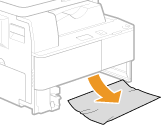
Paper Jams in the Multi-Purpose Tray
If there is paper loaded in the tray, remove it first. Then, follow the procedure below.
1
Gently pull out the jammed paper.
2
When the screen shown below is displayed, use  / to select <Yes>, and press
  .
.
/ to select <Yes>, and press .
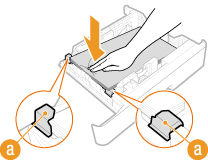
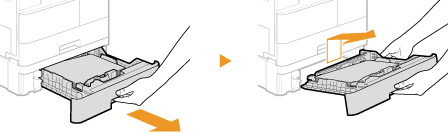
Paper Jams in the Paper Drawer
1
Pull out the paper drawer until it stops, and slightly lift the front side to remove it.
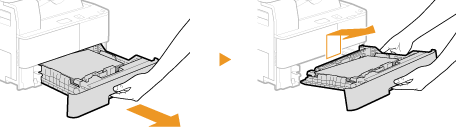
IMPORTANT:
Make sure to hold the paper drawer with both hands when you lift the front side, and remove it gently. Otherwise, you may damage the paper drawer by dropping it.
2
Gently pull out the jammed paper.
3
Insert the paper drawer into the machine.
Insert the paper drawer at an angle, and then push it in horizontally.
IMPORTANT:
Make sure that the paper stack is under the small tabs ( ).
).
).
4
When the screen shown below is displayed, use / to select <Yes>, and press .
/ to select <Yes>, and press .
Paper Jams in the Optional Paper Drawer
1
Open the left cover of the optional paper drawer.
2
Gently pull out the jammed paper.
3
Close the left cover of the optional paper drawer.
4
Pull out the optional paper drawer until it stops, and slightly lift the front side to remove it.
IMPORTANT:
Make sure to hold the paper drawer with both hands when you lift the front side, and remove it gently. Otherwise, you may damage the paper drawer by dropping it.
5
Gently pull out the jammed paper.

6
Insert the paper drawer into the machine.
Insert the paper drawer at an angle, and then push it in horizontally.
IMPORTANT:
Make sure that the paper stack is under the small tabs ().
).7
When the screen shown below is displayed, use / to select <Yes>, and press .
/ to select <Yes>, and press .