Installing Using a USB Connection
This explains the procedure for connecting a device and computer with a USB cable and installing a driver.
 IMPORTANT
If connected by USB, you may not be able to use the device information retrieval function, depending on the device and environment you are using.
Prerequisites
Installation of the optional USB interface board (if required with the device you are using)
Page description language selection (plug & play) function setting of the device (if required with the device you are using)
Set [PDL Selection (Plug and Play)] at the device to match the driver you are using. For details about the setting method, refer to the manual of the device.
When starting the computer, log on as a user with administrator privileges.
[Desktop] screen display (when using Windows 8.1/Server 2012/Server 2012 R2)
Procedures
1.
Turn off the device.
2.
Start the installer.
If you are using an installer downloaded from the web site
Double-click the downloaded file to decompress it. If the installer does not start automatically after it is decompressed, double-click [Setup.exe].
If you are using the accompanying CD-ROM
(1) Set the CD-ROM in the computer.
If the CD-ROM menu is not displayed, click the subsequent "Open details."
Start the installer by following the procedure below.
If a message prompting you to insert a CD-ROM is displayed or if Windows Explorer is displayed: Execute [MInst.exe].
If nothing is displayed: Double-click the CD-ROM icon.
If the above [MInst.exe] does not exist: Execute [Setup.exe] in the driver folder of the CD-ROM.
If you executed [Setup.exe], proceed to step 3.
(2) If the language selection screen is displayed, select a language → click [OK].
(3) Click [Installation] from the menu screen.
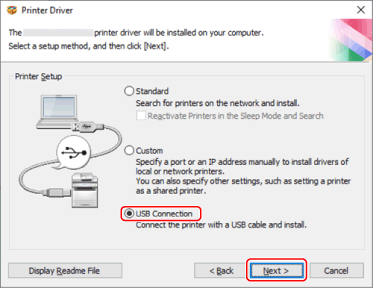
(4) If the [Select the Type of Connection] screen is displayed, select [USB Connection] → click [Next].
(5) In the displayed screen, confirm that the driver(s) to be installed have been selected → click [Install].
(6) Confirm the content of the CANON SOFTWARE LICENSE AGREEMENT → click [Yes].
Select a language → click [Next].
4.
When the CANON SOFTWARE LICENSE AGREEMENT is displayed, confirm the content → click [Yes].
5.
Select [USB Connection] → click [Next].
Proceed with the installation according to the instructions on the screen.

6.
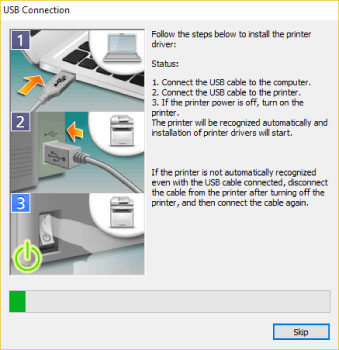
When the following screen appears, connect the device and computer with a USB cable → turn on the device.

Proceed with the installation according to the instructions on the screen.
If installation fails in the above screen, click the subsequent "Open details" and perform the necessary operations.
Reinstall the driver after performing the following procedure.
(1) Connect the device and computer with a USB cable → turn on the device.
(2) Display [Device Manager].
If displaying from [ (the Start menu)]
 (the Start menu)]
Right-click [ ] → select [Device Manager] from the menu.
 ] → select [Device Manager] from the menu.
If displaying from [Control Panel]
Display [Hardware and Sound] (or [Hardware]/ [System and Maintenance]) > [Device Manager].
(3) Right-click the target device in [Other devices] → select the menu for uninstalling the device.
(4) Confirm the device name.
Canon + <model name being used>
7.
Click [Restart] (or [Exit]).