
Basic Windows Operations
|
Depending on the computer that you use, the operation may differ. |
Displaying the Printer Folder
Windows Vista
[Start] select [Control Panel] [Printer].
[Start]
Windows 7/Server 2008 R2
[Start] select [Devices and Printers].
[Start]
Windows 8/Server 2012
Right-click the lower-left corner of the screen select [Control Panel] [View devices and printers].
Right-click the lower-left corner of the screen
Windows 8.1/Server 2012 R2
Right-click [Start] select [Control Panel] [View devices and printers].
Right-click [Start]
Windows 10
[ ] select [Windows System] [Control Panel] [Hardware and Sound] [Devices and Printers].
[
] Windows Server 2008
[Start] select [Control Panel] double-click [Printers].
[Start]
Windows Server 2016
Right-click [] select [Control Panel] [Hardware] [Devices and Printers].
Right-click [
] Enabling [Network discovery]
Enable [Network discovery] to view the computers on your network.
Windows Vista
[Start] select [Control Panel] [View network status and tasks] select [Turn on network discovery] under [Network discovery].
[Start]
Windows 7/Server 2008 R2
[Start] select [Control Panel] [View network status and tasks] [Change advanced sharing settings] select [Turn on network discovery] under [Network discovery].
[Start]
Windows 8/Server 2012
Right-click the lower-left corner of the screen select [Control Panel] [View network status and tasks] [Change advanced sharing settings] select [Turn on network discovery] under [Network discovery].
Right-click the lower-left corner of the screen
Windows 8.1/Server 2012 R2
Right-click [Start] select [Control Panel] [View network status and tasks] [Change advanced sharing settings] select [Turn on network discovery] under [Network discovery].
Right-click [Start]
Windows 10
[] select [Windows System] [Control Panel] [View network status and tasks] [Change advanced sharing settings] select [Turn on network discovery] under [Network discovery].
[
] Windows Server 2008
[Start] select [Control Panel] double-click [Network and Sharing Center] select [Turn on network discovery] under [Network discovery].
[Start]
Windows Server 2016
Right-click [] select [Control Panel] [View network status and tasks] [Change advanced sharing settings] select [Turn on network discovery] under [Network discovery].
Right-click [
] Displaying Shared Printers in the Print Server
1
Open Windows Explorer.
Windows Vista/7/Server 2008
[Start] select [All Programs] or [Programs] [Accessories] [Windows Explorer].
[Start]
Windows 8/Server 2012
Right-click the lower-left corner of the screen select [File Explorer].
Right-click the lower-left corner of the screen
Windows 8.1/Server 2012 R2
Right-click [Start] select [File Explorer].
Windows 10/Server 2016
Right-click [] select [File Explorer].
Right-click [
] 2
Select the printer server in [Network] or [My Network Places].
To view computers on the network, you may need to turn on network discovery or search the network for computers.

Shared printers are displayed.

Displaying the [Software Programs/Manuals Setup] Screen
If your computer does not display the [Software Programs/Manuals Setup] screen after inserting the provided CD-ROM/DVD-ROM, follow the procedure below. The CD-ROM/DVD-ROM drive name is indicated as "D:" in this manual. The CD-ROM/DVD-ROM drive name may differ depending on the computer you are using.
Windows Vista/7/Server 2008
[Start] enter "D:\MInst.exe" in [Search programs and files] or [Start Search] press the [ENTER] key.
Windows 8/Server 2012
Right-click the lower-left corner of the screen [Run] Enter "D:\MInst.exe" click [OK]
Windows 8.1/Server 2012 R2
Right-click [Start] [Run] Enter "D:\MInst.exe" click [OK]
Windows 10
Enter "D:\MInst.exe" in the search box click [D:\MInst.exe] displayed as the search result.
Windows Server 2016
Click [ ] enter "D:\MInst.exe" click [D:\MInst.exe] displayed as the search result.
] Printing a Test Page in Windows
You can check whether the printer driver is operational by printing a test page in Windows.
1
Load Letter size paper in the drawer. Loading Paper in the Drawer
2
Open the printer folder. Displaying the Printer Folder
3
Right-click the printer driver icon for this machine, and click [Printer properties] or [Properties].

4
Click [Print Test Page] in [General] tab.
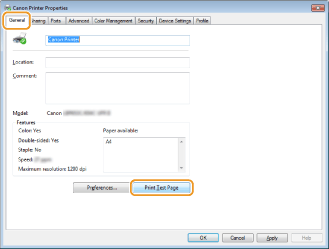
The test page is printed.
Checking the Bit Architecture
If you are not sure whether your computer is running 32-bit or 64-bit Windows follow the procedure below.
1
Display [Control Panel].
Windows Vista/7/Server 2008
[Start] select [Control Panel].
[Start]
Windows 8/Server 2012
Right-click the lower-left corner of the screen select [Control Panel].
Right-click the lower-left corner of the screen
Windows 8.1/Server 2012 R2
Right-click [Start] select [Control Panel].
Right-click [Start]
Windows 10/Server 2016
Proceed to step 2.
Proceed to step 2.
2
Display [System].
Windows Vista/7/8/Server 2008 R2/Server 2012
Click [System and Maintenance] or [System and Security] [System].
Click [System and Maintenance] or [System and Security]
Windows 10/Server 2016
Click [] [Settings] [System] select [About].
Click [
] Windows Server 2008
Double-click [System].
Double-click [System].
3
Check the bit architecture.
For 32-bit versions
[32-bit Operating System] is displayed.
[32-bit Operating System] is displayed.
For 64-bit versions
[64-bit Operating System] is displayed.
[64-bit Operating System] is displayed.

Checking the Printer Port
1
Open the printer folder. Displaying the Printer Folder
2
Right-click the printer driver icon for this machine, and click [Printer properties] or [Properties].
3
In the [Ports] tab, check that the port is selected correctly.

|
If you are using a network connection and have changed the machine's IP addressIf [Description] for the selected port is [Canon MFNP Port], and the machine and the computer are on the same subnet, then the connection will be maintained. You do not need to add a new port. If it is [Standard TCP/IP Port], you need to add a new port. Configuring Printer Ports |
Checking Bidirectional Communication
1
Open the printer folder. Displaying the Printer Folder
2
Right-click the printer driver icon for this machine, and click [Printer properties] or [Properties].
3
In the [Ports] tab, make sure that the [Enable bidirectional support] check box is selected.
Checking the SSID to Which Your Computer is Connected
If your computer is connected to a wireless LAN network, click  ,
,  ,
,  , or
, or  in the system tray to display the SSID of the connected wireless LAN router.
, , , or in the system tray to display the SSID of the connected wireless LAN router.
When Printing from the Windows Store App
Windows Server 2012
Display the charms on the right side of the screen Tap or click [Devices] The driver that you use [Print].
Display the charms on the right side of the screen
Windows 8.1/Server 2012 R2
Display the charms on the right side of the screen Tap or click [Devices] [Print] The driver that you use [Print].
Display the charms on the right side of the screen
Windows 10
Tap or click [Print] on the application The driver that you use [Print].
Tap or click [Print] on the application
|
If you print using this method, only a limited number of print settings are available. If the message [The printer requires your attention. Go to the desktop to take care of it.] is displayed, go to the desktop and follow the instructions in the displayed dialog box. This message appears when the machine is set to display the user name during printing and similar instances. |