Basic Copy Operations
This section describes the basic operations for copying.
1
Place the original. Placing Originals

If <Auto Collate> is set to <On>, the Collate mode is automatically set when you place your originals in the feeder. <Auto Collate>
2
Press <Copy>. <Main Menu> Screen
3
Enter the number of copies using the numeric keys on the Copy Basic Features screen. Copy Basic Features Screen
4
Specify the copy settings as necessary.
Selecting Color Copying or Black and White Copying
Enlarging or Reducing Copies
Selecting Copy Paper
2-Sided Copying
Adjusting Image Quality of Copies
Specifying the Orientation of the Original
Selecting Color Copying or Black and White Copying
| You can select the color mode for copying. For example, this enables you to save toner by copying color originals in black and white, or copying tickets with a single color such as red or blue to indicate the date they are distributed. |
1
Press <Select Color>.
2
Select the color to copy with.
 <Auto (Color/B&W)>
Automatically detects the color of the original. Color pages are copied in four colors (CMYK), and black and white pages are copied in black (K) only.
 <Full Color>
Copies in four colors (CMYK), regardless of the color of the original.
 <Black & White>
Copies in black (K) only, regardless of the color of the original.
 <Two Colors>
Copies in black and the color you specify. Select <Red>, <Green>, <Blue>, <Yellow>, <Magenta>, or <Cyan>.

You can set whether to replace a chromatic color other than the specified color (or approximate color) with black or the specified color. <Conversion Color by Specific Color for Two Colors Print>
 <Single Color>
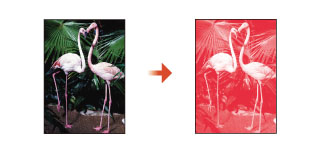
Copies with the color you specify only. Select <Red>, <Green>, <Blue>, <Yellow>, <Magenta>, or <Cyan>.
Example: If you copy with red
3
Press <OK>.

Depending on the state of the color original, it may be detected as black and white when scanned, even if you set <Auto (Color/B&W)>. To avoid this, set the color mode to <Full Color>.
When the Auto (Color/B&W) mode is set, black-and-white copies are output at the same speed as colour copies.
If a black-and-white document is copied in the <Full Color>, <Single Color>, or <Two Colors> mode, it is counted as a color copy.

The following restriction(s) will apply when storing documents in the Mail Box with <Scan and Store>.
Color pages are stored in the RGB format.
You cannot specify <Two Colors> and <Single Color>.
Back to Top
Enlarging or Reducing Copies
 | You can enlarge or reduce copies from standard paper sizes to other standard paper sizes. Enlarging or Reducing Copies with Standard Paper Sizes | |
 | You can enlarge or reduce by specifying the copy ratio (%). You can specify the vertical and horizontal ratios individually. Enlarging or Reducing Copies by Specifying the Copy Ratio | |
 | You can enlarge or reduce to automatically fit the paper size selected. Enlarging and Reducing Copies to Fit Paper Size |
Enlarging or Reducing Copies with Standard Paper Sizes
1
Press <Copy Ratio>.
2
To reduce, select the copy ratio from , to enlarge, select the copy ratio from , and press <OK>.
, to enlarge, select the copy ratio from , and press <OK>.
Back to Top
Enlarging or Reducing Copies by Specifying the Copy Ratio
1
Press <Copy Ratio>.
2
Specify the copy ratio and press <OK>.

To specify vertical and horizontal ratios individually, press <XY Ratio> and then specify the ratios for each. Depending on the ratio, the image on the printout may be rotated by 90 degrees.
Back to Top
Enlarging and Reducing Copies to Fit Paper Size
1
Press <Select Paper>.
2
Select paper and press <OK>.
3
Press <Copy Ratio>.
4
Press <Auto>.

5
Select the size of the original, and press <OK>.

|
When copying in equal copy ratio to paper that has the same size as the original, the edges of the copied image may be slightly missing. To avoid this, reduce the size of the image by pressing <Copy Ratio> If you select <Fit to Page>, <Shift> is automatically set to <Center>. You cannot scan highly transparent originals, such as transparencies, using the Auto setting for Copy Ratio. Use the Preset Zoom or Zoom by Percentage mode instead. If you set <Auto>, you have to select a paper size manually. If you do not select a paper size, the copy ratio is automatically set to match the size of paper loaded in paper drawer 1. |
Back to Top
Selecting Copy Paper
 | If you want to copy free size originals or highly transparent originals, or if you want to copy with paper set in the multi-purpose tray, you need to select paper manually. |
1
Press <Select Paper>.
2
Select paper and press <OK>.
Pressing  enables you to confirm detailed information of the paper selected.
enables you to confirm detailed information of the paper selected. |
Be sure to correctly set the paper type. If the type of paper is not set correctly, it may adversely affect image quality. Moreover, the fixing unit may become dirty, or the paper could jam, and a service repair may be needed. Take care when copying an original with an image that extends all the way to the edges. If you copy on the same size paper, the periphery of the original image may be cut off slightly on the copy. For more information on how much may be cut off, see Hardware Specifications. |
Back to Top
2-Sided Copying
 | You can copy 1-sided originals on both sides of the paper. You can also copy a 2-sided original on both sides of the paper, or on two separate sheets. Copying 1-Sided to 2-Sided Copying 2-Sided to 2-Sided Copying 2-Sided to 1-Sided |
|
Place the original in a proper orientation as shown in the illustrations below.  Originals of heavy or thin paper cannot be placed in the feeder. Place the original on the platen glass. In this case, place the original in a proper orientation as shown in the illustrations below.  When making 2-sided copies, functions of some settings such as the paper size and type are limited. For more information, see Hardware Specifications. |
Copying 1-Sided to 2-Sided
When copying a horizontally long original, place the original in landscape orientation.
1
Press <Options>  <2-Sided>.
2
Press <1-Sided  2-Sided>.

3
Set <Finishing Copy Format> and press <OK>.
To change the print orientation, press <Set Details>. Select <Book Type> to make the front and back sides of the printout have the same top-bottom orientation. Select <Calendar Type> to make the front and back sides of the printout have opposite top-bottom orientations.
Back to Top
Copying 2-Sided to 2-Sided
1
Press <Options> <2-Sided>.
2
Press <2-Sided 2-Sided>.

3
Set <Original Type> and <Finishing Copy Format>, and press <OK>.
To specify orientation of the original and change the print orientation, press <Set Details>. Select <Book Type> when the front and back sides of the original have the same top-bottom orientation. Select <Calendar Type> when the front and back sides of the original have opposite top-bottom orientations. You can also set the page orientation of the printout with <Book Type> or <Calendar Type>.
Back to Top
Copying 2-Sided to 1-Sided
Place the original in the feeder.
1
Press <Options> <2-Sided>.
2
Press <2-Sided 1-Sided>.

3
Set <Original Type> and press <OK>.
To specify the orientation of the original, press <Set Details>. Select <Book Type> when the front and back sides of the original have the same top-bottom orientation. Select <Calendar Type> when the front and back sides of the original have opposite top-bottom orientations.
Back to Top
Adjusting Image Quality of Copies
 | You can adjust density of the entire document. For example, increasing copy density enables you to easily read faint characters written in pencil. Adjusting the Density of Copies | |
 | You can adjust density of the background. This enables you to make clear copies of originals such as newspapers or originals with colored backgrounds. Adjusting the Density of the Background of Copies |
Adjusting the Density of Copies
1
Press <Options> <Density>.
2
Adjust density and press <OK>.
Press  to decrease density. Press
  to increase density.
to decrease density. Press to increase density.Back to Top
Adjusting the Density of the Background of Copies
1
Press <Options> <Density>.
2
Press <Adjust> in <Background Density>.

To adjust the background automatically, press <Auto> and proceed to step 4.
3
Adjust density and press <OK>.
Press <-> to decrease the density of the entire background. Press <+> to increase the density of the entire background.
Depending on the colors of originals, sections other than the background may be affected.
If you press <Adjust> <Adjust Each Color>, you can adjust the background density by color.
4
Press <OK>.
Back to Top
 Confirm settings before copying
If you press <Check Settings>, the list of the specified settings is displayed.
If you select a setting on the list and press <Change>, you can change the setting. After changing the settings, press <OK>.
5
Press  (Start).
(Start).Copying starts.
To cancel copying, press <Cancel> or  (Stop). Cancelling Copying
(Stop). Cancelling CopyingPressing or during copying enables you to adjust density.
or during copying enables you to adjust density. |
You cannot change the density while printing with <Secure Watermark> set. |
When <Press the [Start] key to scan the next original.> is displayed
Place the next original and press (Start). After scanning all of the originals, press <Start Copying> to start copying.
(Start). After scanning all of the originals, press <Start Copying> to start copying.Specifying the Orientation of the Original
 | You can specify the orientation of an original placed on the platen glass or into the feeder as horizontal or vertical. |
1
Press <Options> <Original Content Orientation>.
2
Select the orientation of the original.
Select <Top at Far Edge> for horizontally-oriented originals, or <Top at Side Edge> for vertically-oriented originals.
For Originals in Portrait Orientation | |||||
Type of Original | Platen Glass | Feeder | |||
 |  |  | |||
For Originals in Landscape Orientation | |||||
Type of Original | Platen Glass | Feeder | |||
 |  |  | |||
3
Press <OK>.
Back to Top
|
When multiple sheets are fed at onceScanning is stopped and the message is displayed on the screen. Follow the instructions to clear the jam. When you have cleared the jam, the resume job screen is displayed. If the machine mistakenly detects multiple sheet feeding, press <Do Not Detect Multi. Sheet Feed> to resume scanning. To set the machine in advance to not notify you of multiple sheet feeding, perform one of the following operations. Each time you copy, press <Options> on the Copy Basic Features screen Set <Set Detection of Feeder Multi. Sheet Feed as Default> to <Off> (<Set Detection of Feeder Multi. Sheet Feed as Default>). |
TIPS |
Reserving a copyScanning can be performed in advance, even if the machine is preparing to print or printing. This function is called "Reserved copy." For example, to perform reserved copy while the printing or waiting screen is displayed, press <Close>, specify the copy settings in the usual manner, and press (Start).You can specify up to 50 jobs to be reserved, including the current job. Interrupt copy jobs are not included in this count. |
<Common> <Paper Output Settings>