Preparing the Address Book
There are a number of methods for specifying the destination address for sending a fax from Desktop.
Prepare the address book for the fax driver in advance and use it when sending a fax
Enter the destination address when sending a fax
Acquire the address book from the external device and use it when sending a fax
Import from an external CSV (*.csv)/Excel (*.xlsx, *.xlsm, *.xlsb, or *.xls)/Canon Address Book (*.abk) file and use it when sending
Acquire the address from the document's property information and use it when sending a fax
This section describes how to prepare the address book for the Canon fax driver.
|
NOTE
|
|
For information on how to configure settings when sending a fax, see the following.
The fax driver screen may differ depending on the product.
You can register up to 3,000 personal destinations to the address book of the fax driver.
You cannot view or edit the address book if you do not have the write permission (Windows) for the storage destination folder of the address book. Log into the system as a user with the write permission (Windows) or click [Specify a Folder] on the [Edit Address Book] page and change the storage destination of the address book to a folder such as [My Documents]/[Document] for which you have write permission (Windows).
|
You can register personal transmission destination in the address book of the fax driver.
|
NOTE
|
|
You can edit registered personal destination information. For more information, see "Help" by clicking [Help] in the lower-right corner of the print settings screen of the fax driver.
|
1.
Display the [Devices and Printers] of Windows.
|
NOTE
|
|
For information on displaying the [Devices and Printers], see the following.
|
2.
Right-click the icon of the fax to use and then select [Printing Preferences].
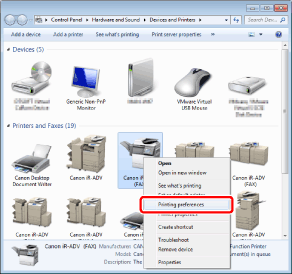
The print settings screen of the fax driver is displayed.
3.
Click [Add Person] on the [Edit Address Book] tab.
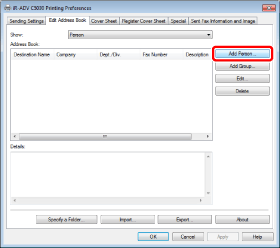
The [Add Person] is displayed.
|
NOTE
|
|
If you are using the Canon Generic FAX Driver, click [Edit Address Book] on the [Select Destination] tab, and click [Add Person] on the [Edit Address Book] that is displayed.
|
4.
Enter the information of the new destination to register, and then click [OK].
For more information on the settings, see the Help of the fax driver.
5.
Click [OK].
The settings are registered.
You can register multiple destinations as a group in the address book of the fax driver.
|
NOTE
|
|
In addition to registered persons, you can also register a registered group to a new group as its child group.
|
1.
Display the [Devices and Printers] of Windows.
|
NOTE
|
|
For information on displaying the [Devices and Printers], see the following.
|
2.
Right-click the icon of the fax to use and then select [Printing Preferences].

The print settings screen of the fax driver is displayed.
3.
Click [Add Group] on the [Edit Address Book] tab.
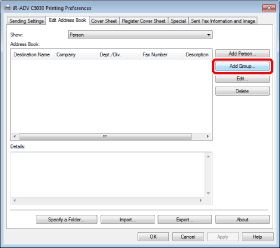
The [Add Group] is displayed.
|
NOTE
|
|
If you are using the Canon Generic FAX Driver, click [Edit Address Book] on the [Select Destination] tab, and click [Add Group] on the [Edit Address Book] that is displayed.
|
4.
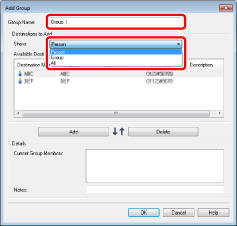
Enter the name of a new group in [Group Name] and then select an item to register in [Show] from the pull-down list.
5.
Select a person or group to register in the new group from [Available Destinations] and then click [Add].
The selected person or group is listed in [Current Group Members] under [Details].
|
NOTE
|
|
To delete an added destination from [Current Group Members], select the destination and then click [Delete].
Multiple destinations can be selected by clicking them while holding down the [Shift] or [Ctrl] key on the keyboard.
|
6.
In [Notes], enter the additional information used as the keyword for the group to be newly added, and then click [OK].
7.
Click [OK].
The settings are registered.
You can import the externally stored destination information to the address book of the fax driver. You can import the following file types into the address book.
CSV (*.csv)
Canon Address Book file (*.abk)
1.
Display the [Devices and Printers] of Windows.
|
NOTE
|
|
For information on displaying the [Devices and Printers], see the following.
|
2.
Right-click the icon of the fax to use and then select [Printing Preferences].

The print settings screen of the fax driver is displayed.
3.
Click [Import] on the [Edit Address Book] tab.
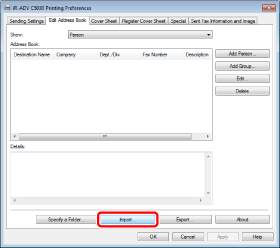
The [Open] is displayed.
|
NOTE
|
|
If you are using the Canon Generic FAX Driver, click [Edit Address Book] on the [Select Destination] tab, and click [Load File] on the [Edit Address Book] that is displayed.
|
4.
Select a file to import into the address book and click [Open].
The selected file is loaded and addresses read from it are added to the list.
|
NOTE
|
|
If you select one of the following as the file format to import in [Files of type], only the files of the selected format are displayed.
CSV (separated by commas)(*.csv)
Canon Address Book (*.abk)
If you select [All Files (*.*)], all files are displayed.
When selecting the CSV format, also specify the delimiter used.
When importing a Canon Address Book file with a Euro symbol in [Destination Name], the Euro symbol may not be displayed correctly depending on the specifications of Windows.
|
5.
Click [OK].
The settings are registered.
Exporting the Address Book of the Fax Driver
You can export destination information stored in the address book. The address book can be saved in one of the following file formats.
CSV (*.csv)
Canon Address Book file (*.abk)
|
NOTE
|
|
The data format of fax driver address books (*.csv) differs from that of CSV format address books that can be imported to Desktop. Exported address books must be edited before they can be imported. For more information, see the following.
Exported address books with the *.abk extension can be imported without editing.
|
1.
Display the [Devices and Printers] of Windows.
|
NOTE
|
|
For information on displaying the [Devices and Printers], see the following.
|
2.
Right-click the icon of the fax to use and then select [Printing Preferences].

The print settings screen of the fax driver is displayed.
3.
Click [Export] on the [Edit Address Book] tab.
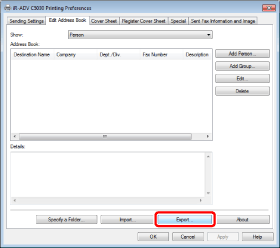
The [Save As] is displayed.
|
NOTE
|
|
If you are using the Canon Generic FAX Driver, click [Edit Address Book] on the [Select Destination] tab, and click [Save File] on the [Edit Address Book] that is displayed.
If you have selected [Protect with Password when Exporting Address List] in the [Security Settings] of the [Special] tab, clicking [Save File] displays the dialog box for password input.
|
4.
Specify the save destination and file name and then click [Save].
The address book of the fax driver is saved.
|
NOTE
|
|
In [Files of type], select the file format in which to save the address book as from one of the following.
CSV (separated by commas)(*.csv)
Canon Address Book (*.abk)
When selecting CSV (separated by commas)(*.csv), also specify the delimiter to use.
|
Changing the Storage Destination of the Address Book of the Fax Driver
You can change or newly create the storage destination of the address book of the fax driver (Canon Fax Driver Address Book).
1.
Display the [Devices and Printers] of Windows.
|
NOTE
|
|
For information on displaying the [Devices and Printers], see the following.
|
2.
Right-click the icon of the fax to use and then select [Printing Preferences].

The print settings screen of the fax driver is displayed.
3.
Click [Specify a Folder] on the [Edit Address Book] tab.
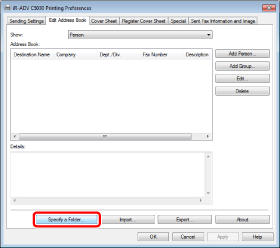
The [Browse For Folder] is displayed.
|
NOTE
|
|
If you are using the Canon Generic FAX Driver, click [Edit Address Book] on the [Select Destination] tab, and click [Specify a Folder] on the [Edit Address Book] that is displayed.
|
4.
Select the storage destination folder of the address book and then click [OK].
A message is displayed.
|
NOTE
|
|
Be sure to specify a folder for which you have the write permission (Windows) for the storage destination folder of the address book; for example, the [Document] folder.
|
5.
Click [New] when you are creating a new address book or [Copy] when you are copying the address book currently used by the fax driver.
The address book is created or copied.
|
NOTE
|
|
If another address book already exists in the folder specified in step 4, a message indicating its existence is displayed. Click [Use] when you use the existing address book or [Overwrite] when you use the address book currently used by the fax driver.
|
6.
Click [OK].
The settings are registered.