Sending Faxes from Quick Printing Tool
You can drag and drop documents, folders, or pages to the Quick Printing Tool to send them via fax. You can send multiple documents at the same time.
|
NOTE
|
|
Drag and drop operations can be performed from the following locations.
Documents/folders in a library
Pages of the PDF document selected in the Preview Window of the Desktop Browser screen or the Edit Pages Mode
Documents/folders in a Windows Folder
Documents/folders on the desktop
msg documents/e-mail folders in Microsoft Outlook
If you dragged and dropped a folder, the documents in the folder are sent via fax.
|
1.
Select the documents/folders/pages to fax.
|
NOTE
|
|
Pages can only be selected for PDF documents.
You can use the Preview Window of the Desktop Browser screen or the Edit Pages Mode to select pages.
You can select multiple documents, folders, or pages. To select multiple pages, do one of the following.
Switching the Preview Window of the Desktop Browser screen to the thumbnail view
Starting the Edit Pages Mode of Desktop Browser
For information on starting the Edit Pages Mode, see the following.
|
2.
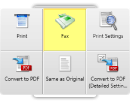
Drag the documents, folders, or pages to the Quick Printing Tool.
A popup menu is displayed.

|
NOTE
|
|
While dragging the mouse, the Quick Printing Tool is displayed at the front if the [T] key on the keyboard is pressed, or near the mouse cursor if the [N] key on the keyboard is pressed. You can also change the assigned keys. For more information, see the following.
|
3.
Drop the dragged documents, folders, or pages to [Fax].
The menu that the mouse cursor is currently over is highlighted in yellow.
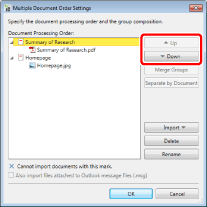
When you drag and drop multiple documents, folders, or Outlook message files (*.msg), [Multiple Document Order Settings] is displayed. In this case, proceed to step 4.
In the following cases, proceed to step 6.
If you selected a single document or page
If you selected the [Send one file at a time by fax without combining multiple files] check box on the [Other] tab of [Detailed Settings for imageRUNNER ADVANCE Desktop Quick Printing Tool]
|
NOTE
|
|
If you dragged and dropped a folder or Outlook message file (*.msg), [Multiple Document Order Settings] is displayed even if the [Send one file at a time by fax without combining multiple files] check box is selected.
Right-click the Quick Printing Tool > [Detailed Settings] > [Other] tab > [Send one file at a time by fax without combining multiple files]
If you right-click to select the document or folder, and drag and drop it to [Fax], the following menu is displayed.
[Multiple Document Order Settings]: Displays [Multiple Document Order Settings].
[Cancel]: Cancels sending the fax.
|
4.
Select a document in [Document Processing Order] and click [Up]/[Down] to specify the order of faxing the documents.

|
NOTE
|
|
For more information on [Multiple Document Order Settings], see the following.
|
5.
Click [OK].
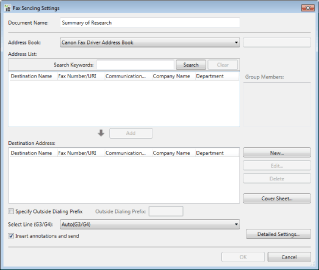
[Fax Sending Settings] is displayed.
6.
Configure the fax destination.

|
NOTE
|
|
For details on how to set the destination address, see the following.
|
7.
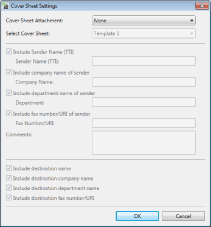
Configure the cover sheet settings if necessary.

|
NOTE
|
|
For more information on how to configure cover sheet settings, see the following.
|
8.
To specify a job name for the fax document to be sent, enter the name in [Document Name].
9.
To fax a document using an external number, select the [Specify Outside Dialing Prefix] check box and enter the fax number in [Outside Dialing Prefix].
10.
When specifying the line to be used, select it from the [Select Line (G3/G4)] pull-down list.
Select [Auto (G3/G4)] when specifying line is not required. Send faxes using the prior sending line specified by the device.
|
NOTE
|
|
If you send a fax with the IP fax function, this setting will be disabled.
|
11.
Select the [Insert annotations and send] check box to include annotations when sending the fax.
|
NOTE
|
|
Annotations added with something other than Desktop Editor may be faxed regardless of whether you select the [Insert annotations and send] check box, depending on the type of annotation.
|
12.
If you want to receive e-mail notification when sending is complete, click [Detailed Settings] and configure the required settings.
|
NOTE
|
|
To receive e-mail notification when sending is complete, see the following.
|
13.
Click [OK].
The faxing starts.
|
NOTE
|
|
If you dropped multiple documents to [Fax] with the [Send one file at a time by fax without combining multiple files] check box selected, [Fax Sending Settings] is displayed for the next document. In this case, repeat steps 6 to 12.
Right-click the Quick Printing Tool > [Detailed Settings] > [Other] tab > [Send one file at a time by fax without combining multiple files]
For more information on the status of fax jobs, see the following.
The [Printing] dialog box or the [Print] dialog box of the application used to create the document may be displayed. In this case, select [Desktop Document Writer] as the output printer and print.
|