
Loading Paper into the POD Deck Lite XL-A1
If the POD Deck Lite XL-A1 is attached, it can provide one extra paper source in addition to the paper drawers pre-installed in the machine by default.
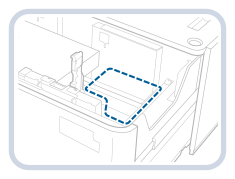
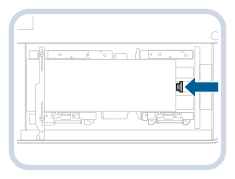
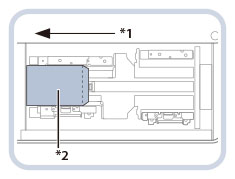
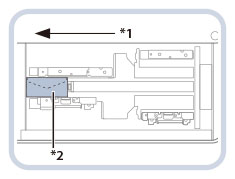
The location of the POD Deck Lite XL-A1 is indicated in the following illustration.
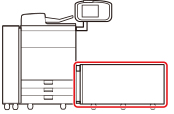
The POD Deck Lite XL-A1 holds up to 3,500 sheets of plain paper (80 g/m2) or 1,000 sheets of long sheet paper (80 g/m2).
|
|
|
If the machine is in the Sleep mode (the touch panel is not displayed, and only
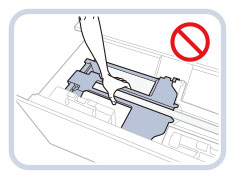
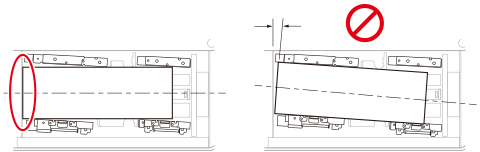
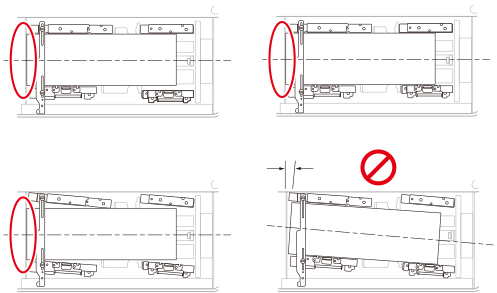
 is lit), you may be unable to open the paper deck. In this case, press to reactivate the machine, and then press the open button on the paper deck. is lit), you may be unable to open the paper deck. In this case, press to reactivate the machine, and then press the open button on the paper deck.If you need to lift up the lifter (for example, if you drop objects inside the POD Deck Lite XL-A1), do not lift up the lifter more than 50 mm or diagonally, as this may result in a malfunction or damage to the machine.
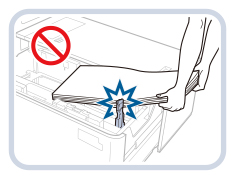
 Do not give a strong shock to the rear edge retainer when loading paper into the paper deck, as this may result in a malfunction or damage to the machine.
 Adjust the size change plates (outer and inner) and rear edge retainer correctly to avoid paper jams, dirty prints, or making the inside of the machine dirty.
Curled paper must be straightened out before loading it into the paper deck.
You will not be able to make copies or prints if you load paper exceeding the loading limit mark (
 ), or if the paper deck is not completely pushed into the machine. ), or if the paper deck is not completely pushed into the machine.Make sure that the height of the paper stack does not exceed the loading limit mark (
).Always check that the paper deck is in place.
Never place paper or any other items in the empty parts on the sides of the paper deck, as this may result in a malfunction or damage to the machine.
|
 |
|
The POD Deck Lite XL-A1 is an optional product.
For information on the available paper, see Available Paper Stock.
When printing on paper whose length along the paper feeding direction is 487.8 mm or longer, see Setting/Changing the Size of Paper for the Long Sheets.
If there are instructions on the package of paper about which side of the paper to load, follow those instructions.
When loading paper into the POD Deck Lite XL-A1, load it with its print side facing up.
If problems occur with prints, try turning the paper stack over, and reload it. However, textured paper, single-sided coated paper, and paper already printed on cannot be turned over. Change to new paper.
If the height of the paper stack is too high, the edges of the paper stack may become curled or creased, and poor print quality may result. Separate the paper stack into several sets and load them individually, each having a height of 20 mm or lower.
|
Setting/Changing the Size of Paper for Standard Size Paper
Follow the procedure below to change the paper setting for standard size paper (less than 487.8 mm).
1
Register the paper size for the POD Deck Lite XL-A1 in [Paper Settings] in [Preferences] (Settings/Registration).
For details about how to register the paper size for the POD Deck Lite XL-A1, see "Registering the Paper Size and Type for a Paper Source" in the User's Guide.
2
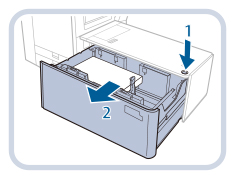
Open the paper deck.
 |
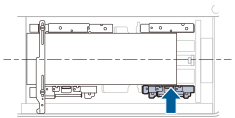
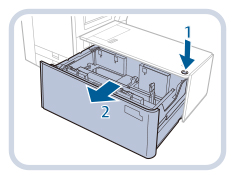
Press the open button.
|
 |
Open the paper deck.
The inside lifter automatically descends to the paper loading position.
 |

It may take a while for the paper deck to open, depending on the conditions.
The fixing bracket for the size change plates is required only when using long sheets. Have it removed when using standard size paper. In addition, it cannot be used when the width of the paper in use is under 210 mm.
If the fixing bracket for the size change plates has been attached, remove it, and then attach it to its specified position, which is on the right side of the paper deck.

3
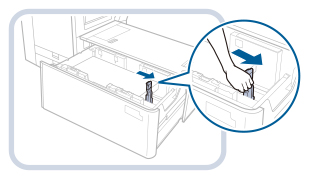
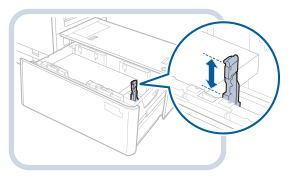
Slide the rear edge retainer to the position where it does not interfere with the paper.
Slide the rear edge retainer by pressing on its lever as shown in the illustration.
4
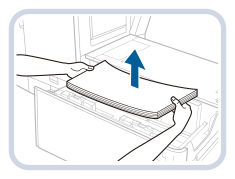
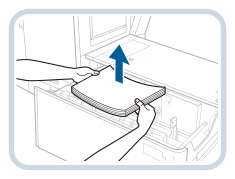
Remove the loaded paper completely.
If the rear edge retainer is set on the long sheet position, the paper size switch lamp is illuminated. In this case, slide the rear edge retainer to the standard size position.
5
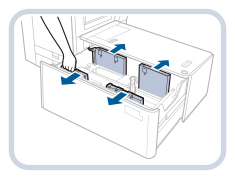
By pressing on the lever as shown in the illustration, slide the size change plates (outer and inner) to the position where they do not interfere with the paper.
6
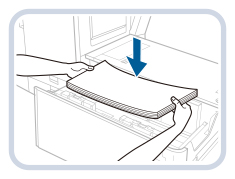
Load the desired paper to approximately 10 mm in height.

When loading paper, take care not to cut your hands on the edges of the paper.

To load the long sheets (487.8 mm or longer), first close the paper deck to raise the inside lifter, open the paper deck, and then load the paper. If you try to load paper when the inside lifter is at its lowest position, the paper may not be loaded properly, and paper jams may occur. Setting/Changing the Size of Paper for the Long Sheets
Never place paper or any other items in the empty parts in the paper deck. Doing so may result in a malfunction or damage to the machine.
7
By pressing on the lever as shown in the illustration, slide the left size change plates (outer and inner) and adjust them for the size of paper in use.
8
Slide the rear edge retainer and adjust it for the size of paper in use.
If the rear edge retainer is not adjusted properly, paper may become jammed, the quality of the image may be degraded, or the inside of the machine may become dirty. Make sure to load paper with the rear edge retainer properly aligned with the paper size marks on the top and base of the paper deck.
9
Load all remaining paper into the paper deck.
If the height of the paper stack is too high, the edges of the paper stack may become curled or creased, and poor print quality may result. Separate the paper stack into several sets and load them individually, each having a height of 20 mm or lower.
10
Gently push the paper deck back into the machine until it clicks into place in the closed position.
The inside lifter automatically ascends, and prepares the paper deck for printing.
When closing the paper deck, be careful not to get your fingers caught.
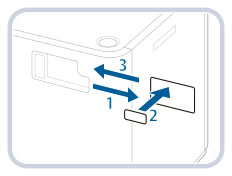
11
Change the paper size on the media sheet and insert it into the media plate.
|
|
Pull the media sheet out of the media plate.
|
|
|
Stick the paper size label to match the new paper size on the media sheet.
|
 |
Insert the media sheet into the media plate.
 |
Setting/Changing the Size of Paper for the Long Sheets
Follow the procedure below to change the paper setting for the long sheets (487.8 mm or longer).
1
Register the paper size for the POD Deck Lite XL-A1 in [Paper Settings] in [Preferences] (Settings/Registration).
For details about how to register the paper size for the POD Deck Lite XL-A1, see "Registering the Paper Size and Type for a Paper Source" in the User's Guide.
2
Open the paper deck.
|
|
Press the open button.
|
|
|
Open the paper deck.
The inside lifter automatically descends to the paper loading position.
 |
It may take a while for the paper deck to open, depending on the conditions.
3
Slide the rear edge retainer to the position where it does not interfere with the long sheet paper.
Slide the rear edge retainer by pressing on its lever as shown in the illustration.

4
Remove the loaded paper completely.
When you slide the rear edge retainer to the long sheet position after removing all paper, the paper size switch lamp flashes or illuminates.
When the paper size switch lamp is flashing  Proceed to step 5
When the paper size switch lamp is illuminated Proceed to step 6
5
Close the paper deck.

The paper size switch lamp begins to flash. While they are flashing, do not open the paper deck. Once the preparation is complete, the paper size switch lamp stop flashing and stay illuminated. You can now load paper into the paper deck.
6
Open the paper deck, and then load the long sheets to approximately 10 mm in height.
When loading paper, take care not to cut your hands on the edges of the paper.
7
Keeping the paper stack pressed against the left wall, slide the left size change plate (outer) to the paper.
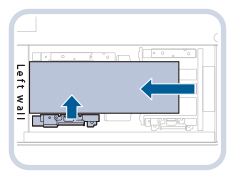
The edge of the long sheet paper stack must be parallel to the left wall.
Do not adjust the size change plate too tightly, as this may cause the paper to be partially lifted.
8
Push the paper stack flush against the left wall and the left size change plate (inner).
9
Take the fixing bracket for the size change plates attached on the right side of the paper deck.

10
Attach the fixing bracket for the size change plates.
|
|
Insert the positioning pin.
|
|
|
Tighten the coin screw on the inner side.
 |
Be sure to tighten the coin screw on the inner side first. If you tighten the coin screw on the outer side first, the size change plates may become skewed.
Tighten the coin screw firmly. If the coin screw is slanted or loose, print precision may become affected.
11
Keeping the left size change plate (outer) pressed against the long sheet paper stack, tighten the outer side coin screw of the fixing bracket for the size change plates.
Check that both ends of the long sheet paper stack's left edge are in contact with the left wall.
12
Push the rear edge retainer against the long sheet paper stack.
If the rear edge retainer is not adjusted properly, paper may become jammed, the quality of the image may be degraded, or the inside of the machine may become dirty. Make sure to load paper with the rear edge retainer properly aligned with the paper size marks on the top and base of the paper deck.
13
Slide the right size change plate (outer) to the paper.
Check that the long sheet paper stack is flush against the left wall.
When sliding the right size change plate (outer), take care as the paper may slip under the plate.
14
Load all remaining paper into the paper deck.

If the height of the paper stack is too high, the edges of the paper stack may become curled or creased, and poor print quality may result. Separate the paper stack into several sets and load them individually, each having a height of 20 mm or lower.
15
Gently push the paper deck back into the machine until it clicks into place in the closed position.
The inside lifter automatically ascends, and prepares the paper deck for printing.
When closing the paper deck, be careful not to get your fingers caught.
16
Change the paper size on the media sheet and insert it into the media plate.
|
|
Pull the media sheet out of the media plate.
|
|
|
Stick the paper size label to match the new paper size on the media sheet.
|
|
|
Insert the media sheet into the media plate.
|
Loading Paper into the POD Deck Lite XL-A1
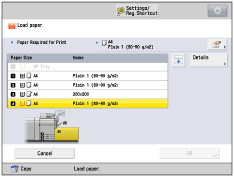
If you select the POD Deck Lite XL-A1 when it has no paper, or if the POD Deck Lite XL-A1 runs out of paper during a print job, a screen prompting you to load paper appears on the touch panel display.
Follow the procedure below to load paper into the POD Deck Lite XL-A1.
 |
|
When loading paper, take care not to cut your hands on the edges of the paper.
|
|
|
|
If paper runs out and printing is stopped when you are printing in the Staple mode, do not remove the output sheets that are waiting to be stapled. (Printing and stapling resume after you load paper.)
|
 |
|
If a message prompting you to load paper appears during printing, the remaining prints are automatically made after you load the correct paper. If you select a different paper source, the remaining prints are made after you press [OK].
|
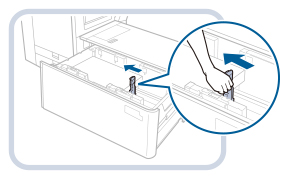
1
Open the paper deck.
|
|
Press the open button.
|
|
|
Open the paper deck.
The inside lifter automatically descends to the paper loading position.
 |
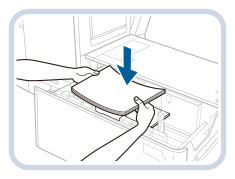
2
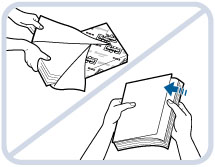
Prepare the paper to load.
|
Open the packaging for the paper, and remove the paper stack.
 |
For high-quality printouts, use paper recommended by Canon.
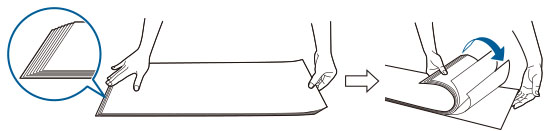
Before loading paper, always fan the sheets several times, and align the edges to facilitate feeding. Paper taken freshly out of its packaging should be fanned as a stack.
For a long sheet paper stack, make an oblique angle by holding its both ends. Then, fan the sheets well on one side to let the air in. After aligning the paper stack, fan the opposite side in the same way. If several sheets are stuck together, separate them carefully one by one.
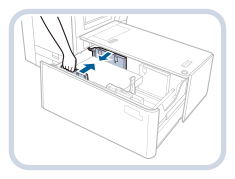
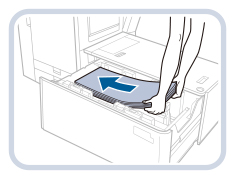
3
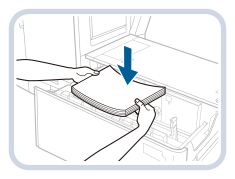
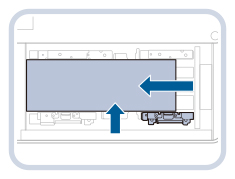
Load the paper stack into the paper deck, keeping its edge flush against the left wall.
4
Gently push the paper deck back into the machine until it clicks into place in the closed position.
The inside lifter automatically ascends, and prepares the paper deck for printing.
When closing the paper deck, be careful not to get your fingers caught.
|
|
|
In the following situations, adjust the size change plates to match the size of paper being loaded.
Setting/Changing the Size of Paper for Standard Size Paper Setting/Changing the Size of Paper for the Long Sheets When you load paper into the paper deck for the first time.
When you load paper and the edges of the paper stack may become curled in the paper deck or there are gaps between the edge of paper and the size change plates, because the size of paper being loaded does not match the paper size that the size change plates currently set for.
Do not give a strong shock to the rear edge retainer when loading paper into the paper deck, as this may result in a malfunction or damage to the machine.
Do not load the following types of paper into the POD Deck Lite XL-A1. Doing so may cause a paper jam.
Severely curled or wrinkled paper
Thin straw paper
Paper which has been printed on using a thermal transfer printer
The reverse side of paper which has been printed on using a thermal transfer printer
Curled paper must be straightened out before loading it into the paper deck.
Do not load paper that has been previously copied onto into the POD Deck Lite XL-A1, as this may result in a malfunction or damage to the machine. Always use the bypass tray to feed paper when you want to copy onto the back of a sheet of paper that already has something copied on its front side (2nd side of 2-Sided copy).
Never place paper or any other items in the empty parts of the paper deck, as this may result in a malfunction or damage to the machine.
A paper blower is attached inside of the POD Deck Lite XL-A1. Do not insert paper clips or other foreign objects into the blower port.
Paper jams may occur if you load paper into the POD Deck Lite XL-A1 in a low humidity environment. If paper jams occur, follow the instructions on the touch panel display to remove the jammed paper Clearing Paper Jam in the POD Deck Lite XL-A1. In addition, make sure that the loaded paper is not curled. Curled paper must be straightened out before loading it into the paper deck.
You will not be able to make copies or prints if you load paper exceeding the loading limit mark (
), or if the paper deck is not completely pushed into the machine.Make sure that the height of the paper stack does not exceed the loading limit mark (
).Always check that the paper deck is in place.
If the first output sheet cannot be output onto the output tray smoothly, we recommend that you place a blank sheet of the same or larger size than the output paper on the output tray in advance.
|
|
|
|
When loading paper into the paper deck, make sure that the paper size setting of the POD Deck Lite XL-A1 matches the size of paper being loaded.
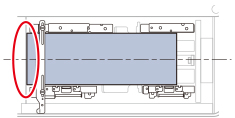
Load the paper below the rollers of the rear edge retainer.
 If the height of the paper stack is too high, the edges of the paper stack may become curled or creased, and poor print quality may result. Separate the paper stack into several sets and load them individually, each having a height of 20 mm or lower.
For instructions on loading tab paper into the paper deck, see "Loading Tab Paper" in the User's Guide.
You can load about 550 sheets of paper at a time into the POD Deck Lite XL-A1. If more sheets of paper can be loaded, the lifter descends again.
For instructions on loading transparencies/clear film, see "Loading Transparencies/Clear Film" in the User's Guide.
If there are instructions on the package of paper about which side of the paper to load, follow those instructions.
When loading paper into the POD Deck Lite XL-A1, load it with its print side facing up.
If problems occur with prints, try turning the paper stack over, and reload it.
For more information on the print direction of preprinted paper (paper with logos or patterns already printed on it), see "Relationship Between the Original Orientation and Paper Orientation" in the User's Guide.
Rewrap any remaining paper in its original package, and store it in a dry place, away from direct sunlight.
If paper runs out and printing is stopped, load a new paper stack. Printing restarts after the new paper stack is loaded.
 |
Loading Envelopes into the POD Deck Lite XL-A1
This section explains available envelope types and loading limits with the POD Deck Lite XL-A1, and envelope feeding direction with the Envelope Feeder Attachment-G1.
For more information on procedures for attaching the Envelope Feeder Attachment-G1 to the POD Deck Lite XL-A1 and loading envelopes, see the instruction manual of the Envelope Feeder Attachment-G1.
|
|
|
If the fixing bracket for the size change plates is attached, the Envelope Feeder Attachment-G1 cannot be attached. To attach the Envelope Feeder Attachment-G1, remove the fixing bracket for the size change plates in advance.
|
Available Envelope Type and Loading Limit
The loading limit varies, depending on the type of envelope.
|
Envelope Type
|
Loading Limit (Height)
|
Loading Limit Mark
|
|
Nagagata 3*1
|
160 mm*6
|
-
|
|
Yougatanaga 3*2
|
100 mm
|
 |
|
Kakugata 2*3*4
|
||
|
9" x 12"*4
|
||
|
6" x 9"
|
||
|
No. 10(COM10)
|
||
|
ISO-C5
|
||
|
DL
|
||
|
Monarch
|
70 mm
|
 |
|
10" x 13"*5
|
45 mm
|
-
|
*1 If you are using a side seam envelope, make sure the height of the envelope stack does not exceed 100 mm. For the loading limit mark, see "".
".*2 The Envelope Feeder Attachment-G1 may not be required for some types of envelope, depending on the manufacturer.
*3 If you are using a side seam envelope, make sure the height of the envelope stack does not exceed 45 mm. The loading limit is not indicated.
*4 The Support Tray of the Envelope Feeder Attachment-G1 is required to load the envelope.
*5 The Envelope Feeder Attachment-G1 is not required.
*6 If you are using Nagagata 3, make sure the height of the envelop stack does not exceed 160 mm. The loading limit is not indicated.
|
|
|
Make sure that the height of the envelope stack does not exceed the loading limit mark.
|
Envelope Feeding Direction
When you load envelopes into the POD Deck Lite XL-A1, the proper feeding direction differs depending on the type of envelope and whether the envelope flap is folded or unfolded. Load the envelope as shown below.
If you are using Nagagata 3 or Kakugata 2:
 |
|
|
*1 Feeding Direction
*2 Print Side Up
|
If you are using No. 10(COM10), ISO-C5, DL, Monarch, or Yougatanaga 3:
 |
|
|
*1 Feeding Direction
*2 Print Side Up
|
|
|
|
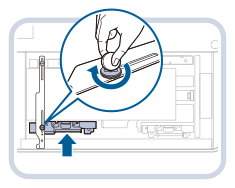
When loading envelope into the POD Deck Lite XL-A1, load it with its print side facing up. Press the loaded envelope by hand until the surface of the envelope is even with the feeding slot.
|