Uninstalling the Driver
This explains the procedure for uninstalling a driver that is no longer needed.
The uninstallation method differs depending on whether the installer, or the add printer function of Windows was used when the driver was installed.
Prerequisites
When starting the computer, logon as a member of Administrators.
[Desktop] screen display (when using Windows 8.1/Server 2012 R2)
Procedures
For drivers that were installed by an installer
1.
Start the uninstaller of the driver.
When using Windows functions
In Windows 10/Server 2016/Server 2019
(1) Display [Settings] > [Apps] or [System] > [Apps & features].
(2) Select the driver to be uninstalled in [V4 Printer Driver Uninstaller] → click [Uninstall].
In operating systems other than the above
(1) Display [Control Panel] > [Programs] > [Uninstall a program].
(2) Select the driver to be uninstalled in [V4 Printer Driver Uninstaller] → click [Uninstall/Change].
When using the Windows uninstall function, the uninstaller is displayed in the language you selected in the installer.
When using the uninstall file provided with the driver
Double-click one of the following files.
When using a file in an installed driver folder
Use [UNINSTAL.exe] corresponding to the driver within the following folder.
<install folder>\Canon\PrnUninstall
When using a file in a downloaded driver folder
Installer\UNINSTAL.exe
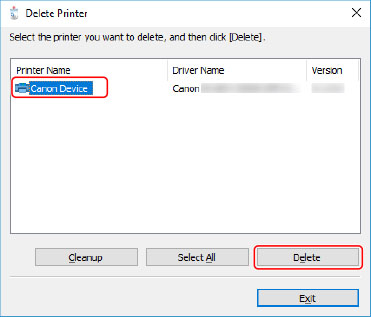
2.
Select the name of the device you want to uninstall → click [Delete].
[Cleanup]: Click this to simultaneously delete all files and registry information relating to all of the drivers displayed in the list, not just the selected driver. Click [Delete] to perform a normal uninstallation of the driver.
3.
In the screen for confirming whether to delete the printer, click [Yes].
A confirmation message asking whether you want to delete the package as well may be displayed.
4.
In the [Delete Printer] screen, click [Exit].
For drivers that were installed with the add printer function of Windows
1.
Display [Devices and Printers] from the [Control Panel] of Windows.
2.
Right-click the icon of the device you are going to remove → select [Remove device].
If you are using a touch panel, press and hold the icon of the device you want to delete → tap [Remove device] in the pop-up menu.
3.
In the [Remove device] screen, click [Yes].
4.
Select the icon of any device → click [Print server properties] from the menu.
5.
Display the [Drivers] sheet in the [Print Server Properties] screen.
6.
Click [Change Driver Settings] → select the driver to be removed from [Installed printer drivers] → click [Remove].
7.
Select [Remove driver and driver package] → click [OK].
8.
Confirm the driver in the confirmation screen → click [Yes].
9.
If the [Remove Driver Package] screen is displayed, click [Delete] after verifying the package information → click [OK].
A message indicating that the package cannot be deleted may be displayed. In this case, only the driver is deleted.