Registering Destinations in the Address Book
This section describes how to register destinations from the operation panel. You can also use the Remote UI to register destinations. Registering Destinations from Remote UI
1
Select <Addr. Book> in the Home screen. Home Screen
2
Select <Regist Dest.>.
If a screen appears prompting you to enter a PIN, enter the PIN for the Address Book and select <Apply>. Restricting Use of the Address Book
3
Select <Coded Dial>  Select the type of address to register.
 Select the type of address to register.
According to the address being registered, select <Fax> or <E-Mail>.
4
Select <Name>.
Registering <Name> is optional. If you register <Name>, the destination can be searched alphabetically.
5
Enter the name, and select <Apply>.
On how to enter text, see Entering Text.
6
Select <Fax Number> or <E-Mail Address>.
7
Enter the destination, and select <Apply>.
 Making detailed settings (only when registered for fax)
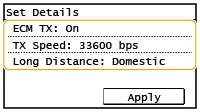
After selecting <Details>, a screen similar to the following is displayed.

<ECM TX>
If an error occurs in an image that is being sent, the error is checked and corrected to prevent an improper image from being sent when setting <On>.
If an error occurs in an image that is being sent, the error is checked and corrected to prevent an improper image from being sent when setting <On>.
<TX Speed>
If it takes time for transmissions to start, such as when there is a poor telephone connection, you can adjust the transmission start speed downward.
If it takes time for transmissions to start, such as when there is a poor telephone connection, you can adjust the transmission start speed downward.
<Long Distance>
Specify <International (1)> to <International (3)> according to the transmission conditions when registering overseas fax numbers.
Specify <International (1)> to <International (3)> according to the transmission conditions when registering overseas fax numbers.
 |
You can make detailed settings for destinations <Menu>  <Fax Settings>. However, settings made from <Addr. Book> are enabled for the detailed settings of destinations registered in the Address Book. <Fax Settings>. However, settings made from <Addr. Book> are enabled for the detailed settings of destinations registered in the Address Book. |
8
Select <Apply>.
A three-digit number is automatically set to destinations. The number can be edited after it has been registered.
 |
You can make a group of destinations already registered in the Address Book and register it as one destination. For more information, see Registering Multiple Destinations as a Group. When you want to change or delete items of information about destinations registered in the Address Book, see Editing the Registered Destinations in the Address Book. |