
Setting the Date/Time
Set the date and time for the machine. The date and time are used as the reference for the functions specifying the time, therefore, they need to be set accurately.
Setting the Time Zone
If the time zone setting is changed, the values set in <Current Date/Time Settings> are also changed accordingly.
1
Display the <Menu> screen. Home Screen
Touch Panel Model
Select <Menu> in the Home screen.
5 Lines LCD Model
Press  .
.
.2
Select <Timer Settings>  <Date/Time Settings> <Time Zone>.
3
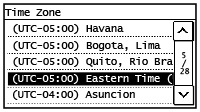
Select the time zone.
|
What is UTC?Coordinated Universal Time (UTC) is the primary time standard by which the world regulates clocks and time. Time differences exist depending on the country or area where the machine is used. The correct UTC time zone setting is required for Internet communications. |
Setting the Current Date and Time
1
Display the <Menu> screen. Home Screen
Touch Panel Model
Select <Menu> in the Home screen.
5 Lines LCD Model
Press .
.2
Select <Timer Settings> <Date/Time Settings> <Current Date/Time Settings>.
3
Enter the date and time.
Touch Panel Model
Tap < > or <
 > to move the cursor, and enter the date and time using the numeric keys. Tap <
 > or <
 > to switch between <AM> or <PM>.
> or <> to move the cursor, and enter the date and time using the numeric keys. Tap <> or <> to switch between <AM> or <PM>.5 Lines LCD Model
Use  or
or  to move the cursor, and enter the date and time using the numeric keys. Use
  or
or  to switch between <AM> or <PM>.
or to move the cursor, and enter the date and time using the numeric keys. Use or to switch between <AM> or <PM>.4
Press <Apply> ( ).
).
). |
Set <Time Zone> before setting the current date and time. If the <Time Zone> setting is changed later, the current date and time are also changed accordingly. |
|
Setting the Daylight Saving Time
If daylight saving time is enabled, specify the dates from which and to which daylight saving time is in effect.
1
Display the <Menu> screen. Home Screen
Touch Panel Model
Select <Menu> in the Home screen.
5 Lines LCD Model
Press .
.2
Select <Timer Settings> <Date/Time Settings> <Daylight Saving Time Settings>.
3
Select <Off> or <On> in <Daylight Saving Time>.
When you select <On>, proceed to step 4.
4
Set the month and day for the start date, and then select <Apply>.
To set the day, specify "what day of which week."
5
Set the month and day for the end date, and then select <Apply>.
To set the day, specify "what day of which week."